
Home › Cursive Numbers › Cursive 6
Cursive 6: How to Write Six in Cursive
6
6 in cursive · 1 (no pencil lift) · free tracing worksheet
Cursive 6 is the number six written as a long curve that sweeps down from the top line and closes into a round loop at the bottom. It is written in one smooth stroke and leans gently to the right. Learn the shape step by step below.
Six took its modern form as scribes rounded and joined older strokes into a single curve with a loop, a change traced in the history of the number 6. Cursive 6 is one of the most natural digits to write because it is all curve and no corners. It begins high, falls in an arc and finishes in a closed loop, a movement very similar to the cursive letter b or a reversed 9. Once that one arc feels relaxed, cursive 6 practically writes itself.
At a glanceCursive 6 Quick Facts
Strokes
1 (no pencil lift)
Start here
On the top line, on the right side
Height
Top line to baseline (full height)
Don’t confuse with
The number 0 and the letter b.
How to Write 6 in Cursive Step by Step
- Start High on the Right: Place the pencil just below the top line, slightly to the right of where the six will stand. Begin by moving up and to the left in a short curve.
- Sweep Down the Arc: Continue down the left side in one long, smooth arc until you reach the baseline. Keep the curve full rather than straight.
- Close the Loop: Curve along the baseline, up the right side to about the midline, and back to the left to meet the arc, closing a round loop at the bottom.
The loop of cursive 6 should sit entirely in the lower half of the digit, between the midline and the baseline. If it climbs higher, the six starts to look like a 0; if it is too small, it can look like the letter b. A loop that fills the bottom half is the sweet spot.
Free printableFree Cursive 6 Tracing Worksheet
Cursive 6 Tracing Sheet (PDF)
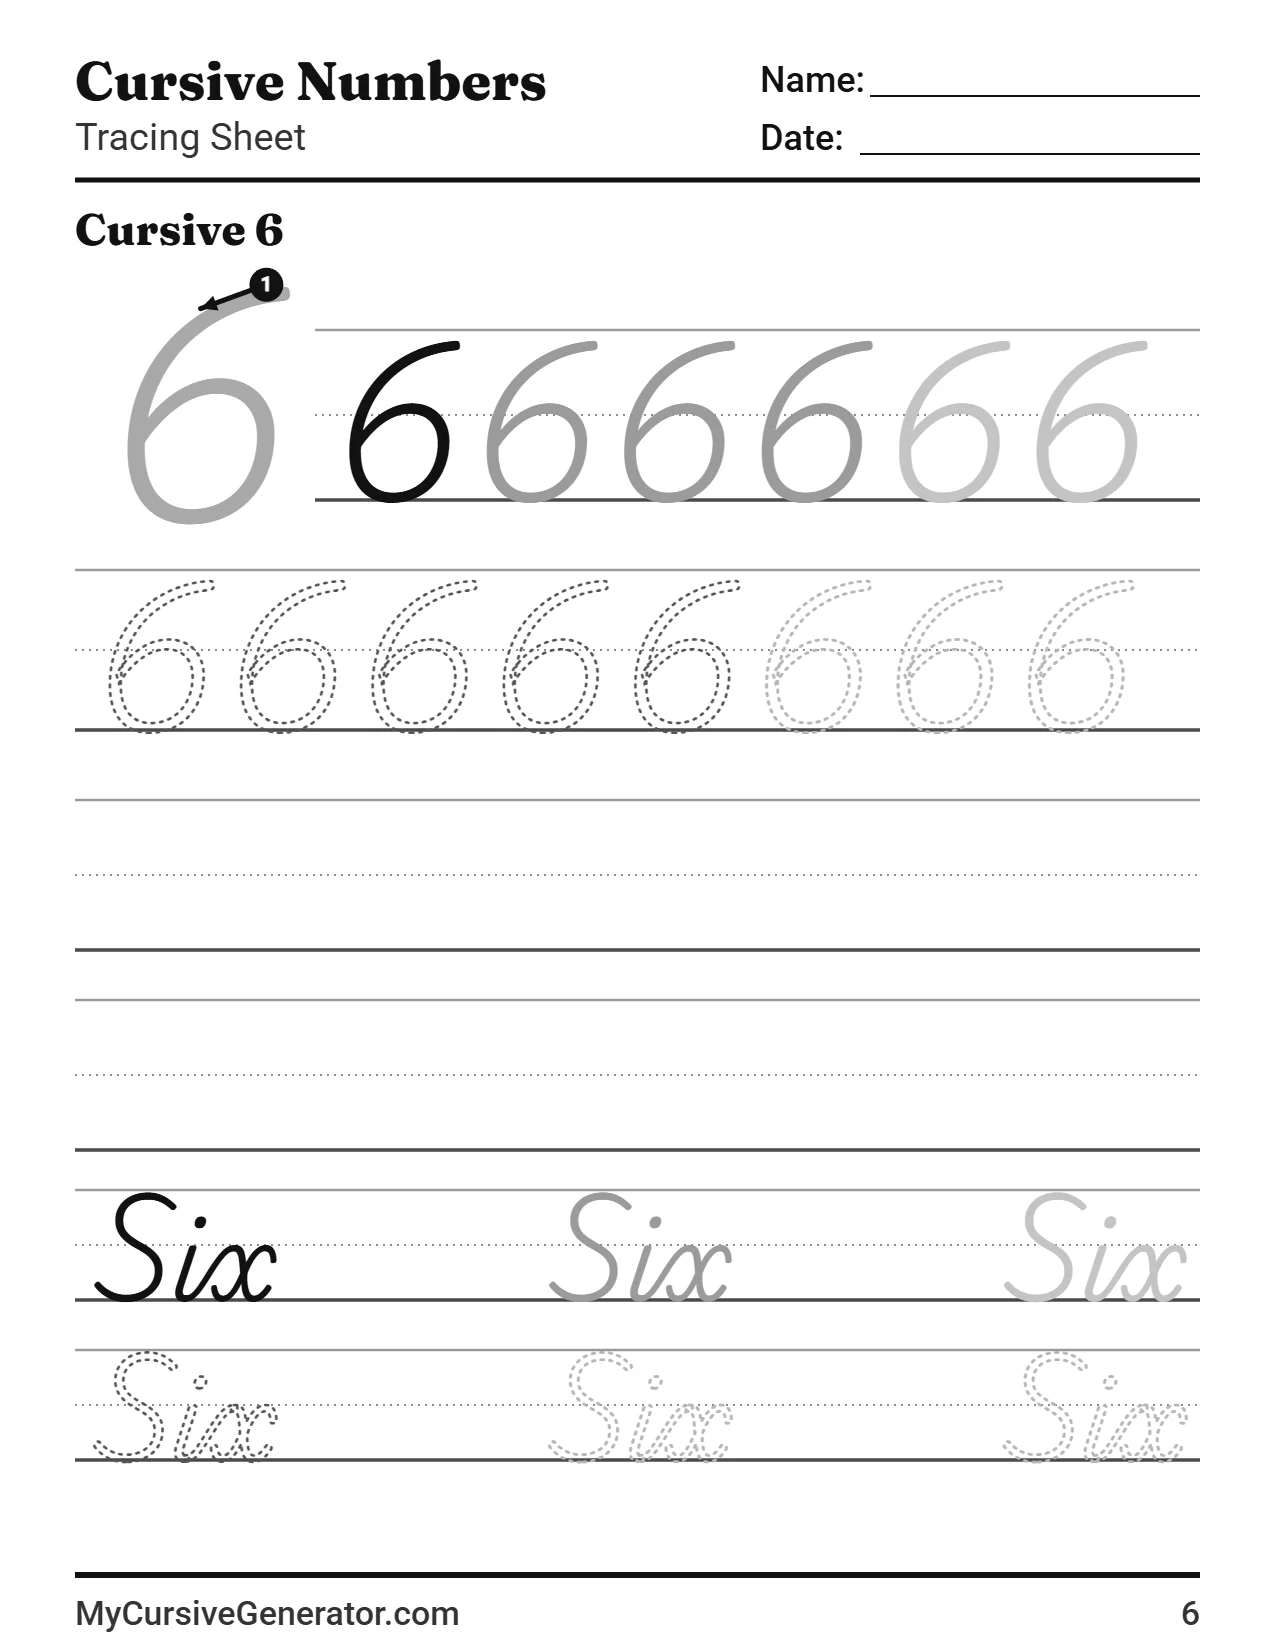
The cursive 6 tracing sheet fits on one US Letter page and prints cleanly in black and white. It starts with a large model of the digit and a numbered arrow that shows where the pen begins, then a row of 6s that fade from solid to light gray, a row of dotted 6s to trace, blank handwriting lines, and two rows of the word “Six” to copy and trace.
Use it in three passes: trace the dotted row, copy the digit on the blank lines without tracing, then write 6 in cursive from memory. The dashed midline shows where the curves should turn, so keep an eye on it while you work.
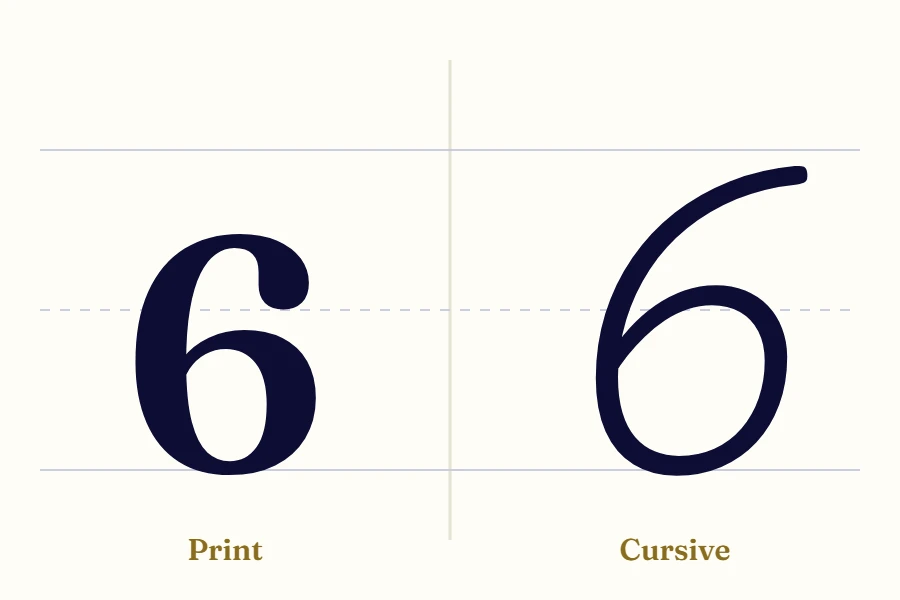
Cursive 6 vs Print 6
A printed 6 often has a straight or barely curved stem and a perfectly round circle at the bottom, standing upright. Cursive 6 replaces the stem with a sweeping arc, leans the whole digit to the right and makes the loop slightly oval to match that slant.
Cursive 6 can be confused with 0 when the loop is too large, and with a lowercase b when the arc becomes a straight line. Keep the top of the arc curved and clearly higher than the loop, and the six will be easy to read.
Avoid mix-upsCommon Mistakes With Cursive 6
| Mistake | How to fix it |
|---|---|
| Leaving the loop open | An open loop makes cursive 6 look like a C or an L. Close it neatly against the arc. |
| A loop that is too large | When the loop climbs above the midline, the six looks like a 0. Keep it in the lower half. |
| A straight stem | A straight top makes the digit look like a b. Keep it curved. |
| Starting at the bottom | Starting with the loop and adding the arc afterwards makes a stiff shape. Always start at the top. |
| Flattening the top | A flat or hooked top looks printed. Let the arc begin with a smooth curve. |
Variations of Cursive 6
Some styles curve the top stem slightly more, like a hook; others keep it nearly straight. Both are fine as long as the loop stays in the lower half.
Beyond digitsHow to Write Six in Cursive
The word “six” is short but includes an unusual letter: the cursive x is often crossed after the word is finished, much like a t. Write the s, join it to the i, form the first half of the x, then add the crossing stroke and dot the i at the end.
If any letter in these words feels unfamiliar, practice it first in the cursive alphabet guides, then come back to the full word.
Everyday uses6 in Cursive: Dates, Times and Prices
Six appears in dates such as the 6th or the 16th, in times like 6:16, in prices such as $6.60 and in years like 2026. Because it is often next to an 8 or a 0, a clean closed loop is essential.
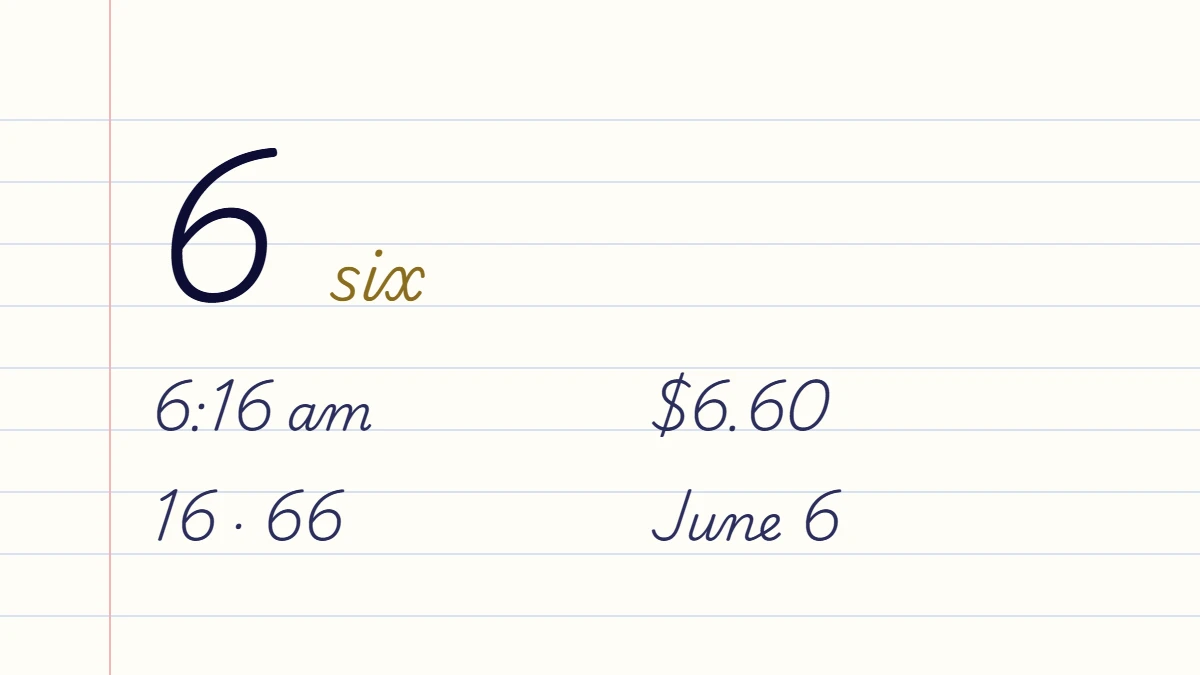
In numbers like 66 or 606, check that each loop is fully closed and the same size. Uneven sixes are the most common reason a handwritten number looks messy. To preview any date or amount in several cursive styles before writing it by hand, type it into our cursive generator.
10 minutes a day10-Minute Practice Routine for Cursive 6
Ten focused minutes a day for one week is enough to make cursive 6 feel automatic. Use the worksheet above or a lined notebook, and keep the pace slow until the shape is steady.
- Warm-up (2 minutes): draw a row of long arcs from the top line to the baseline, then go back and add a closed loop at the bottom of each one.
- Trace (2 minutes): trace one full row of dotted 6s on the worksheet, starting every digit at the top line.
- Copy (3 minutes): write the digit on blank lines beside the model, checking height and slant after every three or four digits.
- Use it (2 minutes): write the word “six” and a few real numbers that contain 6, such as 16, 66, 600 and 2016.
- Check (1 minute): compare your last row with your first. Are all the loops closed and sitting in the lower half of the digit? Do all the arcs lean the same way?
Teaching Cursive 6 to Children
Children usually find it easiest to learn cursive 6 after they can print the digit confidently. Show the movement slowly first, then let the child trace the dotted digits on the worksheet with a finger before using a pencil. Keep each session short and finish while the child is still enjoying it.
Praise the right things: a start at the top line, a steady slant and a digit that sits on the baseline. Those three habits matter more than perfect curves, and once they are in place the shape improves on its own. Adults can follow the same order, simply moving through it faster.
Keep goingPractice Cursive 6 With the Other Numbers
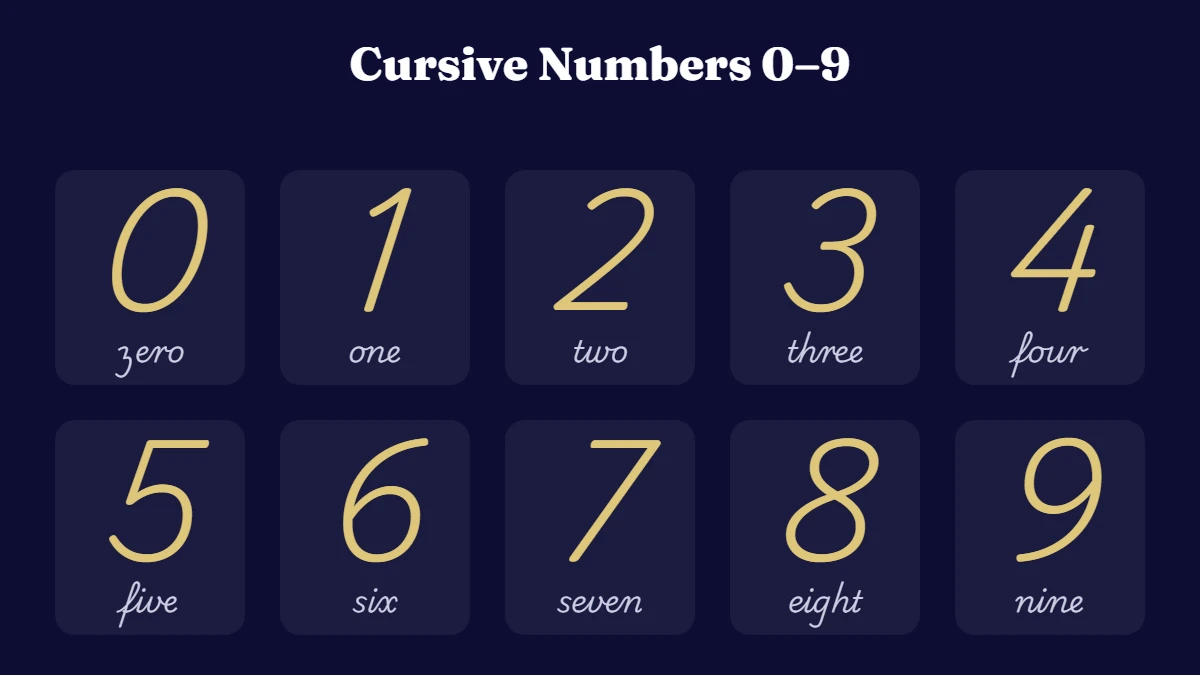
Cursive 6 is the mirror image of 9 in movement, so practice them side by side. It also shares its closed loop with 0 and 8. The chart below shows all ten digits side by side, so you can check that your 6 matches the height and slant of its neighbors.
Cursive 6: Frequently Asked Questions
How do you write 6 in cursive?
Start just below the top line, curve up and to the left, sweep down in a long arc to the baseline, then curve up the right side and back to close a loop at the bottom. Cursive 6 is one continuous stroke.
Is cursive 6 written in one stroke?
Yes. Cursive 6 needs no pen lift. The arc flows straight into the loop.
Why does my cursive 6 look like a 0?
The loop is probably too large. Keep it in the lower half of the digit, below the midline, so the arc above it stays visible.
How do I stop cursive 6 looking like the letter b?
Keep the top of the six curved rather than straight, and do not add an upper loop. A letter b has a loop at the top; a six does not.
How do you write the word six in cursive?
Write the s, join it to the i, form the x, then cross the x and dot the i after the word is finished.
Is cursive 6 easy to learn?
Yes, it is one of the easiest digits because it has no corners and no pen lift. Most learners write a neat cursive 6 in a single session.
Ready for 7?
keep goingMove on to the next digit, or go back to the hub for the full 0–9 chart and worksheets.