
How to Write in Cursive: 6 Easy Steps for Beginners
Learning how to write in cursive is easier than it looks. Every cursive letter is built from just four basic strokes, and once your hand knows those strokes, the alphabet and the joins follow naturally.
This guide takes you from your first stroke to full sentences. You will learn the strokes, the lowercase letters in five easy groups, capital letters, how letters join, and a 4-week practice plan. A free printable worksheet is included.
What Is Cursive Writing?
Cursive writing is a style of handwriting where the letters of a word are joined in one flowing line. Instead of lifting the pen after each letter, as in print, you connect each letter to the next with a small linking stroke.
Cursive is also called joined-up writing or script. Its letters lean slightly to the right, and most of them have an entry stroke at the start and an exit stroke at the end. Those two strokes are what make the letters link together.
Cursive vs print handwriting
| Cursive | ||
|---|---|---|
| Letters joined? | No, each letter is separate | Yes, letters in a word connect |
| Pen lifts | After almost every letter | Only between words (and to dot i/j, cross t/x) |
| Slant | Upright | Leans right |
| Speed once learned | Slower | Faster and smoother |
Why learn cursive writing?
- It is faster. Fewer pen lifts mean quicker note-taking.
- You can read old documents. Letters, diaries and records from before the 2000s are often in cursive.
- A better signature. Most signatures are based on cursive letters.
- Calm, focused practice. Many adults find cursive practice relaxing, much like calligraphy.
What You Need Before You Start
You do not need expensive tools to learn how to write in cursive. A smooth pen, the right paper and a good sitting position matter far more.
- A smooth pen or pencil. A gel pen or a sharp HB pencil glides easily. Avoid scratchy ballpoints while you learn.
- Lined practice paper. Use paper with three guidelines: a top line, a dashed midline and a baseline. Our free worksheet below has them.
- A flat table and good light. Sit upright with both feet on the floor.
- 10–15 minutes a day. Short daily practice beats one long session a week.
How to hold the pen and position the paper
- Hold the pen lightly between your thumb and index finger, resting it on your middle finger. Do not squeeze.
- Tilt the paper. Right-handers turn the top of the page about 30° to the left; left-handers turn it about 30° to the right.
- Move from your forearm, not just your fingers. This keeps the strokes smooth and even.
- Keep your writing hand below the line you are writing on, so you can see your letters.
Tips for left-handed writers
- Tilt the paper to the right so your hand stays below the writing and does not smudge it.
- Use a quick-drying gel pen or a pencil.
- Keep the same right-leaning slant. If that feels hard, an upright slant is fine as long as it is consistent.
How to Write in Cursive: Step-by-Step
Here is how to write in cursive in six steps. Follow them in order. Do not move to the next step until the current one feels comfortable.
Step 1: Learn the three guidelines
Cursive letters sit between three lines. The baseline is where every letter rests. The midline (dashed) is the height of small letters like a, c and o. The top line is the height of tall letters like b, h, l and of capital letters. Letters such as g, j, p, q, y and z drop below the baseline.
Step 2: Master the four basic strokes
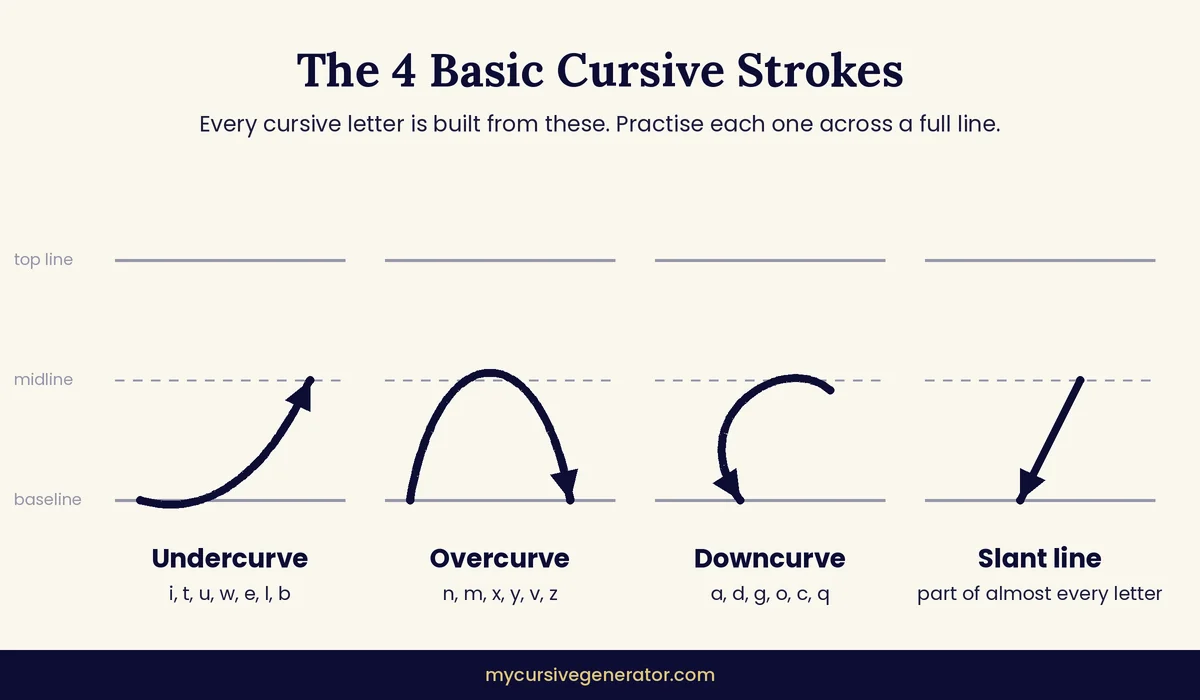
- Undercurve: starts on the baseline and swings up to the right, like a smile. It begins most letters.
- Overcurve: rises like a small hill and comes down to the right. Used in n, m, v, x, y, z.
- Downcurve: starts at the midline and curves back to the left and down, like the start of a c. Used in a, c, d, g, o, q.
- Slant line: a straight line pulled down at the same angle every time. It gives cursive its lean.
Fill one full line of each stroke before you write any letter. Aim for the same height and slant every time.
Step 3: Write lowercase cursive letters in groups
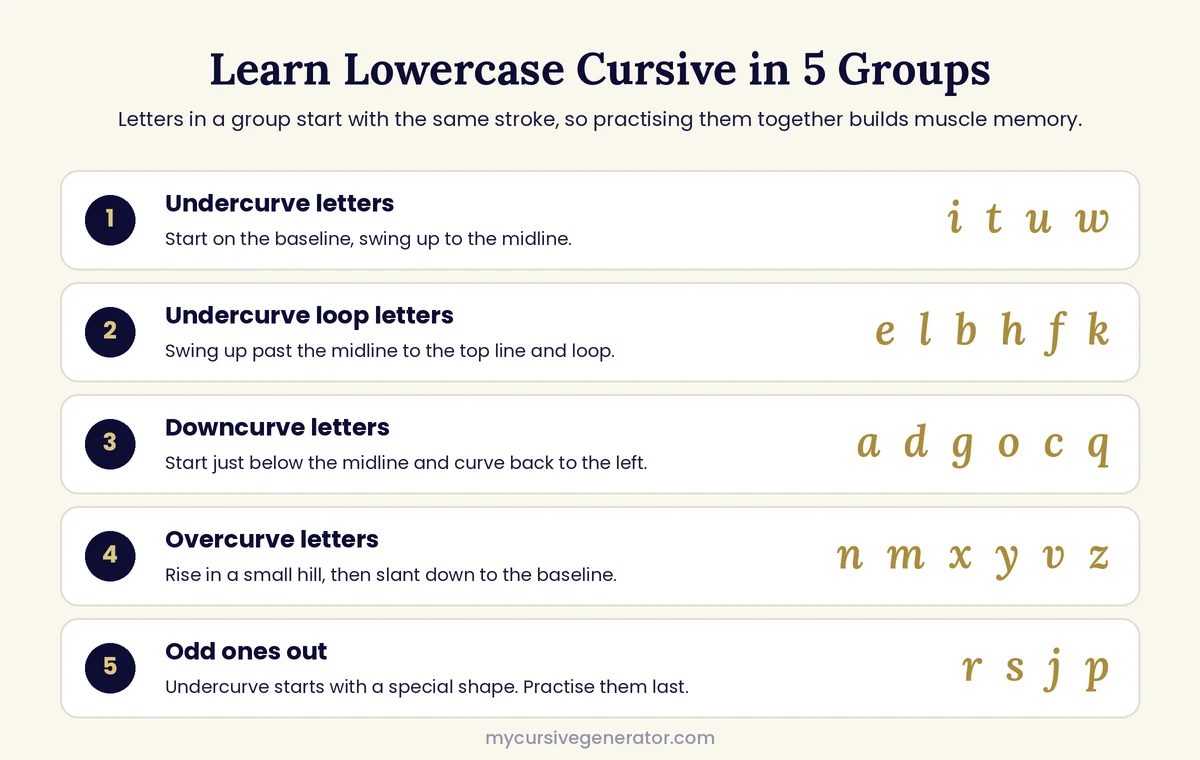
Learning the cursive alphabet in A-to-Z order is the slow way. Letters that begin with the same stroke are easier to learn together:
- Undercurve letters – i, t, u, w. The easiest place to start: up to the midline, slant down, repeat.
- Undercurve loop letters – e, l, b, h, f, k. Swing up to the top line, make a loop, and slant down.
- Downcurve letters – a, d, g, o, c, q. Start just below the midline and curve back to the left.
- Overcurve letters – n, m, x, y, v, z. Rise in a small hump, then slant down.
- Odd ones out – r, s, j, p. Each has a special shape. Learn them last; see cursive s and cursive r for step-by-step help.
See every letter with stroke guides on our cursive alphabet page, or jump to a tricky one such as cursive f, cursive z or cursive g.
Step 4: Learn cursive capital letters
Cursive capital letters are larger and more decorative, and they reach the top line. Most of them do not join to the next letter in modern cursive, so you can treat each one as a single shape. Learn them in these groups:
- Downcurve capitals: A, C, E, O
- Curve-forward capitals: H, K, M, N, U, V, W, X, Y, Z
- Doublecurve capitals: F, T
- Undercurve-loop capitals: I, J, Q
- Slant-and-loop capitals: B, P, R
- Special shapes: D, G, L, S
Practice the capitals of your own name first. It keeps practice useful and motivating.
Step 5: Join letters together
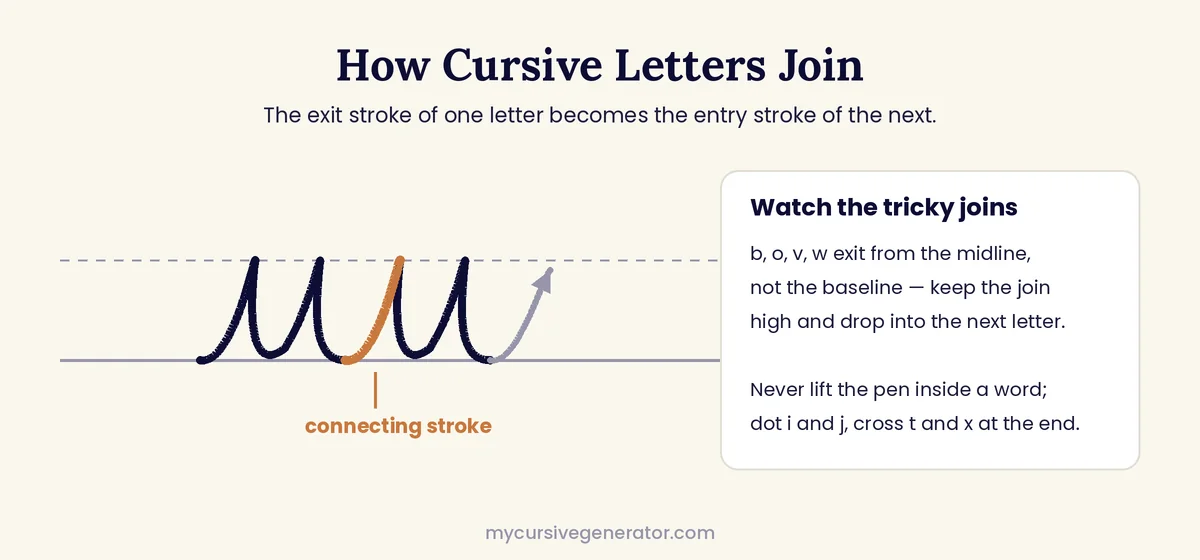
Joining is what turns separate letters into cursive writing. The exit stroke of one letter becomes the entry stroke of the next, so the pen never leaves the paper inside a word.
- Most letters finish on the baseline with an undercurve, which leads straight into the next letter.
- b, o, v and w finish at the midline. Keep the join high, then drop into the next letter.
- Dot your i and j and cross your t and x only after you finish the whole word.
- Keep the joins short. Long connecting strokes make words hard to read.
Start with easy pairs such as it, ut, ll, ee, then three-letter words like cut, lime, dog.
Step 6: Write words and sentences
Once you can join letters, write full words, then short sentences. Good first practice words are your name, the days of the week and short common words such as the, and, you, to. Leave the width of one small letter, such as o, between words.
4-Week Cursive Writing Practice Plan
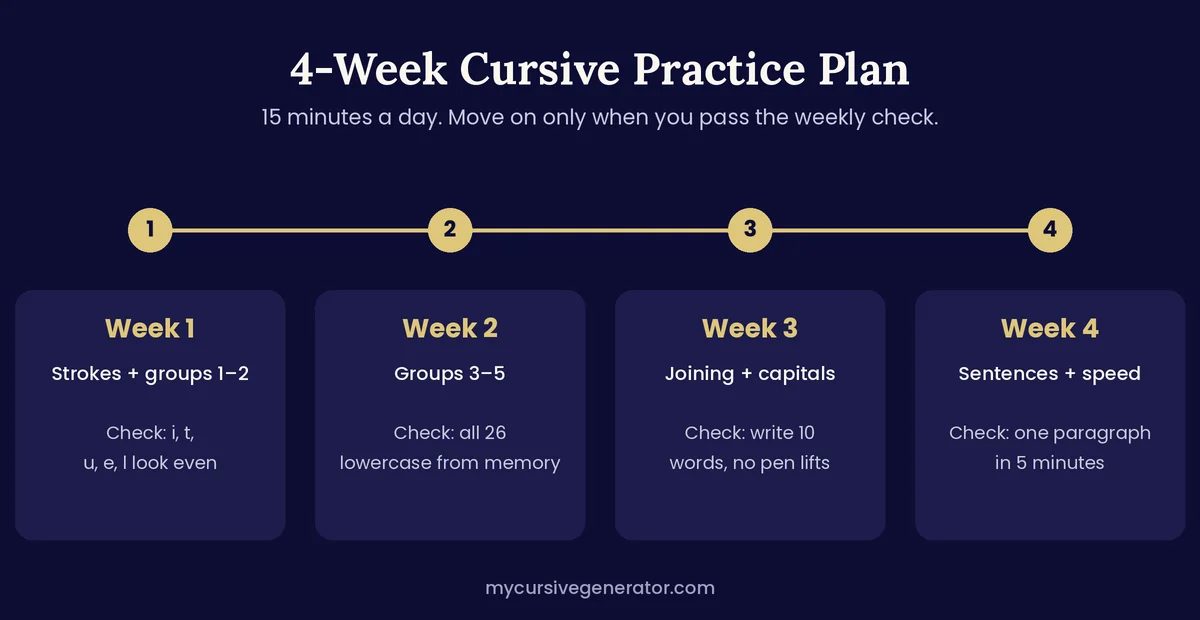
This plan shows you how to write in cursive in four weeks. Practice 15 minutes a day. At the end of each week, do the check. If you pass, move on; if not, repeat the week.
| Week | What to practice | Weekly check |
|---|---|---|
| 1 | Four basic strokes, groups 1–2 (i, t, u, w, e, l, b, h, f, k) | Your i, t, u, e, l are the same height and slant |
| 2 | Groups 3–5 (a, d, g, o, c, q, n, m, x, y, v, z, r, s, j, p) | You can write all 26 lowercase letters from memory |
| 3 | Joining letters, capital letters | You can write 10 words without lifting the pen |
| 4 | Sentences, then gradually faster | You can copy a short paragraph neatly in 5 minutes |
Free Cursive Writing Worksheet
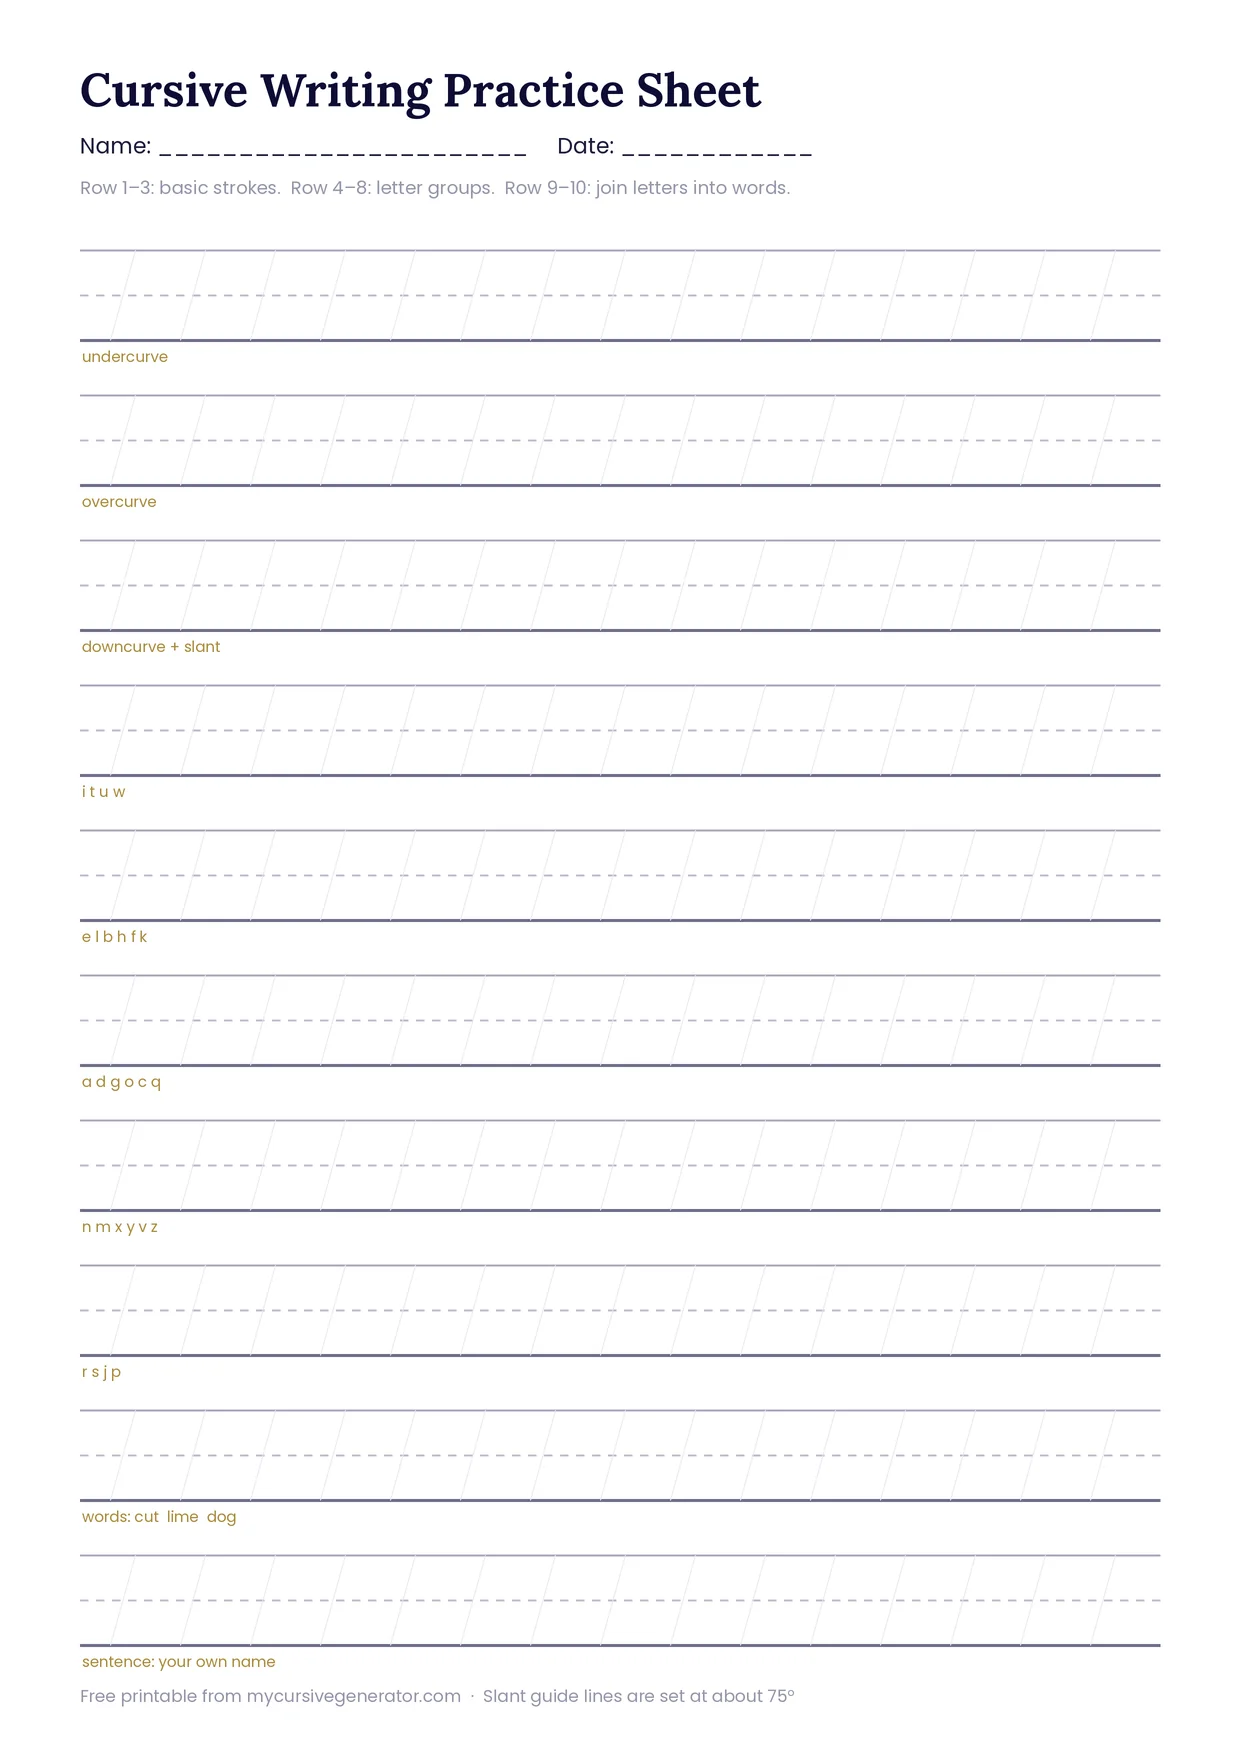
This free sheet is the easiest way to practice everything above. Print it and use one row per stroke or letter group. Each row has a top line, a dashed midline, a baseline and light slant guides, so you can check height and slant as you write.
Common Cursive Mistakes (and How to Fix Them)
- Uneven slant. Use the slant guides on the worksheet and turn the paper, not your wrist.
- Letters of different heights. Small letters must touch the midline, tall letters the top line, every time.
- Gripping the pen too hard. A tight grip causes shaky lines and a sore hand. Relax your fingers.
- Lifting the pen inside words. Finish the whole word first, then dot and cross.
- Closed loops. Keep loops in e, l, h and b open, or e looks like i and l looks like t.
- Rushing. Speed comes last. Slow, correct strokes build the muscle memory that makes you fast later.
Tips to Improve Your Cursive Handwriting
- Warm up with one line of ovals and one line of undercurves before every session.
- Copy from a clear model, not from memory, during the first two weeks.
- Write things you really need: a shopping list, your diary, a birthday card.
- Compare today’s page with last week’s page to see your progress.
- Once your letters are steady, practice cursive numbers too, so dates and prices match your handwriting.
How to Write Your Name in Cursive
Your name is the word you will write most often, so it is the best first word to practice. It also becomes the base of your signature.
- Type your name into our cursive generator and pick a simple, clear style as your model.
- Practice the capital letter on its own line first, ten times, until the size and slant feel steady.
- Write the lowercase letters of your name one by one, checking each against its letter group from Step 3.
- Join the letters without lifting the pen. Cross any t and dot any i or j only at the end.
- Write your full name five times a day for a week. Keep the best one as your model for a signature.
If your name has a tricky letter, open its page in the cursive alphabet, for example cursive k or cursive q, and practice that letter on its own before joining it to the rest of your name. This is exactly how to write in cursive with confidence: one clear letter at a time.
Cursive Letters That Are Easy to Mix Up
A few cursive letters look almost the same when they are written quickly. Knowing the small difference between them keeps your handwriting easy to read.
| Letters | How to tell them apart |
|---|---|
| e and l | e is a small loop that stays below the midline; l is a tall loop that reaches the top line. |
| i and e | i has no loop and needs a dot; e has a small open loop and no dot. |
| n and m | n has two humps; m has three. Count the humps as you write. |
| u and w | u ends on the baseline; w ends with a small tick at the midline before it joins. |
| b and f | b sits on the baseline with a closed bottom; f has a lower loop that drops below the baseline. |
| r and s | Both start with an undercurve and a point; r has a small flat shoulder, s closes into a curve. |
If two of your letters keep looking alike, write a full line of each pair side by side. Then compare them with the stroke guides on the cursive alphabet page.
How to Teach a Child to Write in Cursive
Children usually start cursive once they can print every letter neatly and hold a pencil comfortably. The same steps in this guide work for kids; they just need shorter sessions and more fun along the way.
- Keep sessions short. Five to ten minutes a day works better than a long weekly lesson.
- Start big. Let children trace strokes in the air, in sand or on a whiteboard before using paper.
- Teach letters in groups. Follow the same five letter groups shown above, starting with i, t, u and w.
- Use their name early. Writing their own name in cursive is the most motivating first word.
- Praise neat strokes, not speed. Speed comes naturally once the shapes are right.
Parents and teachers who want to show a child how to write in cursive can print the free worksheet above, one row per day, and use our cursive generator to show any word the child wants to try.
Use a Cursive Generator to Check Your Letters
A cursive generator turns normal typed text into cursive letters instantly. While you learn how to write in cursive, it works as a quick model: type a word, see how it looks in cursive, then copy it by hand.
Use our free cursive generator to:
- See any word or your name in cursive before you practice it.
- Compare different cursive styles with the cursive font generator.
- Copy and paste cursive text for social media bios, cards and invitations.
- Create a model line, print it, and trace over it as a writing worksheet.
Remember that a cursive font is a model, not a replacement. Writing by hand is what builds the skill.
Frequently Asked Questions
Conclusion
Learning how to write in cursive is a skill anyone can master in a few weeks. Start with the four basic strokes, learn the lowercase letters in groups, add capitals, and then join letters into words. Print the free worksheet, follow the 4-week plan, and check your letters with our cursive generator as you go.