
Home › Cursive Alphabet › Cursive Q
Cursive Q: How to Write the Letter Q in Cursive
Cursive Q looks like a big oval with a tail, and that tail is the whole point of the letter. The capital cursive Q is a large oval from the top line to the baseline, with a diagonal tail that crosses the lower right curve. The lowercase cursive q is a small oval at mid height, with a stem that drops below the baseline and loops forward. If the tail is missing, capital Q looks like O, and if the loop is missing, lowercase q looks like a. Both mistakes are common, and both are easy to fix once you know what to look for.
Cursive script is a style of handwriting in which the letters of a word are joined together, and cursive Q tests that idea in a special way. Capital Q almost always starts a word, so it opens the word rather than joining into it. Lowercase q almost always sits before u, in words such as queen, quick, and question, so its main job is to hand over cleanly to u. A printed Q also has a tail, but a cursive Q draws the oval and the tail in one continuous motion, without lifting the pen.
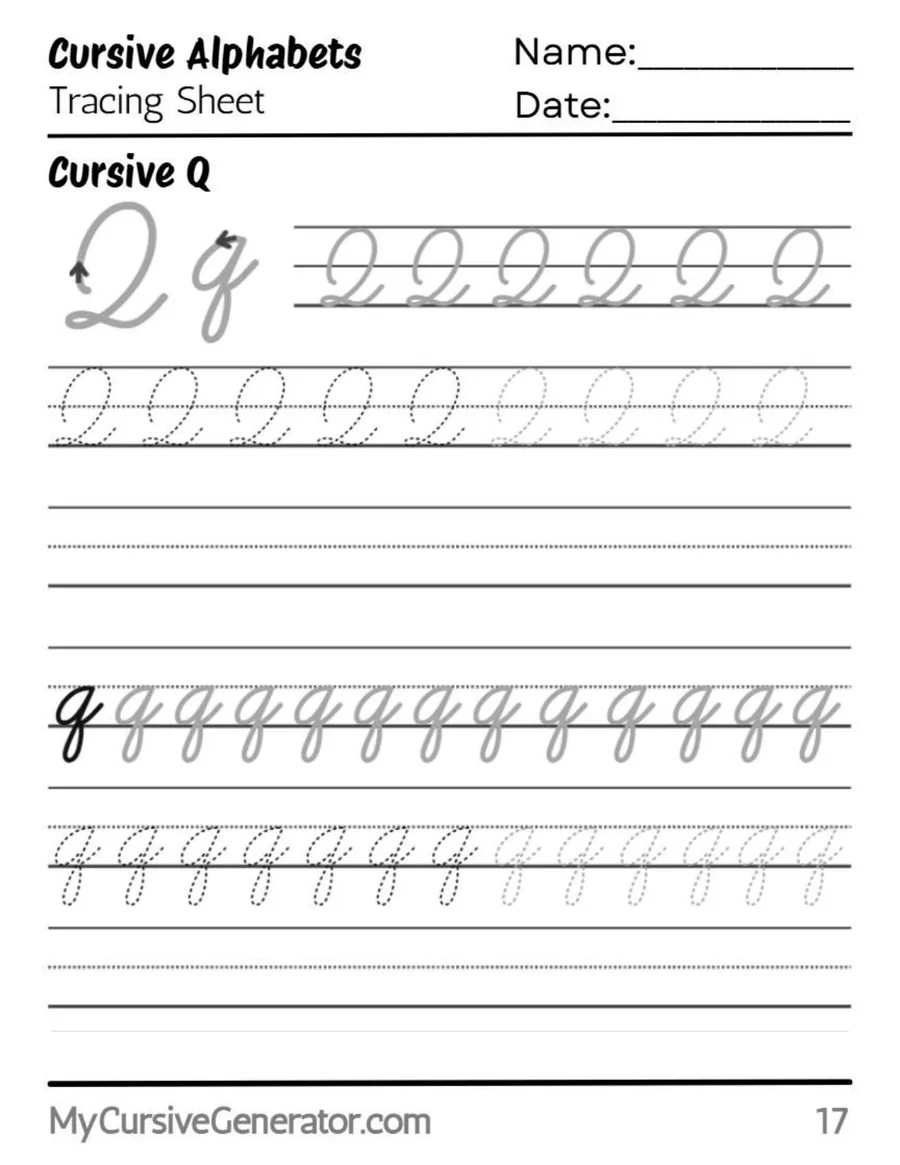
Trace the Cursive Letter Q
Trace the capital Q first, and watch the tail. It should start inside the oval near the lower right, cross the oval wall, and finish just outside the oval, a little above the baseline. A tail that stays inside the oval is too timid, and a tail that shoots far to the right looks like a separate stroke. Trace the lowercase q next, and watch the loop. It should drop below the baseline, swing forward to the right, and return to the baseline, ready to exit. That forward swing is what separates q from g, whose loop swings differently.
Use the worksheet in three passes: trace, copy without tracing, then write short words such as queen, quick, and quiz from memory. Check the tail on every capital Q and the loop on every lowercase q. If a capital Q reads as O, the tail was left out. If a lowercase q reads as a, the loop was left out.
The Anatomy of Cursive Q
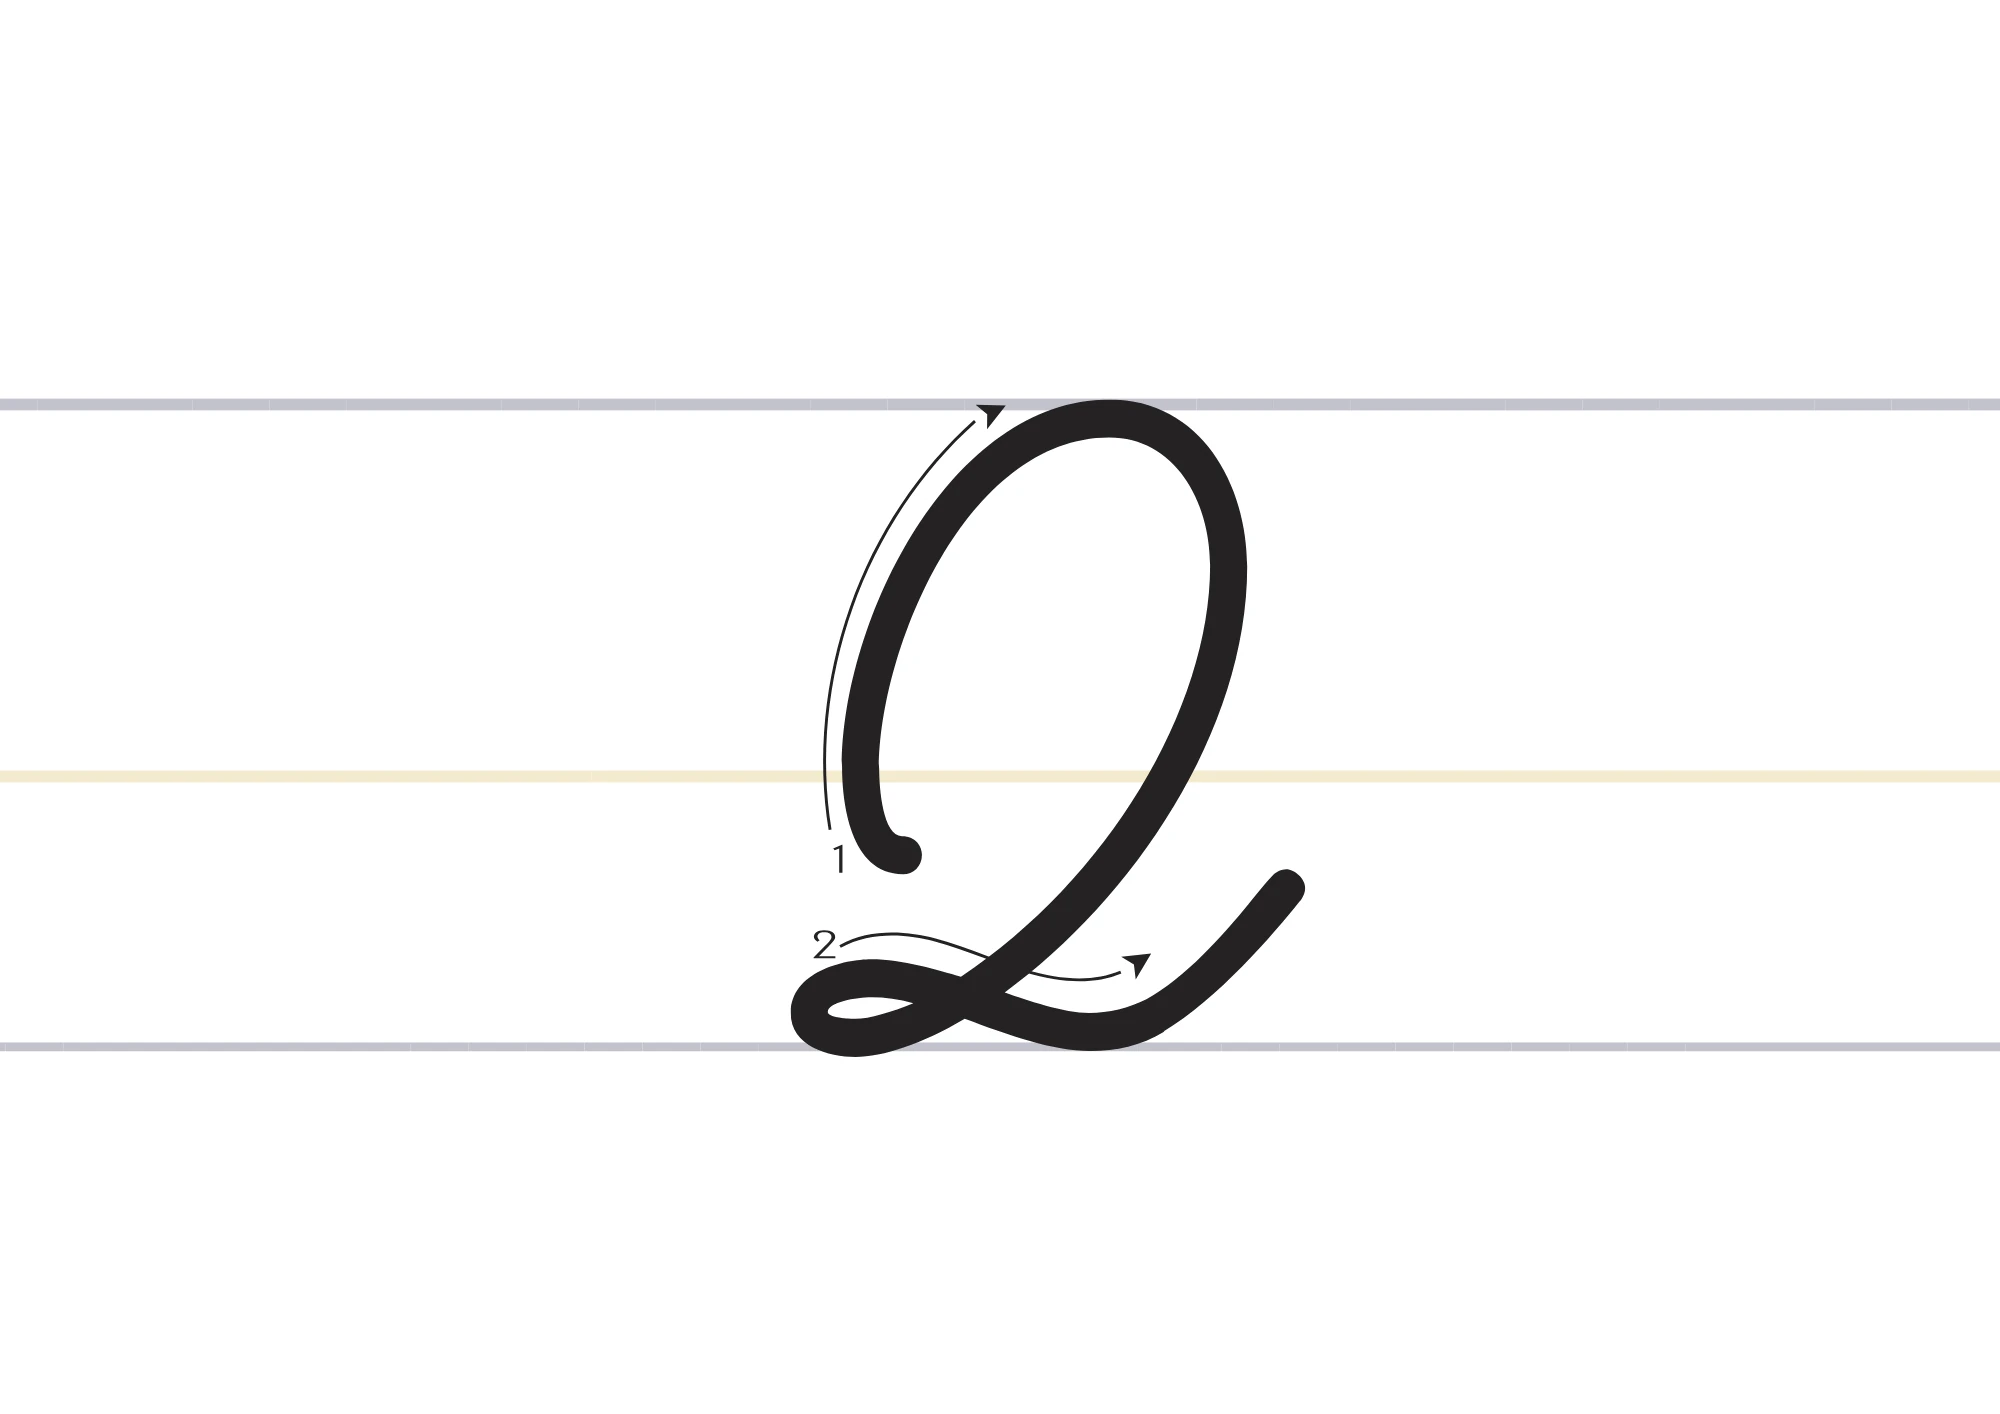
Capital Q has two parts: a large oval and a diagonal tail. The oval runs from the top line to the baseline, counterclockwise, leaning slightly right, and it should be a little taller than it is wide. The tail starts near the lower right inside the oval, crosses the oval wall, and ends just outside it. The tail should not reach the baseline, and it should not be as long as the oval is wide. A short, clear tail is enough to make the letter read as Q.
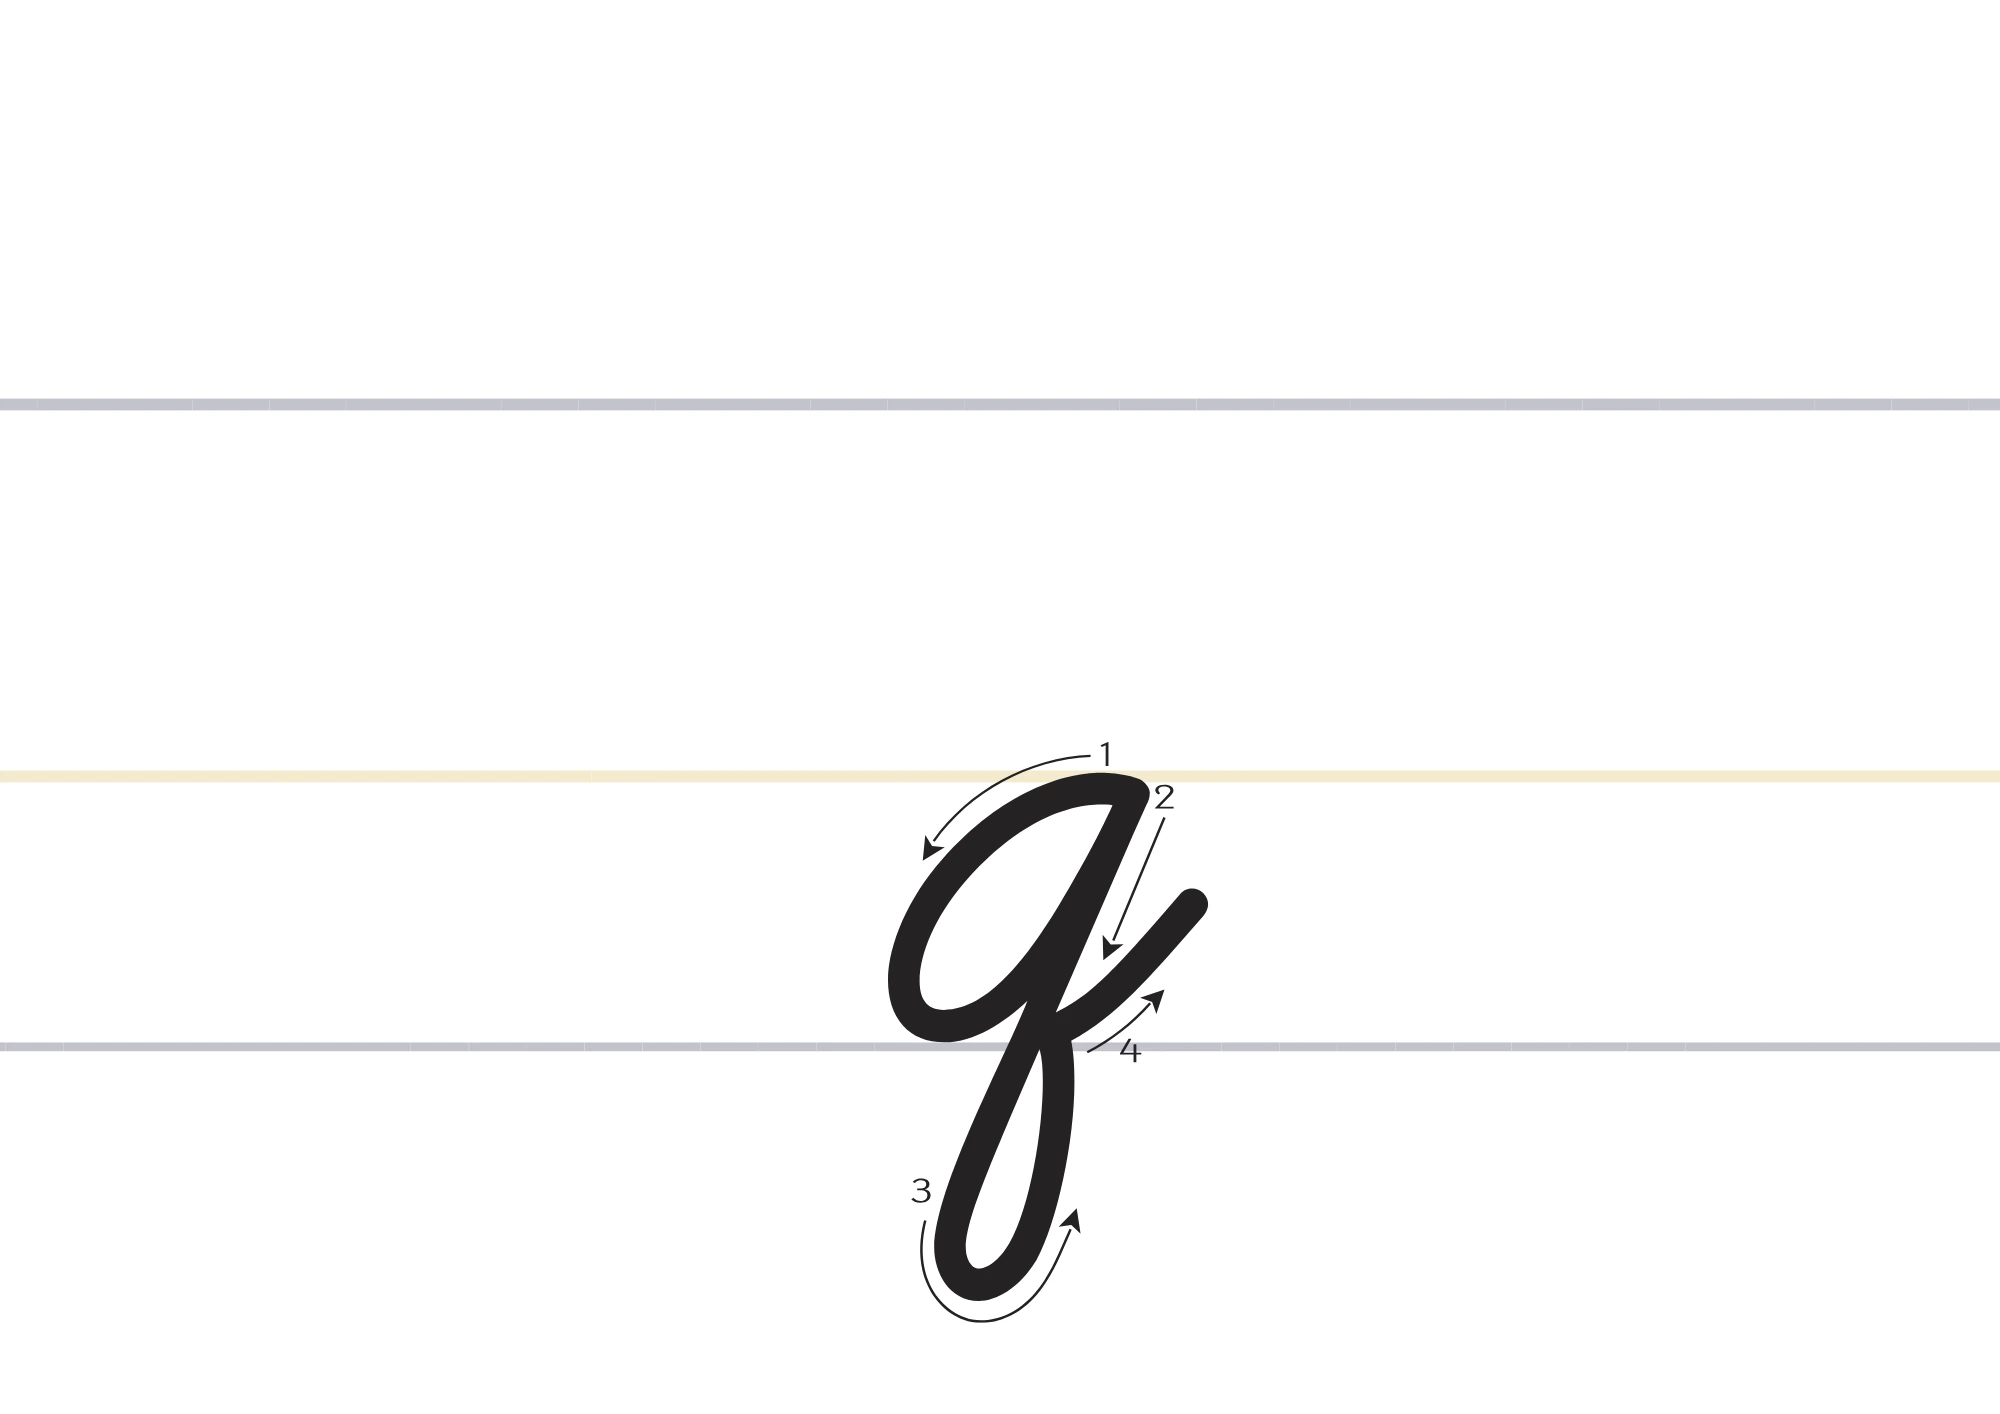
Lowercase q has three parts: a small oval, a descender stem, and a forward loop. The oval sits between the midline and the baseline, like the oval of a. The stem drops from the right side of the oval straight below the baseline. The loop then swings forward to the right and back up to the baseline, where it exits to the next letter. The loop should be open and rounded, not a sharp point, and it should reach about the same depth as the descenders of g, j, p, and y.
Cursive Q Versus Cursive O, P, and G
Capital Q is most often confused with capital O, and the test is the tail. Capital O closes cleanly with no tail. Capital Q must have a tail, or it is an O. Practice Q and O in alternating rows, and stop after each pair to check the lower right. The Q row should show a short diagonal tail. The O row should show none.
Lowercase q is most often confused with lowercase a and lowercase g. Against a, the test is the descender: a stays on the baseline, q drops below it and loops forward. Against g, the test is the loop direction and the oval: q starts with a clear oval like a, then loops forward to the right, while g in most school forms has a loop that swings differently and often starts from a different entry. Keep the oval round, drop the stem straight, and swing the loop forward, and q stays distinct from both.
Before You Start
Sit with both feet flat and the paper tilted slightly to the left if you write with your right hand, and slightly to the right if you write with your left hand. Hold the pencil loosely, about two finger widths above the tip. Cursive Q needs a smooth oval, and a tight grip makes a smooth curve wobble. Use lined paper with a clear descender zone below the baseline, so you can see how far each lowercase q should drop. If your paper has no descender zone, draw a light dotted line below the baseline as a guide.
How to Write Capital Cursive Q
Capital cursive Q is written as one large oval plus a tail. Keep the oval tall and steady, and keep the tail short and clear. Do not lift the pen until the tail is done.
Draw the Large Oval
Start near the top line and draw a counterclockwise oval down to the baseline and back up to the top. Keep the oval a little taller than it is wide, leaning slightly right. Do not close it with a bump at the top.
Return to the Lower Right
Continue the stroke down the right side to the lower right of the oval, inside the oval wall. This is where the tail will start. Keep the motion smooth, with no stop at the bottom of the oval.
Cross With a Short Diagonal Tail
Draw a short diagonal tail from inside the oval, across the lower right wall, to just outside the oval. Finish a little above the baseline. The tail should be short, and it should not turn into a second stroke or a long flourish.
How to Write Lowercase Cursive q
Lowercase cursive q is built from the same oval as lowercase a, plus a descender and a forward loop. If you can write a clean oval, you are most of the way to a clean q.
Draw the Small Oval
Start at the midline and draw a small counterclockwise oval down to the baseline and back up to the midline. Keep the oval round and at x-height, the same height as a, c, and o. Do not add a stem on the right yet.
Drop the Stem Below the Baseline
From the right side of the oval, draw a straight stem down through the baseline to the descender depth. Keep the stem straight and slightly slanted right, at the same depth as your other descenders.
Loop Forward and Exit Right
Swing the stem forward to the right in a rounded loop, back up to the baseline, and exit to the right for the next letter. The loop should be open, not pointed, and the exit should be ready for u in most words.
How to Write Cursive Q: 10-Minute Daily Practice Routine
A short daily routine beats one long session. Ten focused minutes a day, for a week, is enough to make cursive Q feel natural.
- Warm-up ovals (2 minutes): draw large and small ovals at a steady height, width, and slant.
- Capital form (2 minutes): write capital Q slowly and check the tail on every attempt.
- Lowercase form (3 minutes): write small q, with the oval, drop, and forward loop, keeping every loop at the same depth.
- Words (2 minutes): write queen, quick, and quiz slowly, joining each letter without lifting the pen.
- Quick check (1 minute): compare your last row with your first. Are the tails clear? Are the loops open? If a row looks shaky, slow down.
Repeat the routine tomorrow. The goal is a steadier hand by the end of the week, not a perfect page on day one.
Words That Start With Q in Cursive
Practice these common Q words. Read them, trace them, then write them on your own:
Queen · Quick · Quiz · Quiet · Quilt · Quest
Quentin · Quincy · Quinn · Quill · Quarry · Quarter
Inside words, q is rare, but it is almost always followed by u: queen, quick, question, square, and request all test the q to u join. Practice that pair on its own, qu, qu, qu, until the loop of q hands over to the u arch without a gap and without a collision.
Common Mistakes With Cursive Q
- Leaving out the capital tail. Without a tail, capital Q reads as O. Always finish with a short diagonal tail.
- Making the tail too long. A long tail looks like a separate stroke and crowds the next letter. Keep it short and just outside the oval.
- Leaving out the lowercase loop. Without a loop, lowercase q reads as a. Drop below the baseline and loop forward every time.
- Writing lowercase q like g. Keep the oval round like a, drop straight, and swing the loop forward, not back.
- Uneven descenders. If one q drops deeper than the next, the line looks ragged. Use a descender guide line until the depth is steady.
- Writing q with a print tail. Print Q has a short straight tail. Cursive Q has a diagonal tail drawn in the same continuous motion as the oval.
How to Join Q Cursive Letters
Capital Q joins from the tail, or from beside the oval, depending on the school model. In the D’Nealian form used on this page, the tail finishes just outside the oval, and the next lowercase letter starts beside it, rather than being pulled along by a baseline tail. Do not force a baseline connector out of a capital Q. It will distort the oval.
Lowercase q joins from its loop, at the baseline, to the right. In practice, that next letter is almost always u, so learn the qu pair as one unit. Exit from the loop along the baseline, rise into the first arch of u, and keep the spacing tight. A gap between q and u makes the pair look like two separate words, and a collision makes the u arch flatten. In words such as square and request, where q sits in the middle, the same rule applies: the loop exits at the baseline, and u starts at once.
Q Is Almost Always Followed by U
In English, q is almost always followed by u, and that fact should shape how you practice. Do not practice q alone for long. Practice qu as a pair, then words that contain qu, then sentences that contain qu words. The pair has its own rhythm: a drop below the line, a loop forward, a rise into u, and then the rest of the word. If you practice q alone, you will learn a shape. If you practice qu, you will learn a word.
The few exceptions are useful to know, because they show up in names and borrowed words: Qantas, Qatar, and Qat are written without u, and they are good test words for the capital form, because the capital Q must stand on its own without a qu pair to help it read. For everyday writing, though, qu is the pair to master.
How to Write Q in Cursive: Practice Sentences
Single letters are only half the skill, because sentences teach spacing, rhythm, and stamina. Try each sentence three times: once very slowly, once at a normal pace, and once without stopping.
Quinn asked a quick question.
The queen kept a quiet quilt.
We quiz each other every quarter.
Practice cursive q with queen, quick, and question every day.
Read each sentence back and check the tails, the loops, and the qu joins. In the first sentence, check the qu pairs first, if those are clean, the rest usually follows.
Letter Q in Cursive for Names and Signatures
For a first name that begins with Q, keep the capital a little larger and more open than in ordinary writing, so it reads at a glance. The rest of the name should stay at normal size. Quentin, Quincy, and Quinn all need a capital Q with a clear tail, or the name can be misread as starting with O.
For signatures, the same form can be faster and looser, but it must stay recognizable: the oval must stay closed, and the tail must stay visible. A signature Q without a tail looks like an O, and a signature Q with a long flourish looks like a scribble. Slow the signature down until the tail is visible again, then build speed back up.
Cursive Q in D’Nealian and Zaner-Bloser
Most US classrooms teach either D’Nealian or Zaner-Bloser cursive, and for Q the difference is mainly in the tail and the loop. D’Nealian capital Q uses a diagonal tail that crosses the lower right of the oval, and lowercase q uses a forward loop. Zaner-Bloser Q can be a little more upright, with a tail that sits differently on the oval. Match the model on your school worksheet, and use one model for a whole assignment, because mixing them makes tails and loops look inconsistent.
Cursive Q, Frequently Asked Questions
What does the letter Q look like in cursive?
Capital cursive Q is a large oval with a short diagonal tail at the lower right. Lowercase cursive q is a small oval with a stem below the baseline and a forward loop.
Is cursive Q hard to learn?
The capital is not hard, once you add the tail. The lowercase is harder, because of the drop and the loop. Practice qu as a pair, not q alone.
How do you join cursive Q to the next letter?
Capital Q finishes with its tail, and the next letter starts beside it. Lowercase q exits from its loop at the baseline, almost always into u.
What words can I practice with cursive Q?
Start with queen, quick, and quiz, then question, square, and request. For the capital alone, try Qatar and Qantas.
Should I learn the capital or the lowercase form first?
Start with the lowercase form. It appears in qu words that you will write often. The capital uses the same oval at a larger size, plus a tail.
Why does my letter Q look like O?
Usually the tail was left out. Add a short diagonal tail that crosses the lower right of the oval.
How do I teach cursive Q to a child?
Start with the oval, then add the tail for the capital and the loop for the lowercase. Trace first, then copy, then write from memory. Keep sessions short.
What is the difference between cursive Q and print Q?
A print Q is made in separate strokes. A cursive Q is one continuous motion, with an oval and a tail or loop that hands over to the next letter.
See Your Name in Cursive
Type any name or word and convert it into beautiful cursive text you can copy anywhere, free, with no sign-up.
Open the Cursive Generator