
Home › Cursive Alphabet › Cursive I
Cursive I: How to Write the Letter I in Cursive
Cursive I is a short letter with a long shadow. The capital form is a tall, narrow loop that many readers mistake for a capital J, and the small form is a short stem that only becomes readable when its dot is placed in the right spot, after the word is finished. Learn both forms of cursive I slowly, and this letter stops looking like a mystery.
Cursive script joins letters inside a word. Cursive I tests height, slant, and timing at once: a stem too tall breaks the word, a dot too big makes it messy, and a capital loop too wide makes it look like J.
Trace the Cursive Letter I
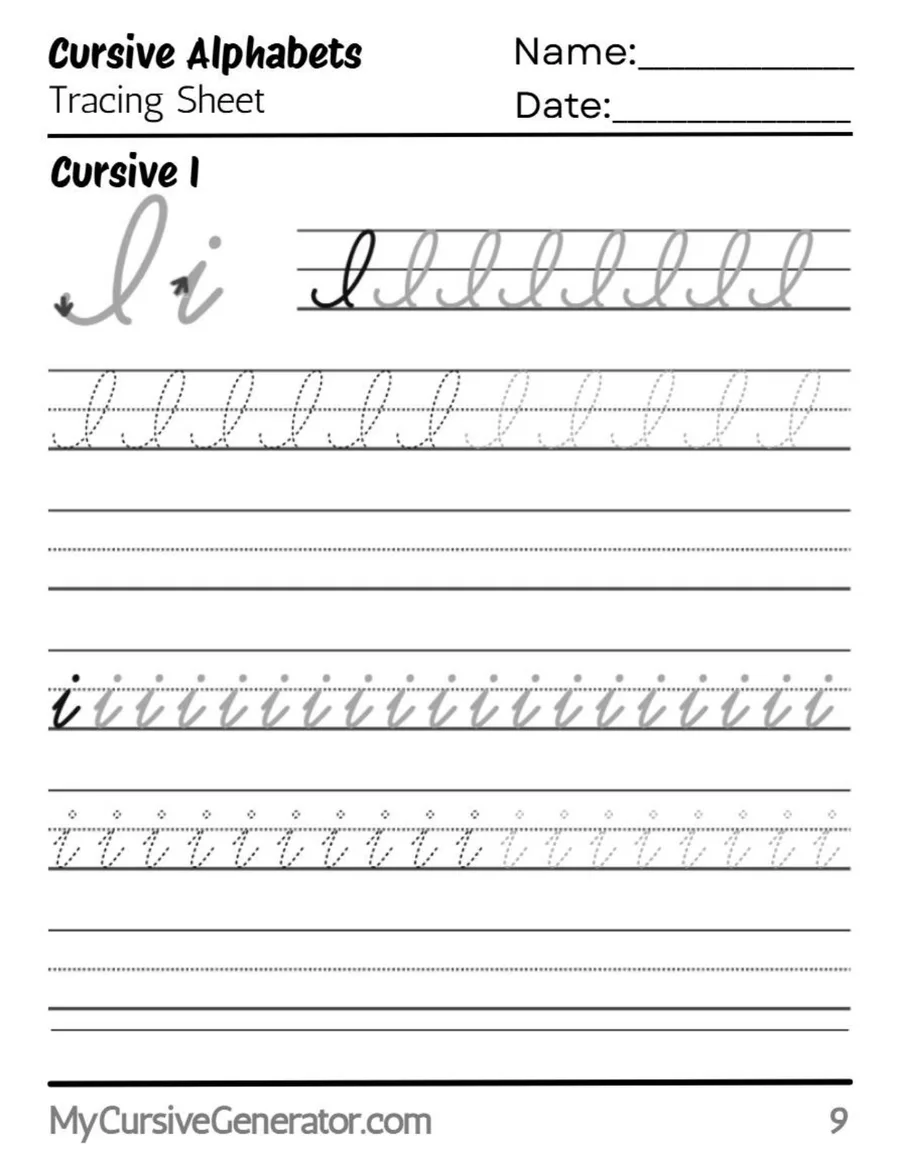
Start on the worksheet, not on a blank page. Trace the tall loop first, then the short stem. In cursive I, the capital loop should rise to the top line without widening. The small stem should rise only to the midline. That height difference is the whole lesson.
Use the worksheet in three passes: trace the model slowly, copy it beside the model, then write it from memory in a short word. In cursive I, do not dot the small form in the first two passes. Dot it only when the word is done.
Before You Start
Name three lines before you write. The top line is the ceiling for capitals. The midline, usually dashed, is the ceiling for small letters like i. The baseline is the floor. A small i that crosses the midline may be read as l. A capital I that stops at the midline has no clear identity.
Hold the pencil loosely, about two finger widths above the tip, and keep your wrist relaxed. In cursive I, a tight grip makes the capital loop stiff and the small stem shake. Tilt the paper slightly to the left for a right hand, or to the right for a left hand, and keep one gentle rightward slant for every letter.
How to Write Capital Cursive I
The capital form of cursive I on this page is one continuous movement, not a printed I with decoration added on. It begins low, rises into a narrow loop, comes down on a slant, and ends with a small curve to the right at the baseline. That curve connects to the next letter. Do not lift the pen in the middle of the loop.
Enter and Loop Up
Start at the baseline with a small curve to the right. Sweep up to the top line, curve left, and come back down a short distance on the left side of the rising stroke. This creates a narrow loop, about as wide as a small stem, leaning slightly right.
Bring the Stem Down
Without lifting the pen, bring the stroke down to the baseline on a steady slant, close to the rising stroke but not retracing it. Too far left opens the loop into a J shape. Too far right closes it into a tall l shape.
Curve Out at the Baseline
At the baseline, curve gently to the right and lift slightly, so the stroke is ready to enter the next lowercase letter. This curve is part of the same movement, not a new stroke.
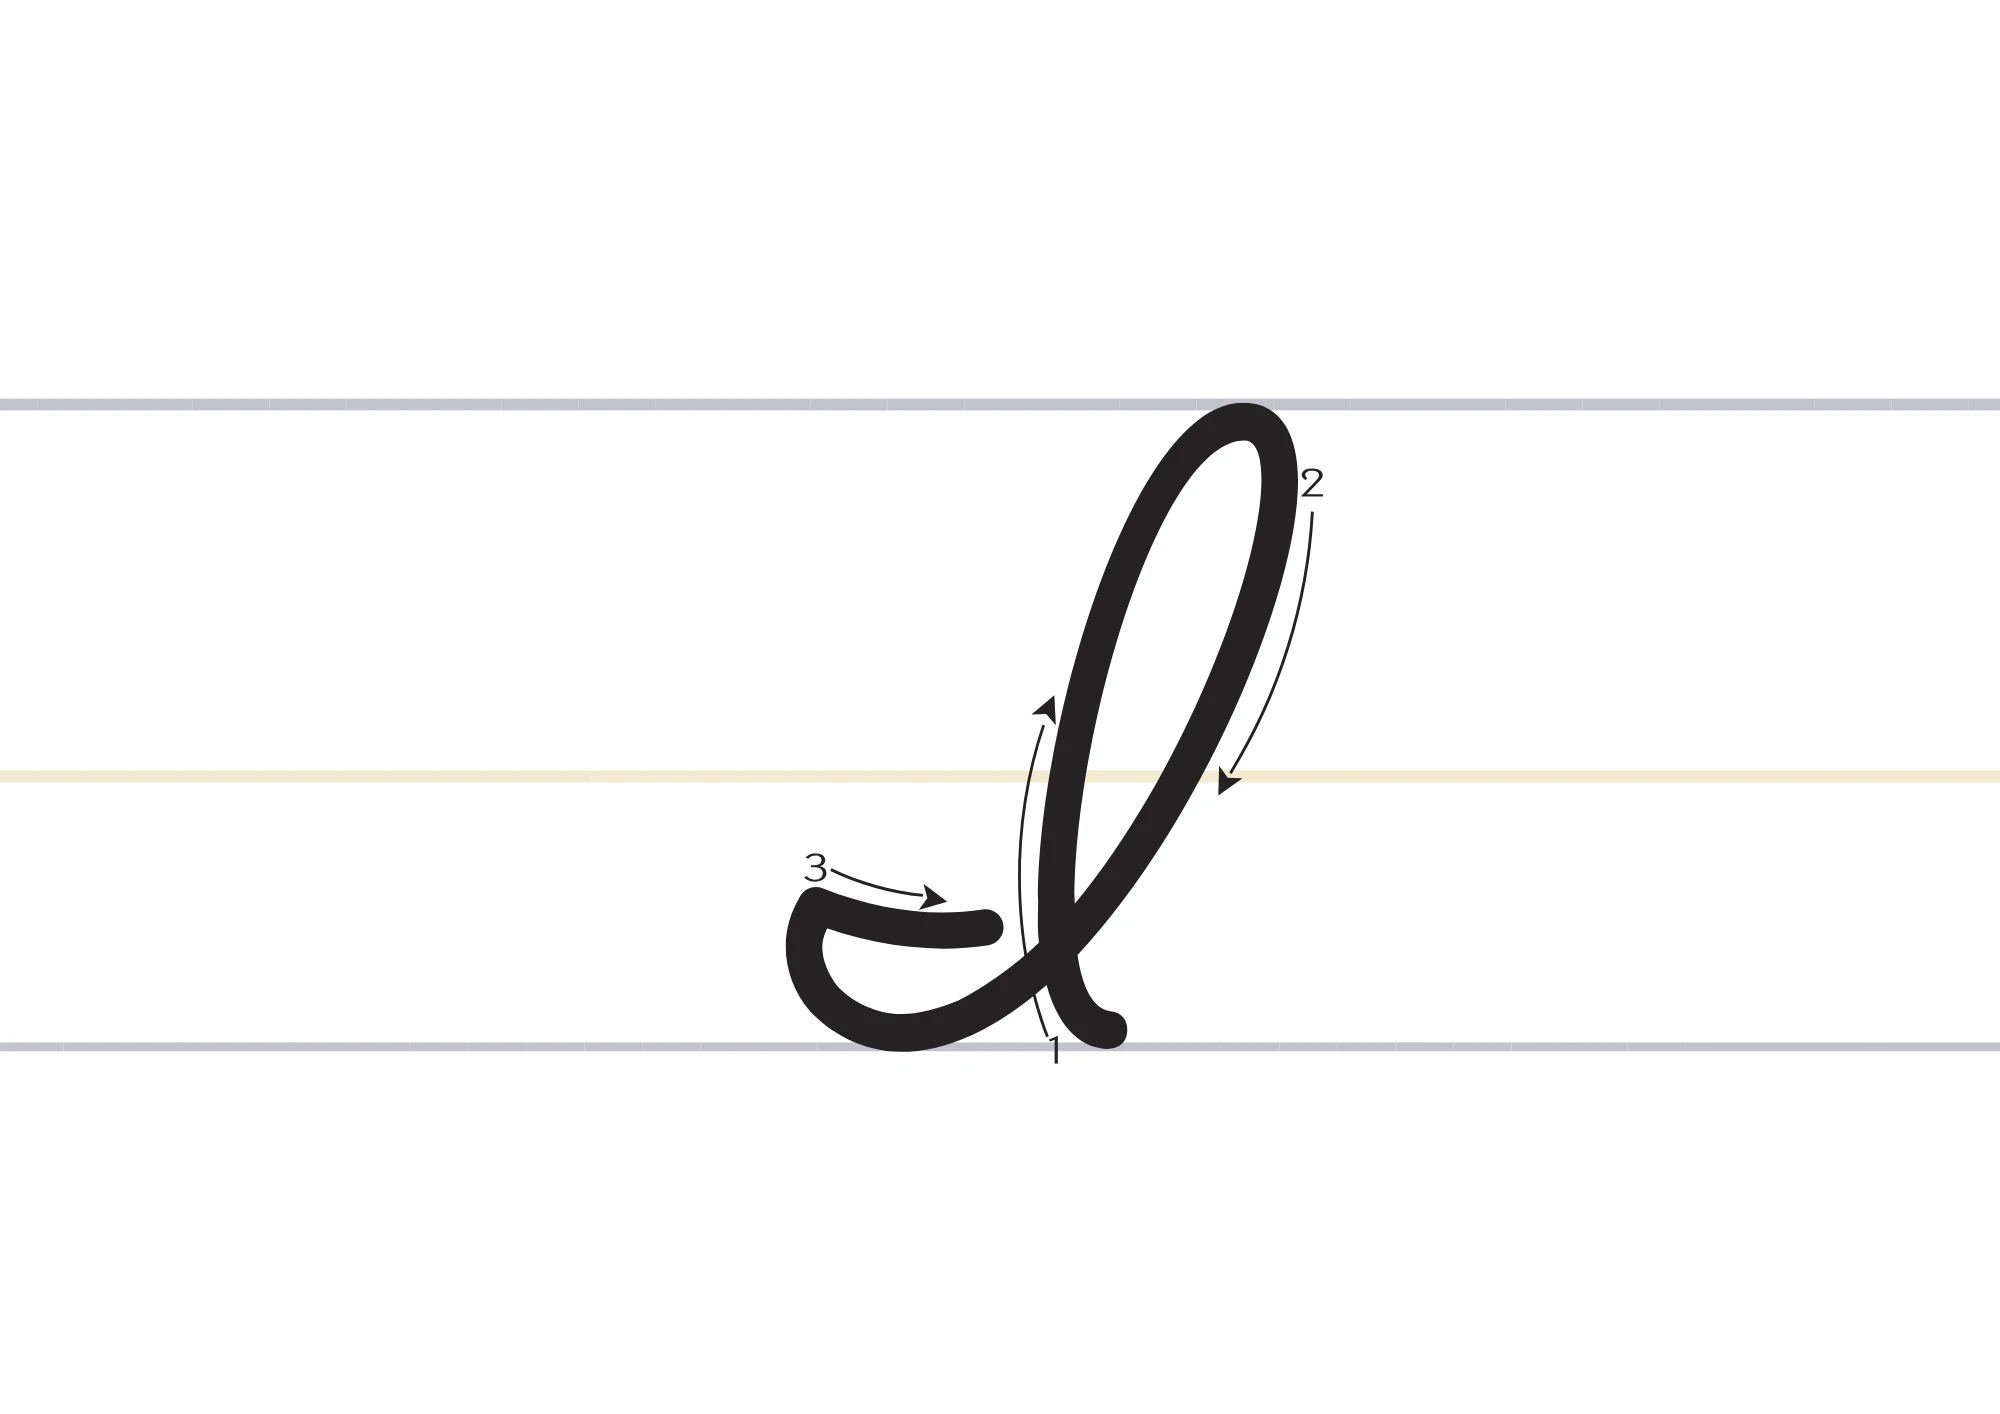
Check the finished capital: does it reach the top line, stay narrow, and leave the baseline at a gentle angle? If not, slow down and trace the model again.
How to Write Lowercase Cursive i
The small form of cursive I appears inside words such as in, it, is, and with. It is a short stem between the midline and the baseline, with an entry curve at the bottom and a dot added later. Do not treat the dot as part of the letter itself. It is a finishing mark, added after the word is complete, like a cross on a t.
Enter From the Baseline
Start at the baseline with a small undercurve to the right, then rise to the midline. Do not start at the midline and drop down, because that makes the stem lean backward and breaks the flow.
Come Back Down and Connect
Come back down to the baseline along nearly the same path, then curve right. That curve connects to the next letter. In in, it flows into n. In it, it flows into the t stem.
Dot After the Word
Finish the whole word first. Then lift the pen, return to the small i, and place a small dot just above the midline, centered over the stem. Make the dot light and round, not a heavy blob and not a slash. If a word has two small i letters, dot both of them after the word is finished, from left to right.
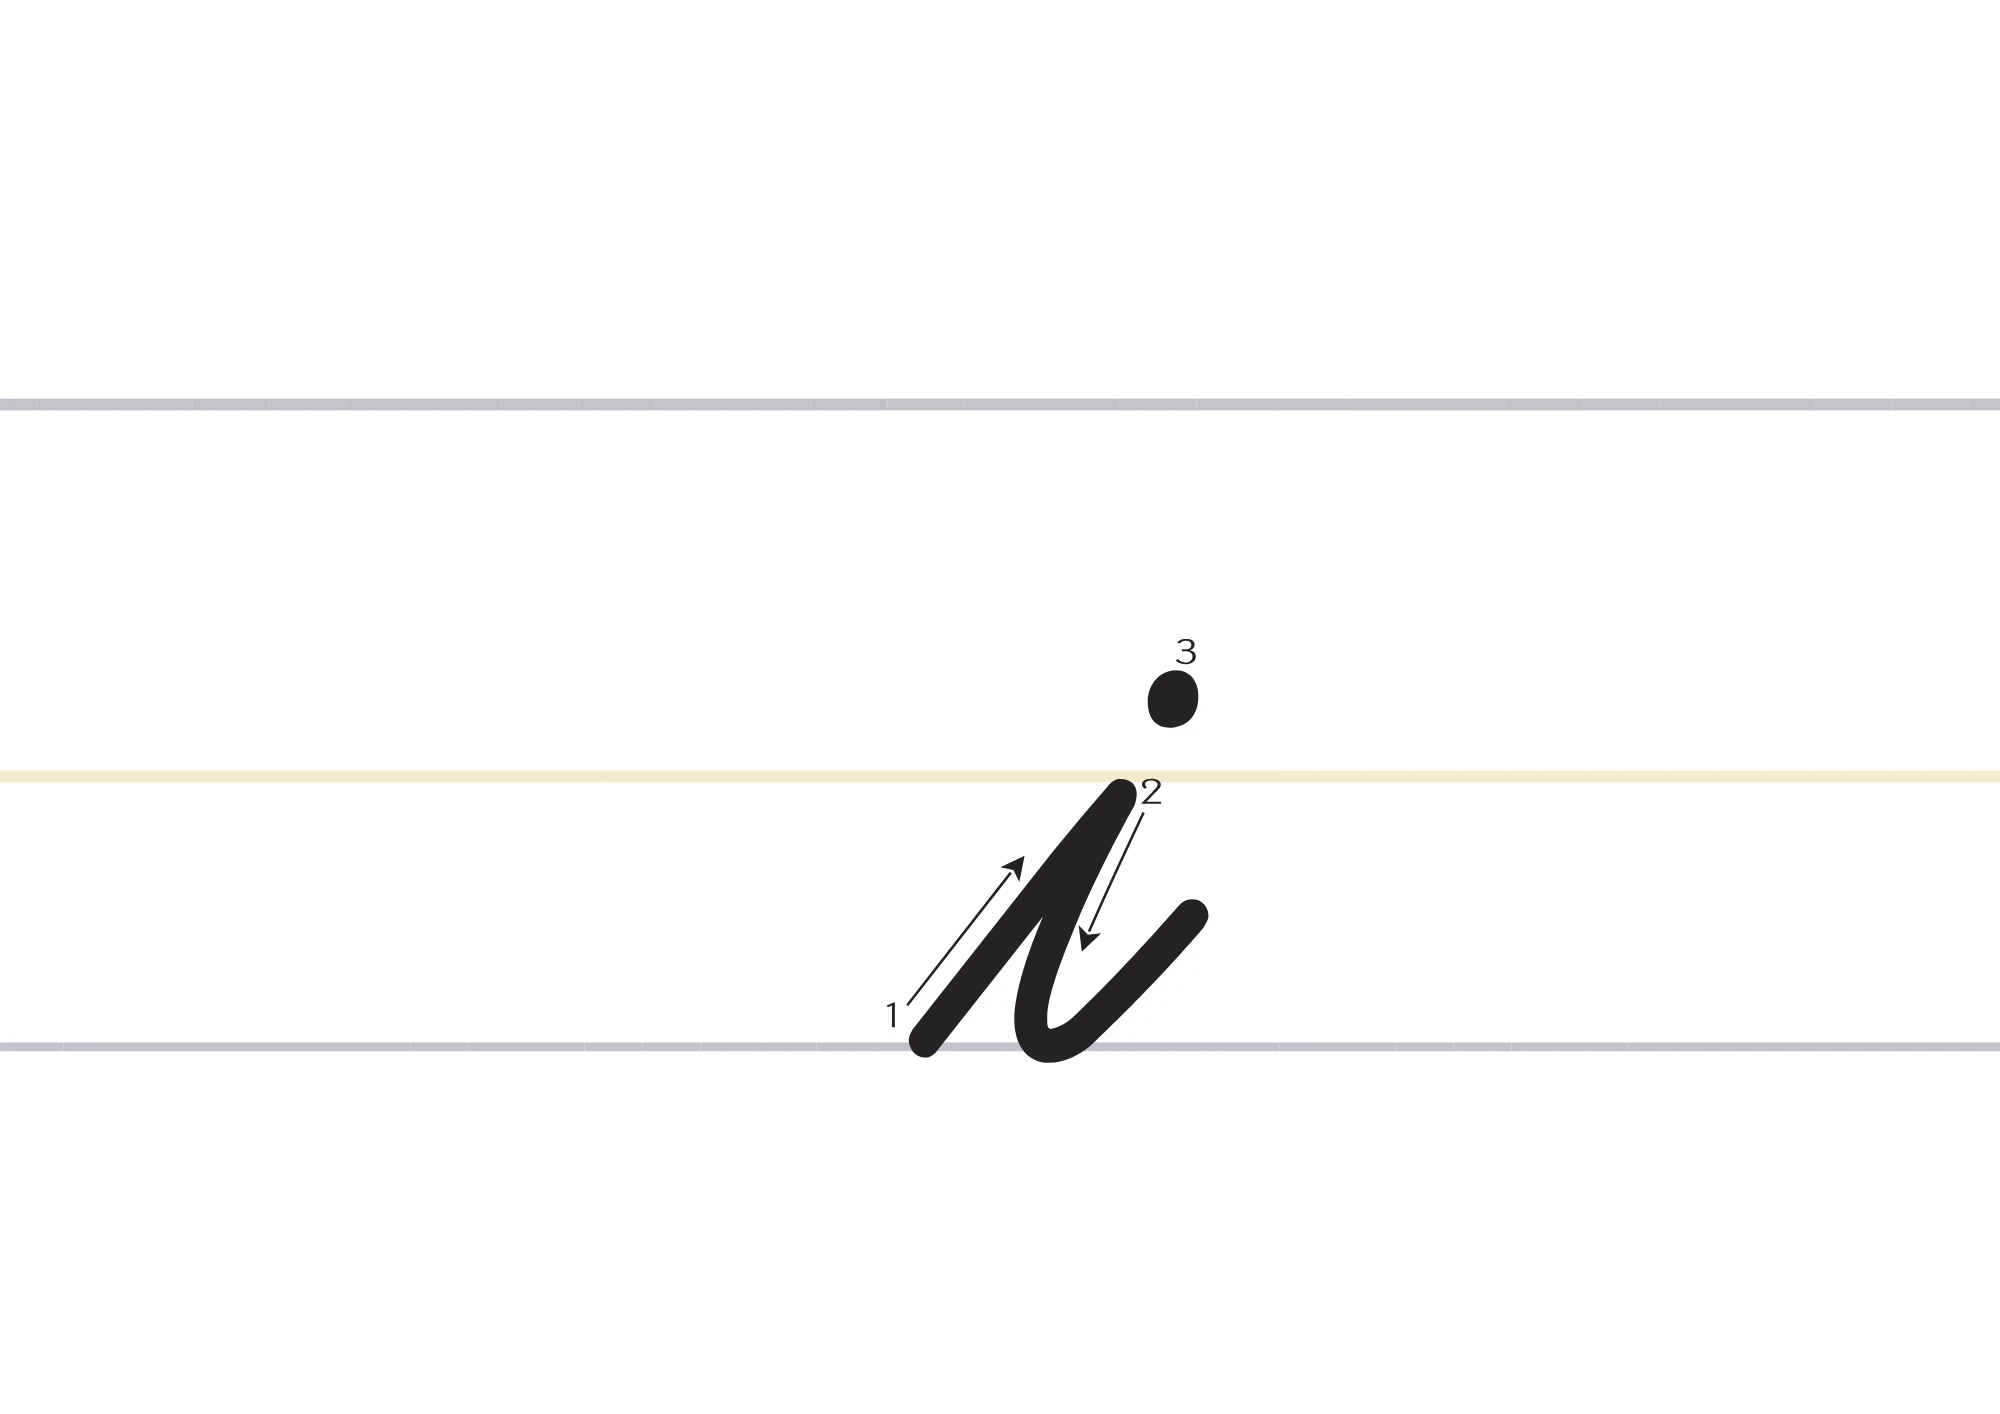
A small i without a dot is not finished, but a dot placed mid-word slows you down and often lands in the wrong place. In cursive I, US teachers teach the dot last so the hand keeps moving and the dot stays centered.
Cursive I in D’Nealian and Other School Styles
D’Nealian is the school style used for the worksheet on this page, and it is the style most US elementary students meet first. In cursive I, its capital form is a tall loop, and its small form is a short stem with a dot. Zaner-Bloser uses a similar loop, often rounder at the top. Palmer method uses a more slanted, faster loop, which can make the capital look even closer to a J.
Spencerian is a formal calligraphy style, not a school style. Its capital I has extra flourishes and a lower loop below the baseline. Do not copy that loop into school writing, because it turns the letter into a J.
Reading Cursive I: I, J, l, and 1
Reading old handwriting is where cursive I causes the most trouble. A capital I written quickly can look like a capital J, especially with a lower loop. A small i without a dot can look like a small l, and a small l can look like the number 1. Read the whole word, then the whole sentence, before you decide.
Three clues help. Height: a capital loop reaches the top line, a small stem reaches only the midline, and a small l reaches the top line but has a loop, not a dot. The dot: a dot above a short stem almost certainly means i. Position: a capital form starts a sentence or a name, while a small form sits inside a word.
How to Write Cursive I: 10-Minute Daily Practice Routine
A short daily routine for cursive I works better than one long session. Ten focused minutes a day, for a week, is enough to make this letter feel steady. Keep the pen moving slowly, and practice the dot only as the last step of a word.
- Warm-up loops (2 minutes): Draw the capital loop shape in the air, then on paper, five times slowly.
- Capital form (2 minutes): Write the capital form on its own, five times, checking height and slant after each row.
- Small form in words (3 minutes): Write in, it, is, and if, five times each. Dot each word only after the whole word is finished.
- Words with two dots (2 minutes): Write initial, division, and Mississippi slowly. Dot all the small i letters at the end, from left to right.
- Quick check (1 minute): Compare your last row with your first row. If a row looks shaky, slow down rather than pressing harder.
Repeat it tomorrow.
Words That Start With I in Cursive
Practice these common I words. Read them, trace them, then write them on your own:
Ice · Igloo · Ink · Island · Iron · Ivy
Isaac · Isla · Ian · Iris · Ivan · Ingrid
In Isaac, the capital loop opens the word and the small stem appears later, with its dot added last. In initial, both dots wait until the word is done. That timing is why this letter is taught as a timing lesson, not just a shape lesson.
Common Mistakes With Cursive I
- Making the capital loop too wide. In cursive I, a wide loop turns a capital I into a capital J in the eyes of most readers. Keep the loop narrow, about the width of a small stem.
- Letting the capital drop below the baseline. A lower loop belongs to J, not to I. The capital form on this page ends at the baseline, with only a small rightward curve.
- Writing the small stem too tall. In cursive I, a small stem that reaches the top line looks like a small l. Stop at the midline, every time.
- Dotting in the middle of the word. Stopping to dot breaks the flow, and the dot often lands over the wrong stem. Finish the word, then dot.
- Making the dot too heavy. A heavy blob draws the eye away from the word and can look like a stray mark. Use a light, round touch.
- Changing the slant inside one word. A stem that leans left while the next stem leans right makes the whole word look shaky. Keep one gentle rightward slant for every stem in the word.
How to Join I Cursive Letters
The small form of cursive I joins on both sides, which is why it is useful inside words. It enters from the previous letter at the baseline, rises to the midline, returns to the baseline, and exits to the right. The capital form joins only on the right, because it usually starts a word. Its final curve at the baseline should enter the next letter without a lift and without a sharp corner.
Joining I After Other Letters
When i follows another letter, the entry curve matters more than the stem. In hi, the h arch should end at the baseline and flow into the small i entry curve. In li, the tall loop of l should come down to the baseline and flow into the same curve. Lifting the pen between those letters breaks the word into print.
Joining I Before Vowels and Consonants
Good pairs to practice first are ia, ie, in, it, and is. In ia, rise gently into the small a oval without closing it too early. In in, rise into the first arch of n at the midline. In it, rise into the tall stem of t, so the height change is smooth, not a sudden jump.
How to Write I in Cursive: Practice Sentences
For cursive I, single letters are only half the skill, because sentences teach spacing, rhythm, and stamina. Try each sentence three times: once very slowly, once at a normal pace, and once without stopping. Dot every small i only after each sentence is finished, and check the dots before you start the next sentence.
Ivy invited Isaac to the island.
Is it time to write in ink?
Ingrid is in the initial group.
We practice cursive i with ice and island every day.
When a sentence is finished, check: are the capitals tall and narrow, are the small stems at midline height, are the dots centered, and does every join flow without a lift?
Letter I in Cursive for Names and Signatures
For cursive I, names are where most people first notice their handwriting, because a name is written far more often than any practice word. For a first name that begins with this letter, keep the capital loop a little larger than in ordinary writing, so it reads better at a glance. The rest of the name should stay at normal size, and small i letters inside it should be dotted last.
For signatures, the same shape can be written faster and looser, but it must stay readable: the loop must stay narrow, and the dot must stay centered. A signature that looks like a J when the name starts with I will cause confusion on a form.
A 7-Day Plan to Master Cursive I
Day 1 is for the capital loop alone. Day 2 is for the small stem in single words, with dots added last. Day 3 is for pairs such as in, it, and is. Day 4 is for words with two small i letters, such as initial and division. Day 5 is for sentences, with a dot check at the end of each sentence. Day 6 is for names. Day 7 is a review: write one paragraph by hand, circle the best capital and the best small form, and note one thing to fix next week.
When Cursive I Keeps Breaking
If cursive I keeps looking like J, narrow the loop and stop at the baseline. If the small form keeps looking like l, stop every stem at the midline. If the dots keep landing in the wrong place, write the word, look at it, then dot from left to right. If the whole word looks shaky, loosen your grip, slow down by half, and write the same word five times.
Cursive I, Frequently Asked Questions
What does the letter I look like in cursive?
The capital form is a tall, narrow loop to the top line, ending with a small curve at the baseline. The small form is a short stem from the midline to the baseline, with a dot added after the word is finished.
Why does capital I look like J in cursive?
Both letters use a loop. Keep the capital loop narrow, stop at the baseline, and do not add a loop below the baseline. That lower loop is the mark of J, not I.
When do you dot a lowercase i in cursive?
After the whole word is finished. Write the stem, finish the word, then place a small dot just above the midline, centered over the stem. Dot two i letters at the end, from left to right.
Is cursive I hard to learn?
No, once you separate the two problems: height for the small form, and width for the capital form. Practice the loop alone, then the stem in short words, then both in sentences.
How do you join cursive I to the next letter?
The small form exits at the baseline to the right, into the next letter. Start with ia, ie, in, it, and is. The capital form exits the same way, but only on the right.
What words can I practice with cursive I?
Start with Ice, Ink, Island, and Ivy, then try Isaac, Isla, and Iris. Type your own name into our cursive generator to see it first.
Should I learn the capital or the lowercase form first?
Start with the small form. It appears in almost every word, while the capital is only needed at the start of sentences and names. Once the small form feels easy, the capital loop is quick to learn.
What is the difference between cursive I and print I?
A print I is a straight line, with a dot for the small form. The school form is a loop for the capital and a short stem for the small form, with a connector to the next letter.
See Your Name in Cursive
Type any name or word and convert it into beautiful cursive text you can copy anywhere, free, with no sign-up.
Open the Cursive Generator