
Home › Cursive Alphabet › Cursive K
Cursive K: How to Write the Letter K in Cursive
Capital K opens a word with height and a clear kick, while small k keeps a word moving with a looped stem and a quick leg to the right. Learn them as two different letters, not as one big shape and one small copy, and cursive K will stop looking like print joined up in a hurry.
Cursive script joins letters inside a word, and cursive K tests that idea well, because it asks for height, slant, and a midline detail in one letter. The capital teaches control of a tall stem. The small form teaches control of a loop at the top and a second, much smaller loop in the middle.
Trace the Cursive Letter K
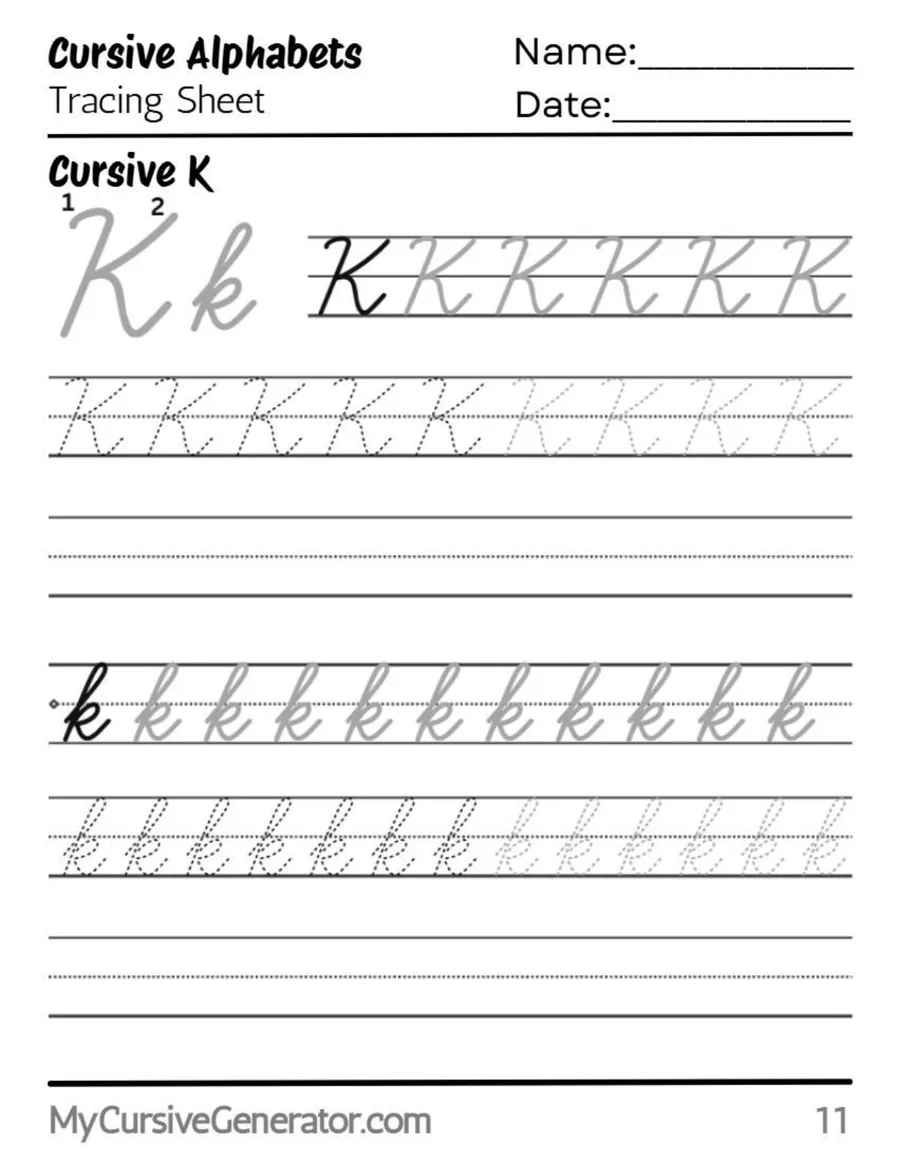
Start on the worksheet for cursive K, not on a blank page. Trace the capital first: stem leaning slightly right, top line to baseline, no wobble. Then trace the small form, with its top loop closing near the stem.
Use the worksheet in three passes: trace, copy beside the model, then write cursive K from memory in key or kite.
Before You Start
Use three lines for cursive K. The top line is the ceiling for both tall forms, the midline is where the small middle loop of small k sits, and the baseline is where both forms land and the connector leaves right.
Hold the pencil loosely, about two finger widths above the tip, and keep your wrist relaxed. Tilt the paper slightly left for right handers, or slightly right for left handers, and keep one gentle slant for the whole word.
How to Write Capital Cursive K
Capital cursive K is one continuous movement here: a tall stem from the top line, a small loop at mid height, and a diagonal leg to the baseline on the right, ending with a connector to the next letter.
Pull the Tall Slanted Stem Down
Start at the top line and pull a tall, slanted stem down to the baseline for cursive K. Keep the slant gentle, and do not let the stem bow, because it sets the height and angle for the rest.
Form the Small Loop at Mid Height
Come back up the stem a short way, then curve right and close a small loop at mid height, just right of the stem. Keep it small and closed: a wide loop turns cursive K into a scribble, and an open loop turns it into a pointed arm.
Send the Diagonal Leg Down and Connect
From the loop, send a diagonal leg down to the baseline right, then curve into a short connector. The leg should land clearly right of the stem, so cursive K keeps its open shape.
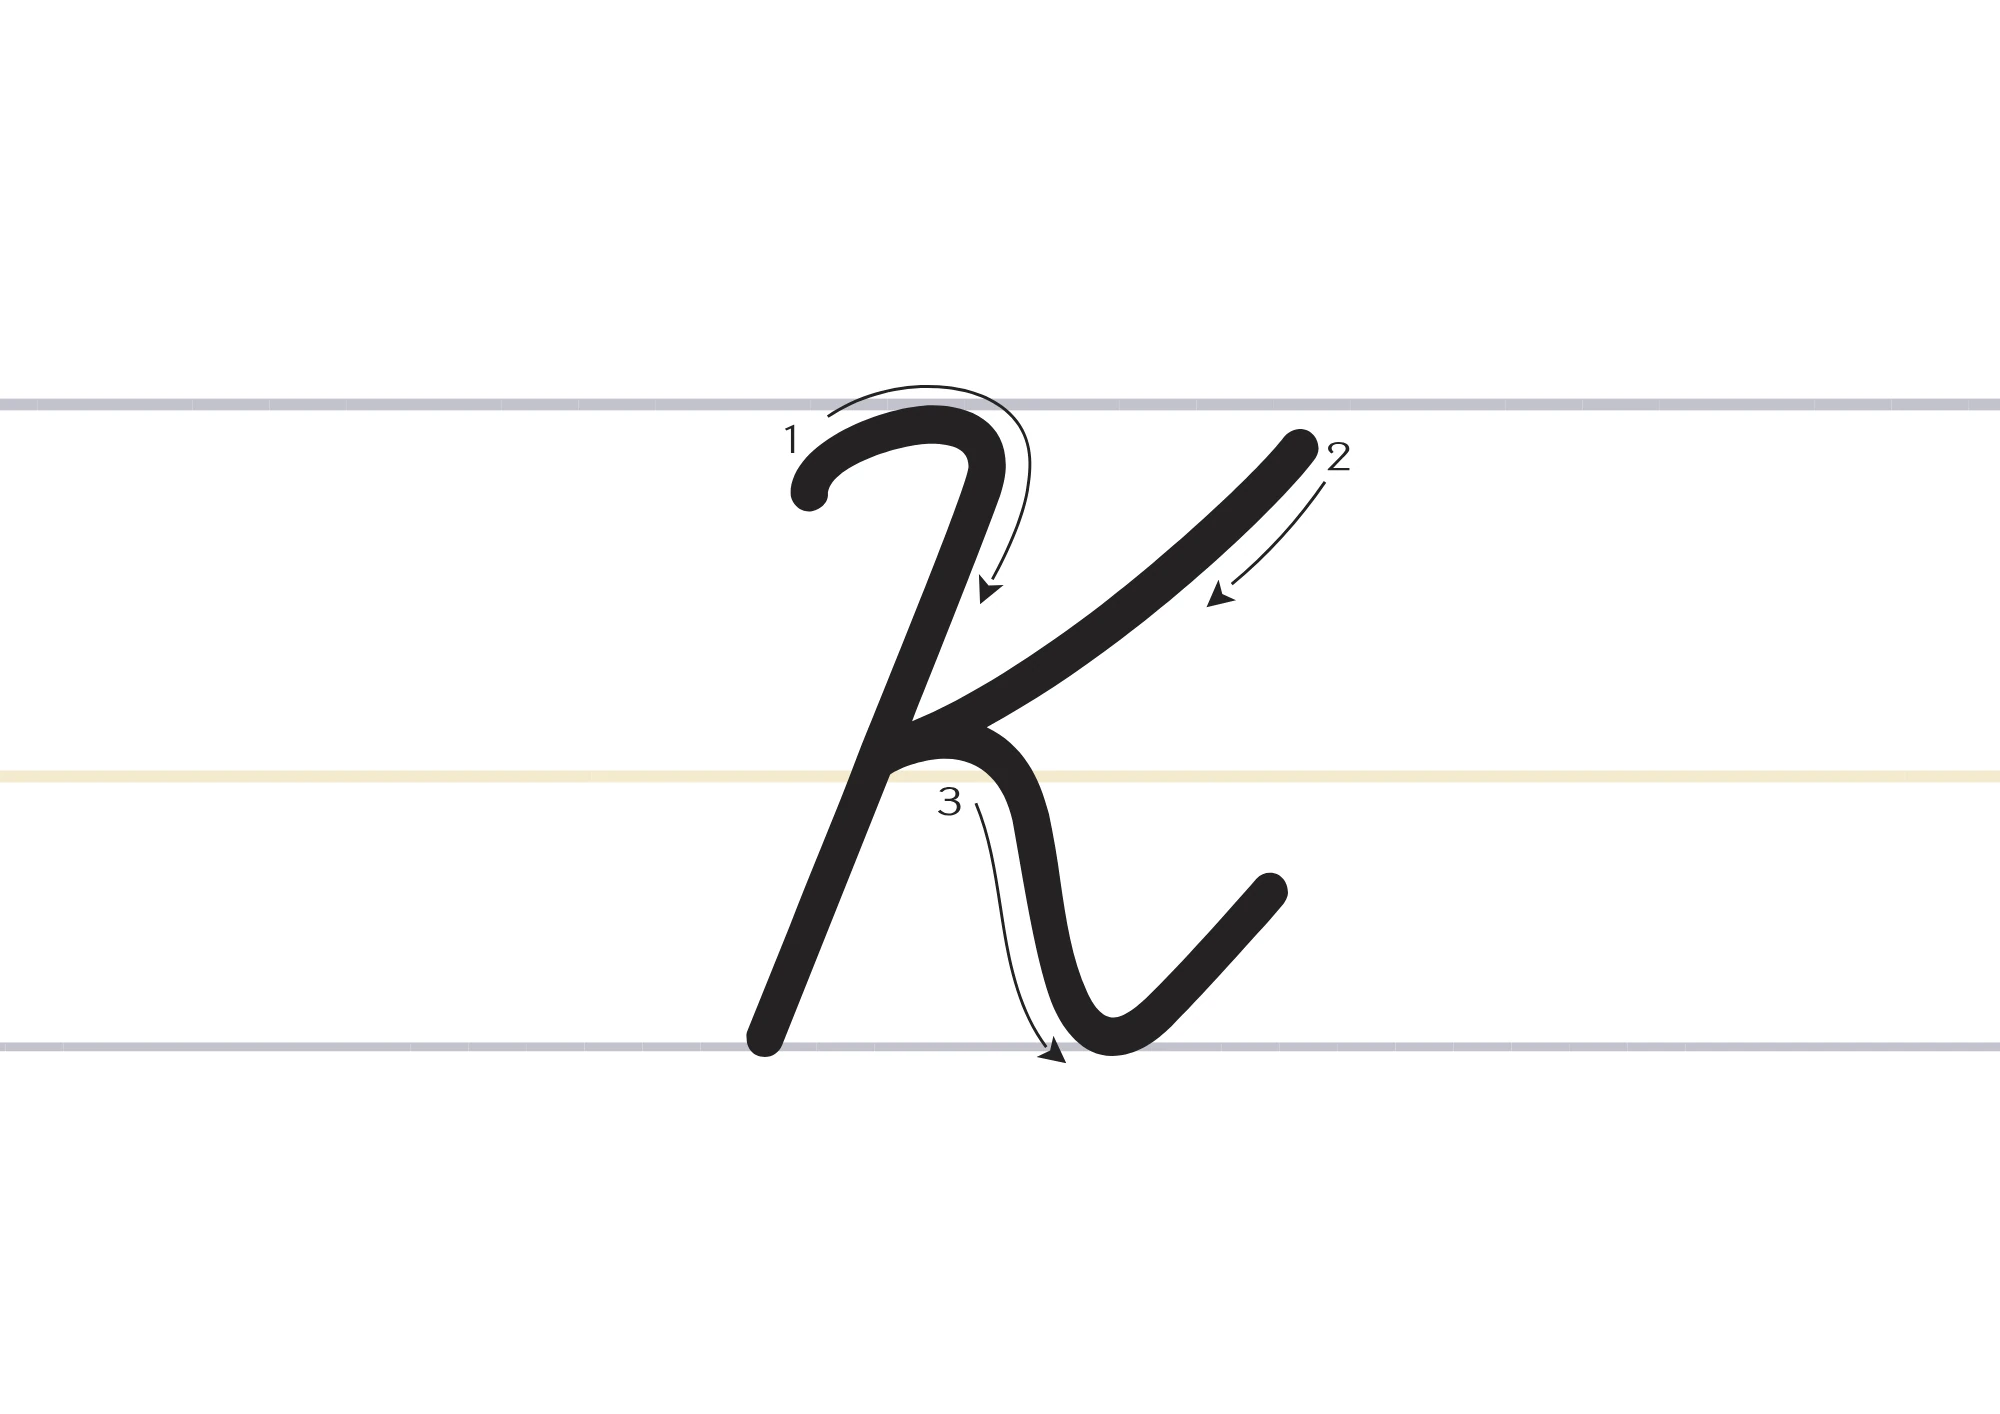
Check the capital for cursive K: stem to top line and baseline, loop small at mid height, leg right of the stem with a connector. If any point fails, trace the model again.
How to Write Lowercase Cursive k
Lowercase cursive k is not a smaller copy of the capital. It starts at the baseline, rises into a tall loop, comes back down, and only then makes its small middle loop and leg. It joins on both sides inside a word, while the capital usually only exits to the right.
Rise From the Baseline Into a Tall Loop
Start at the baseline with a small entry curve, then rise to the top line and loop back down, close to the rising stroke. This tall looped stem makes lowercase cursive k different from the capital, so keep the loop narrow.
Form the Small Loop at the Midline
At the baseline, come back up a short way, then curve right and close a small loop at the midline, just right of the stem. This loop is smaller than the top loop and sits at the dashed line, not halfway up the tall stem of cursive k.
Send the Diagonal Leg Down and Connect
From the midline loop, send a diagonal leg down to the baseline right, then curve into a short connector. The leg should be quicker than the stem, and the connector for cursive k should leave at baseline height, without a lift.
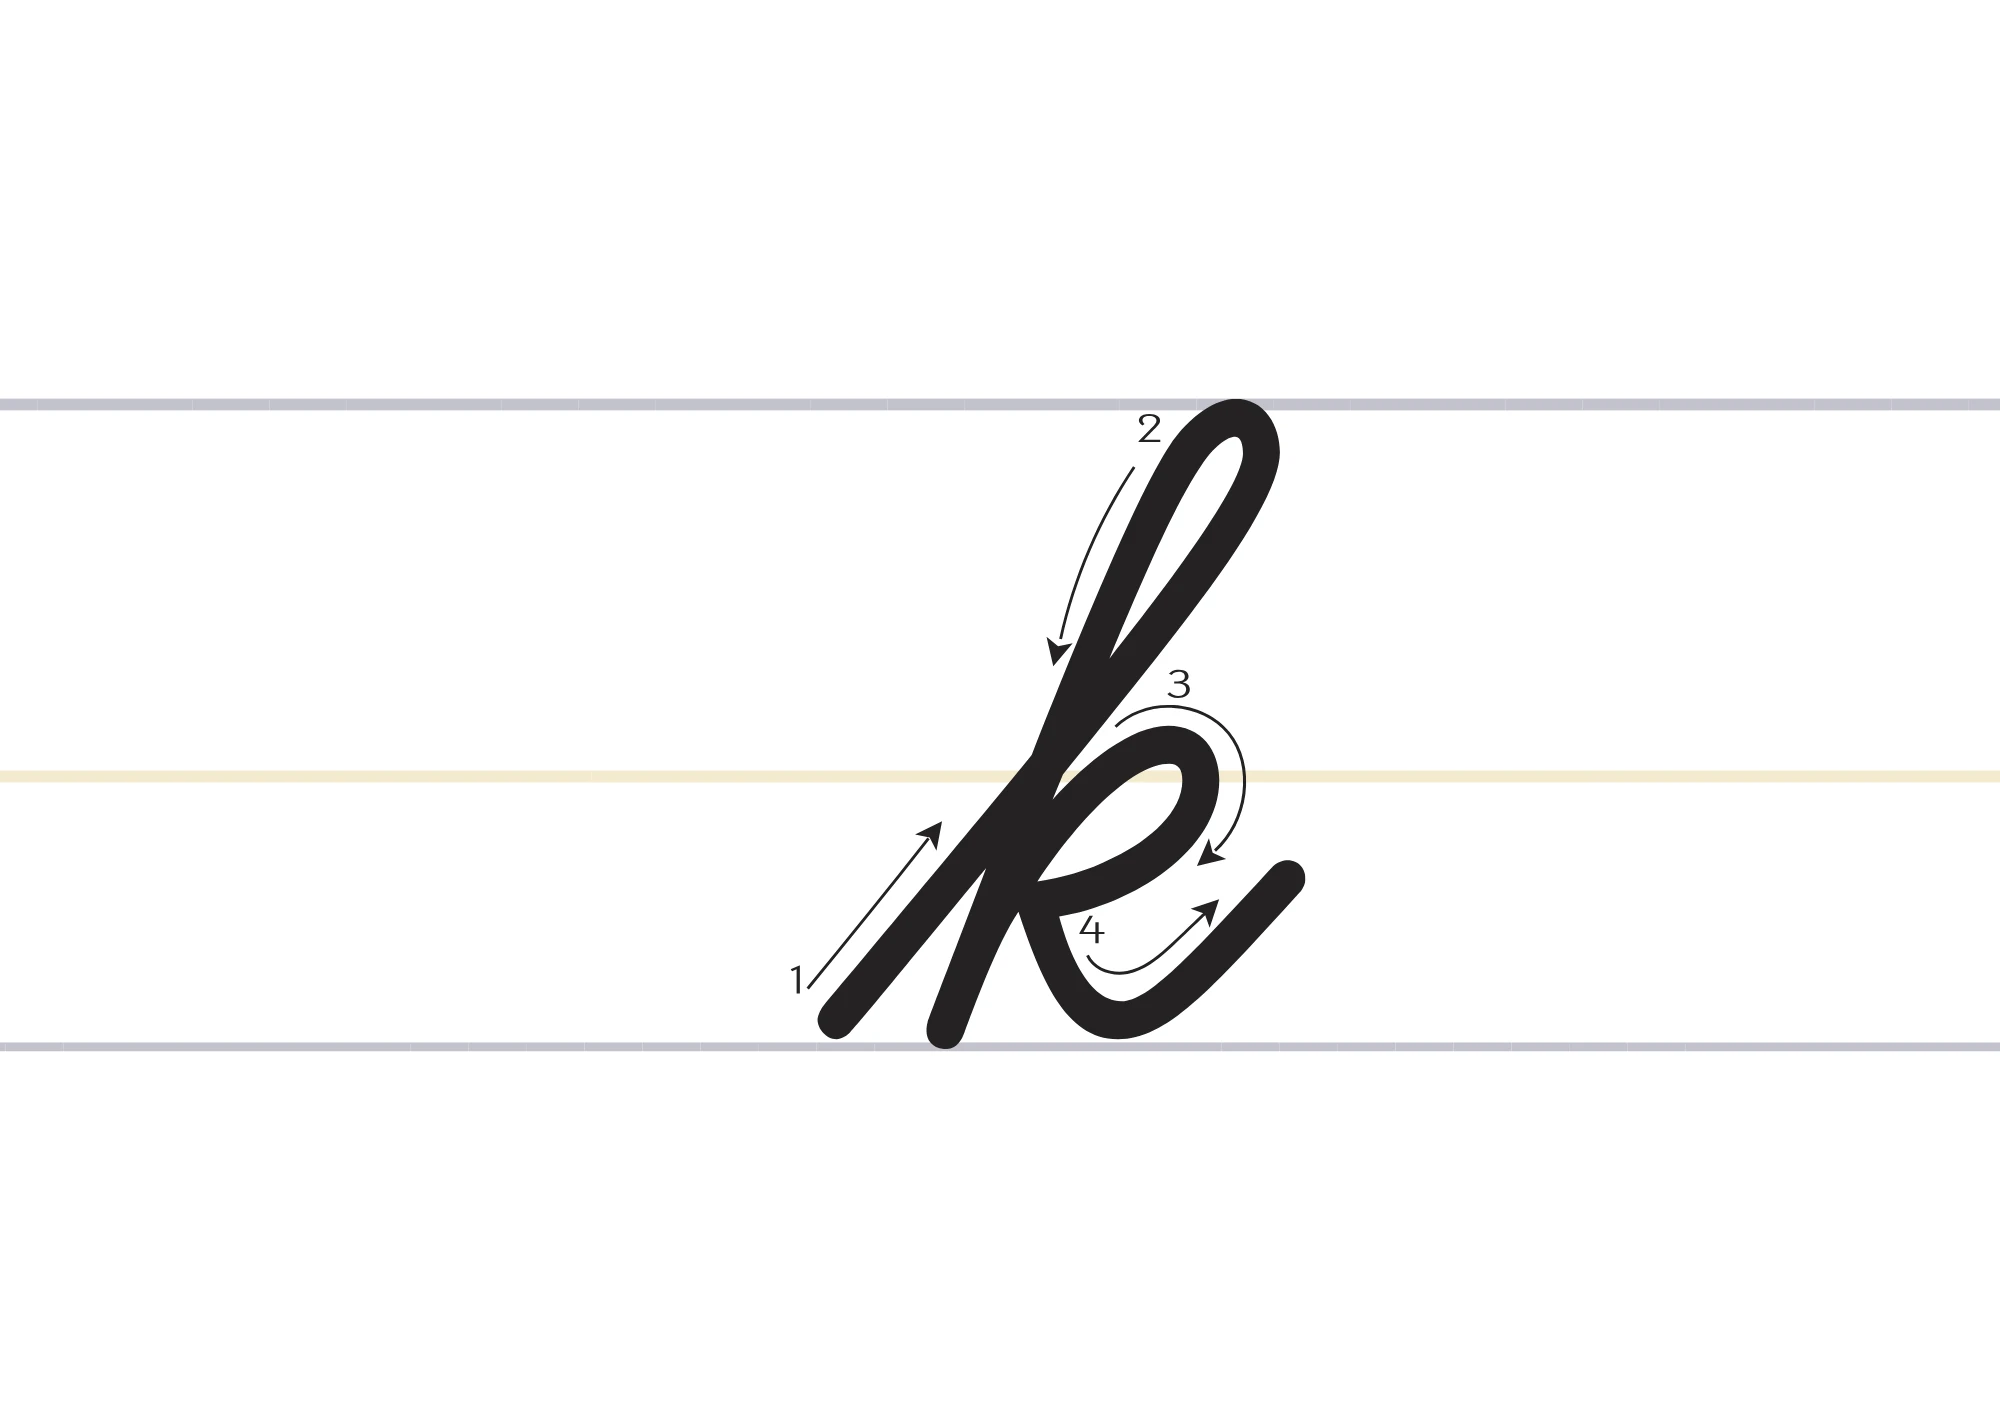
Test small cursive k inside a word, not alone. Write kite, king, and key: if it still looks right between other letters, the loops are the right size.
K Cursive in School Styles: Why the Kick Looks Different
School methods disagree on the kick shape, which is why worksheets for cursive K can look different. Some teach a small, closed loop plus a diagonal leg. Others teach a pointed arm that turns sharply without closing into a loop. Both can be readable, but mixing them in one word makes cursive K inconsistent, so pick one method for at least a week.
This page uses the small loop, which gives a clear center point and turning place. If your class uses the pointed arm, keep it short and consistent.
When Capital K Needs Two Diagonal Arms
Some school and calligraphy models build capital cursive K from two diagonal arms rather than from a loop and a leg. The first diagonal runs from the upper right down to the middle of the stem, and the second runs from that middle point down to the baseline on the right. That version can look more angular, which is why some teachers prefer it for older students.
For everyday writing, the loop version connects more easily. The two arm version needs a careful turn at the middle point, or the join looks like a corner, so practice that turn alone before using it in Kevin or Karen.
Cursive K: How the Kick Collapses Into Print
The most common failure in cursive K is not a bad stem. It is a kick that collapses into print k, when the writer rushes the middle, skips the small loop, and draws two straight strokes meeting at a point. The eye looks for the loop or arm as the mark of cursive.
To stop the collapse in cursive K, slow down where the loop should close: come up, curve out, close the loop, then send the leg down. If it will not close, make it larger for one row, then shrink it back.
Stem Slant and Loop Size: The Two Controls That Decide Readability
Stem slant and loop size decide whether cursive K reads well. Keep slant gentle and consistent, so stem and leg point the same way as the rest of the word. In small cursive k, keep the top loop narrow and closed near the stem, and keep the midline loop smaller still, about half the space between midline and baseline.
Common Mistakes With Cursive K
- Copying the capital for the small form. Starting small k at the top line with a straight stem removes the tall loop that identifies cursive k. Start at the baseline, rise into a loop, and come back down before you make the midline loop.
- Making the midline loop too large. A large middle loop crowds the next letter and makes the leg hard to place. Keep the loop small, closed, and centered at the midline, so the leg has a clean path down.
- Using a pointed arm and a loop in the same word. Mixing the two kick styles makes one word look as if two writers shared it. Choose the loop or the pointed arm, and use that one style for the whole page.
- Letting the kick collapse into print. Two straight strokes meeting at a point are print, not cursive. Slow down at the loop, close it, and only then send the diagonal leg down to the baseline.
- Changing the slant inside one letter. A stem that leans right and a leg that leans left will make the letter look twisted. Keep one gentle slant for the stem, the loop, and the leg.
- Skipping the connector. A letter that ends dead at the baseline cannot join to the next letter. Always finish with a short curve to the right, even at the end of a practice row.
K in Cursive: Joining Into e, i, a, n, and t
Joining is where cursive K earns its keep: the connector after the leg must match the next letter without a second lift. Do not lift between stem and kick, or between kick and next letter.
Practice ke, ki, ka, kn, and kt in real words for cursive k. In ke, keep the connector at mid height, clear of the e loop. In ki, keep it short and dot i after the word. In ka, rise gently into the a oval. In kn, glide into the first n arch. In kt, aim into the t stem and cross t after the word.
Keep the pen down through the whole word, with even spacing about the width of one small oval. Practice in key, kite, kangaroo, kitten, and king.
Words That Start With K in Cursive
Practice these common K words. Read them, trace them, then write them on your own:
Key · Kite · King · Kangaroo · Kitten
Kevin · Karen · Kyle · Katie
Notice how small k behaves in different words: in key, the connector must stay clear of the e loop; in kite, it rises into a tall t; in kangaroo, the a oval must not swallow it; in kitten, the i dot waits until the word is done. Writing words turns a practiced shape into usable handwriting for cursive K.
See any of these words in copyable cursive text with our cursive generator, or go back to the full cursive alphabet chart to pick your next letter.
How to Write Cursive K: 10-Minute Daily Practice Routine
A short daily routine beats one long session for cursive K. Ten focused minutes a day, for a week, is enough to make this letter feel natural.
- Warm-up stems (2 minutes): Draw tall slanted stems in rows, keeping every stem the same height and slant. Do not add loops yet.
- Capital form (2 minutes): Write the capital slowly, checking stem to top line, loop at mid height, and leg right of the stem with a connector.
- Lowercase form (3 minutes): Write the small form in rows, top loop narrow and midline loop small, checking every small k starts at the baseline.
- Words (2 minutes): Write key, kite, king, and kitten slowly, without lifting the pen, and watch how the connector meets the letter after k.
- Quick check (1 minute): Compare your last row with your first row. Are the heights the same? Is the slant steady? Are the loops small and closed?
Repeat the routine tomorrow. The goal is a steadier hand by the end of the week, not a perfect page on day one.
How to Write K in Cursive Without a Second Lift
A second lift is the hidden error in many words with cursive K. The first lift happens when the writer draws the stem, lifts, and then draws the kick as a separate piece. The second lift happens when the writer draws the kick, lifts, and then starts the next letter separately. Either lift turns a cursive word into print letters placed close together.
Practice no lift for cursive K in stages: small k alone, then ke and ka, checking the join is a curve, not a corner, then kangaroo, lifting only to dot an i or cross a t.
Letter K in Cursive for Names and Signatures
Names are where most people first notice their handwriting, because a name is written far more often than any practice word. For a name beginning with cursive K, keep the capital a little larger and more open than in ordinary writing, so it reads better at a glance. Kevin, Karen, Kyle, and Katie all benefit, because the capital carries the name that follows.
For signatures, write the same shape faster and looser, but keep it recognizable: stem visible, loop or arm in place, leg right of the stem. If it becomes a scribble, slow down until stem and leg show again.
Cursive K, Frequently Asked Questions
What does the letter K look like in cursive?
Capital K has a tall slanted stem from top line to baseline, a small loop at mid height right of the stem, and a diagonal leg to the baseline right with a connector. Small k has a tall looped stem rising from baseline to top line and back down, a small loop at the midline, and a diagonal leg to the baseline right with a connector.
What is the difference between capital and lowercase cursive k?
The capital starts at the top line with a straight stem and usually only exits right. The small form starts at the baseline, rises into a tall loop, and joins on both sides. It is smaller overall, its middle loop sits at the midline, and its top loop is the feature the capital lacks.
Why does my cursive k look like print k?
The kick has usually collapsed. When the small loop is skipped, the letter becomes two straight strokes meeting at a point, which is print. Slow down at the midline, close the small loop, and only then send the diagonal leg down to the baseline.
Should the kick be a small loop or a pointed arm?
Both styles are used in schools, so follow the style your class uses and use it consistently. The model on this page uses a small closed loop, because it gives a clear turning point before the leg. A pointed arm can also work, but it must stay short, or it will collide with the next letter.
How do you join cursive k to e, i, a, n, and t?
Keep the pen on the paper and let the connector after the leg flow into the next letter. Keep the join at mid height for e, keep it short for i and dot the i after the word, rise gently into the oval for a, glide into the first arch for n, and aim into the tall stem for t.
Is cursive K hard to learn?
No, it is straightforward once you separate the two forms. Practice the capital stem, loop, and leg on its own, then practice the small looped stem and midline loop, then put them together in short words such as key, kite, and king.
What words can I practice with cursive K?
Start with short, familiar words such as key, kite, king, kangaroo, and kitten, then try names like Kevin, Karen, Kyle, and Katie. Writing your own name is the best motivation, so type it into our cursive generator to see it first.
How do I teach cursive K to a child?
Start with the small form in short words, since it appears more often than the capital. Let the child trace the tall loop, then the midline loop, then the leg, then write the whole letter from memory. Keep sessions short, and praise a steady stem and a closed loop first.
See Your Name in Cursive
Type any name or word and convert it into beautiful cursive text you can copy anywhere, free, with no sign-up.
Open the Cursive Generator