
Home › Cursive Alphabet › Cursive D
Cursive D: How to Write the Letter D in Cursive
Cursive D is a tall letter with two very different forms. In cursive D, the capital form is a large looped shape that fills the full height from the top line to the baseline, and the small form is a small oval with a tall stem that rises to the top line. Learn the oval first, and this letter becomes much easier, because the small form and the capital form both depend on that oval.
Cursive script is a style of handwriting in which the letters of a word are joined together, and cursive D is a good test of the control you built on earlier letters. It rewards a steady slant, a calm hand, and attention to where each stroke starts and stops on the lines.
Trace the Cursive Letter D
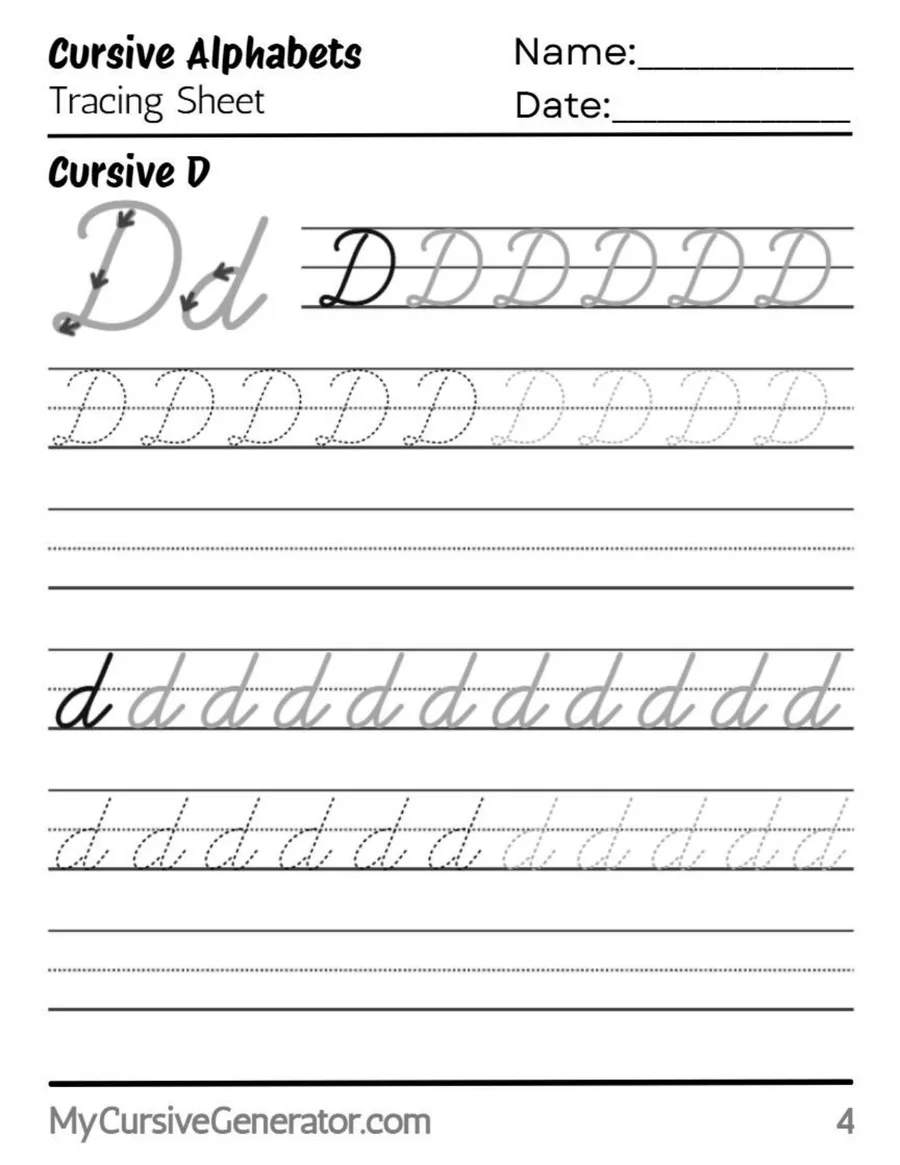
Start with the worksheet before you try cursive D from memory. The sheet shows a large model at the top, then dotted rows to trace, then blank lines for free writing. Trace the small oval first and keep it inside the midline to baseline space. Then trace the tall stem and check that it reaches the top line without going past it. After two traced rows, cover the model and write one row on your own. Compare that row with the model and fix only the worst part, usually the stem. Do not fill a whole page with fast copies of this letter, because a wrong stem repeated many times is harder to fix than a slow, correct stem.
Before You Start
Use lined paper with a clear top line, midline, and baseline. Sit with your paper tilted a little to the left if you write with your right hand, and a little to the right if you write with your left hand. Hold the pencil about two finger widths above the tip and keep your wrist loose. Cursive D belongs with the wave family in its small form, because small d starts like a, c, and o, with an oval, and then adds a tall stem. That link is useful for teaching. If a student can write a steady small a, the next job is only the stem. The capital form is a separate skill, and it is best learned after the small form feels steady, not before it.
What Cursive D Looks Like
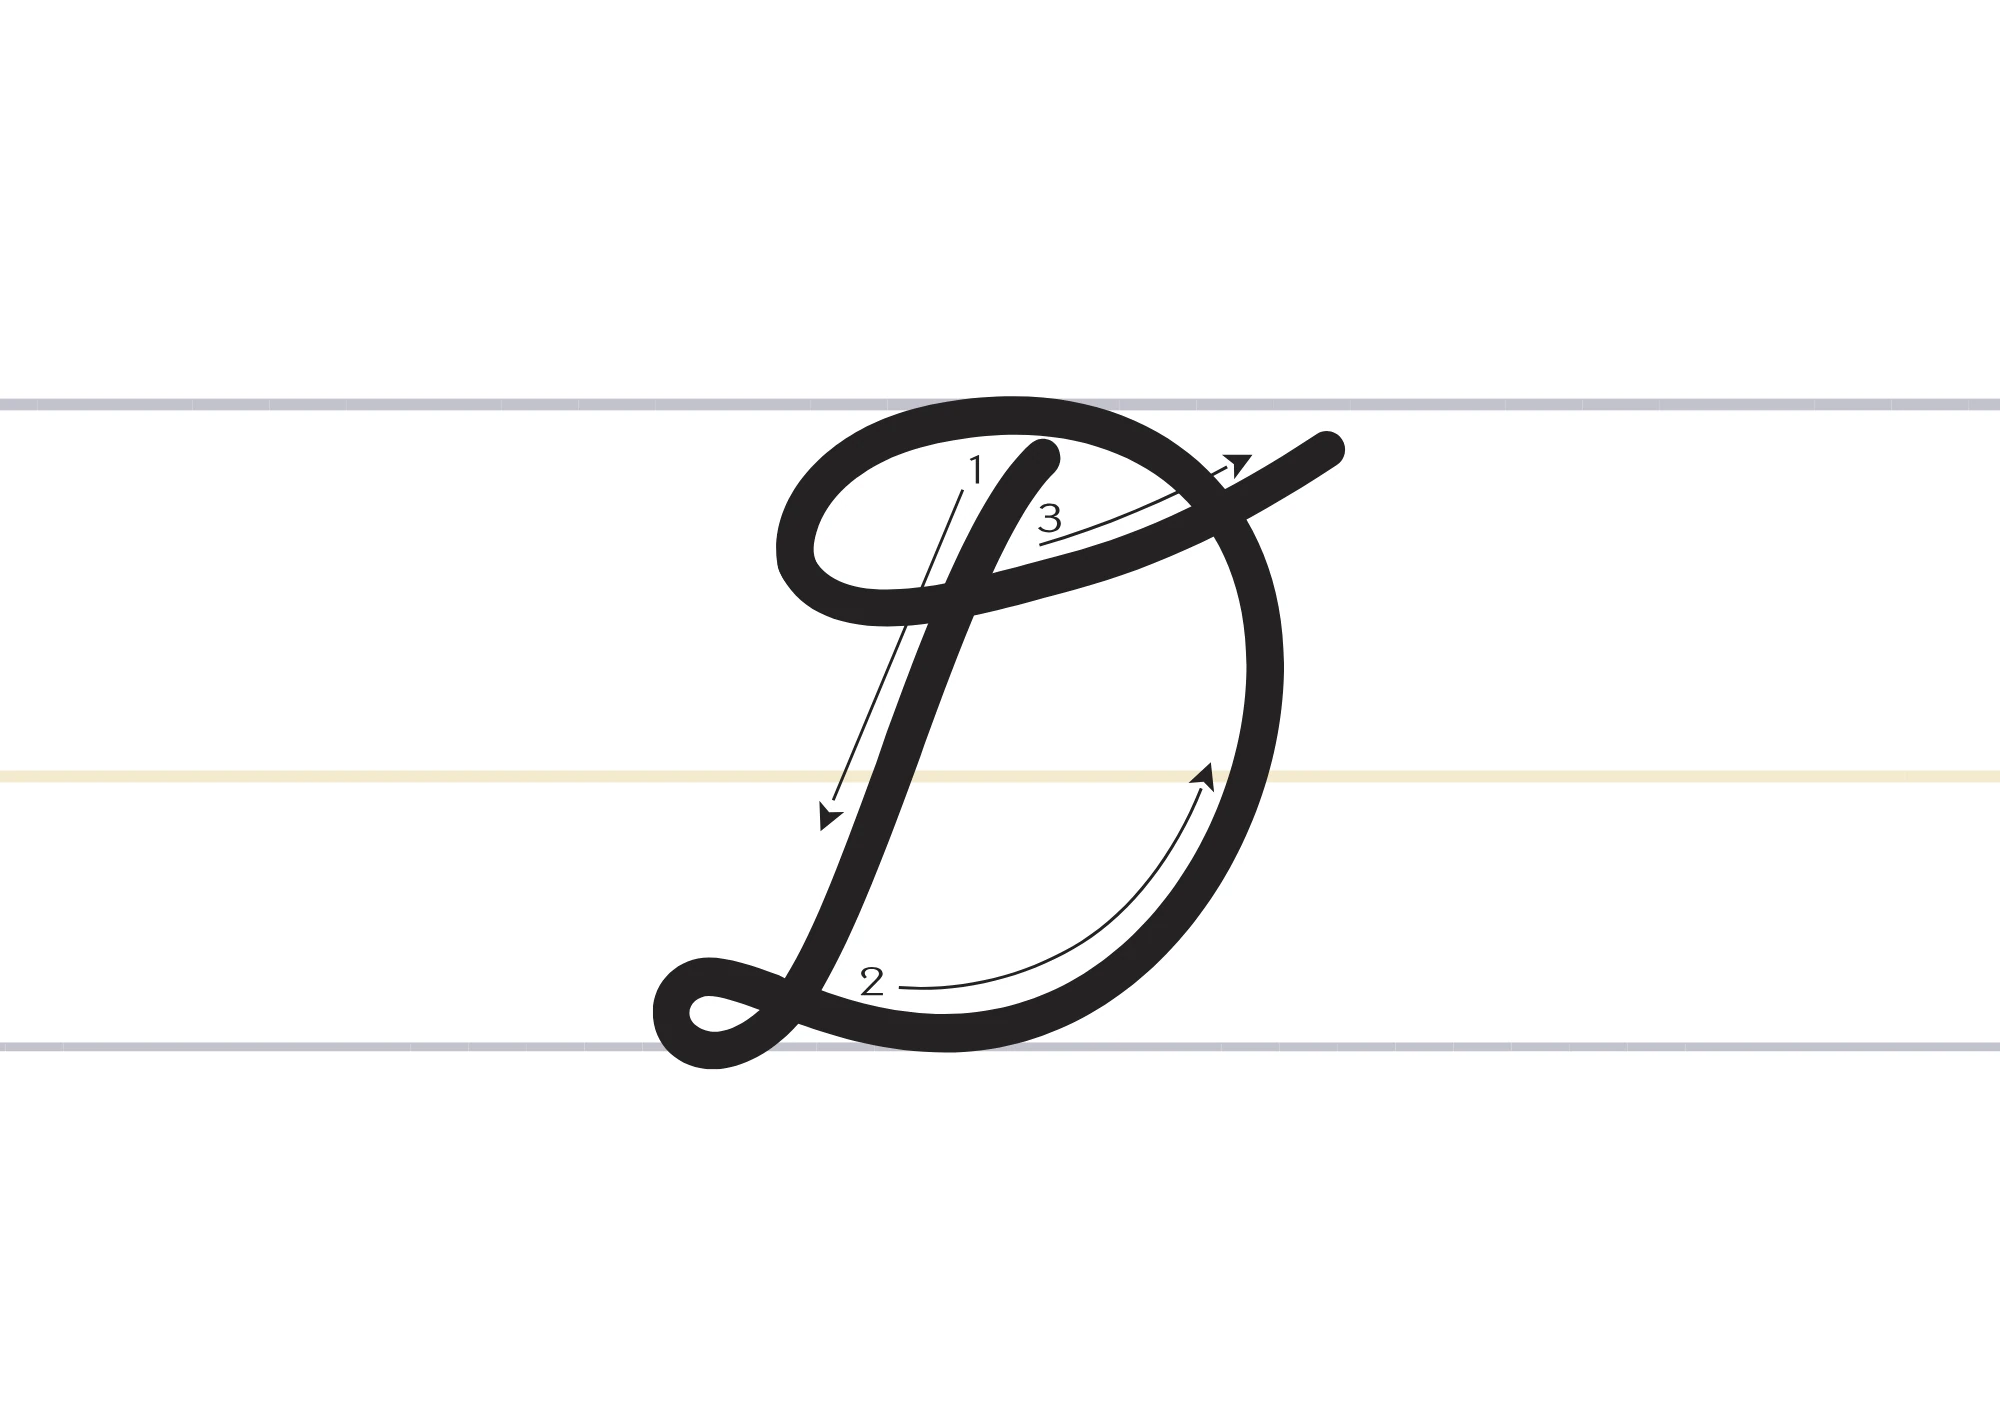
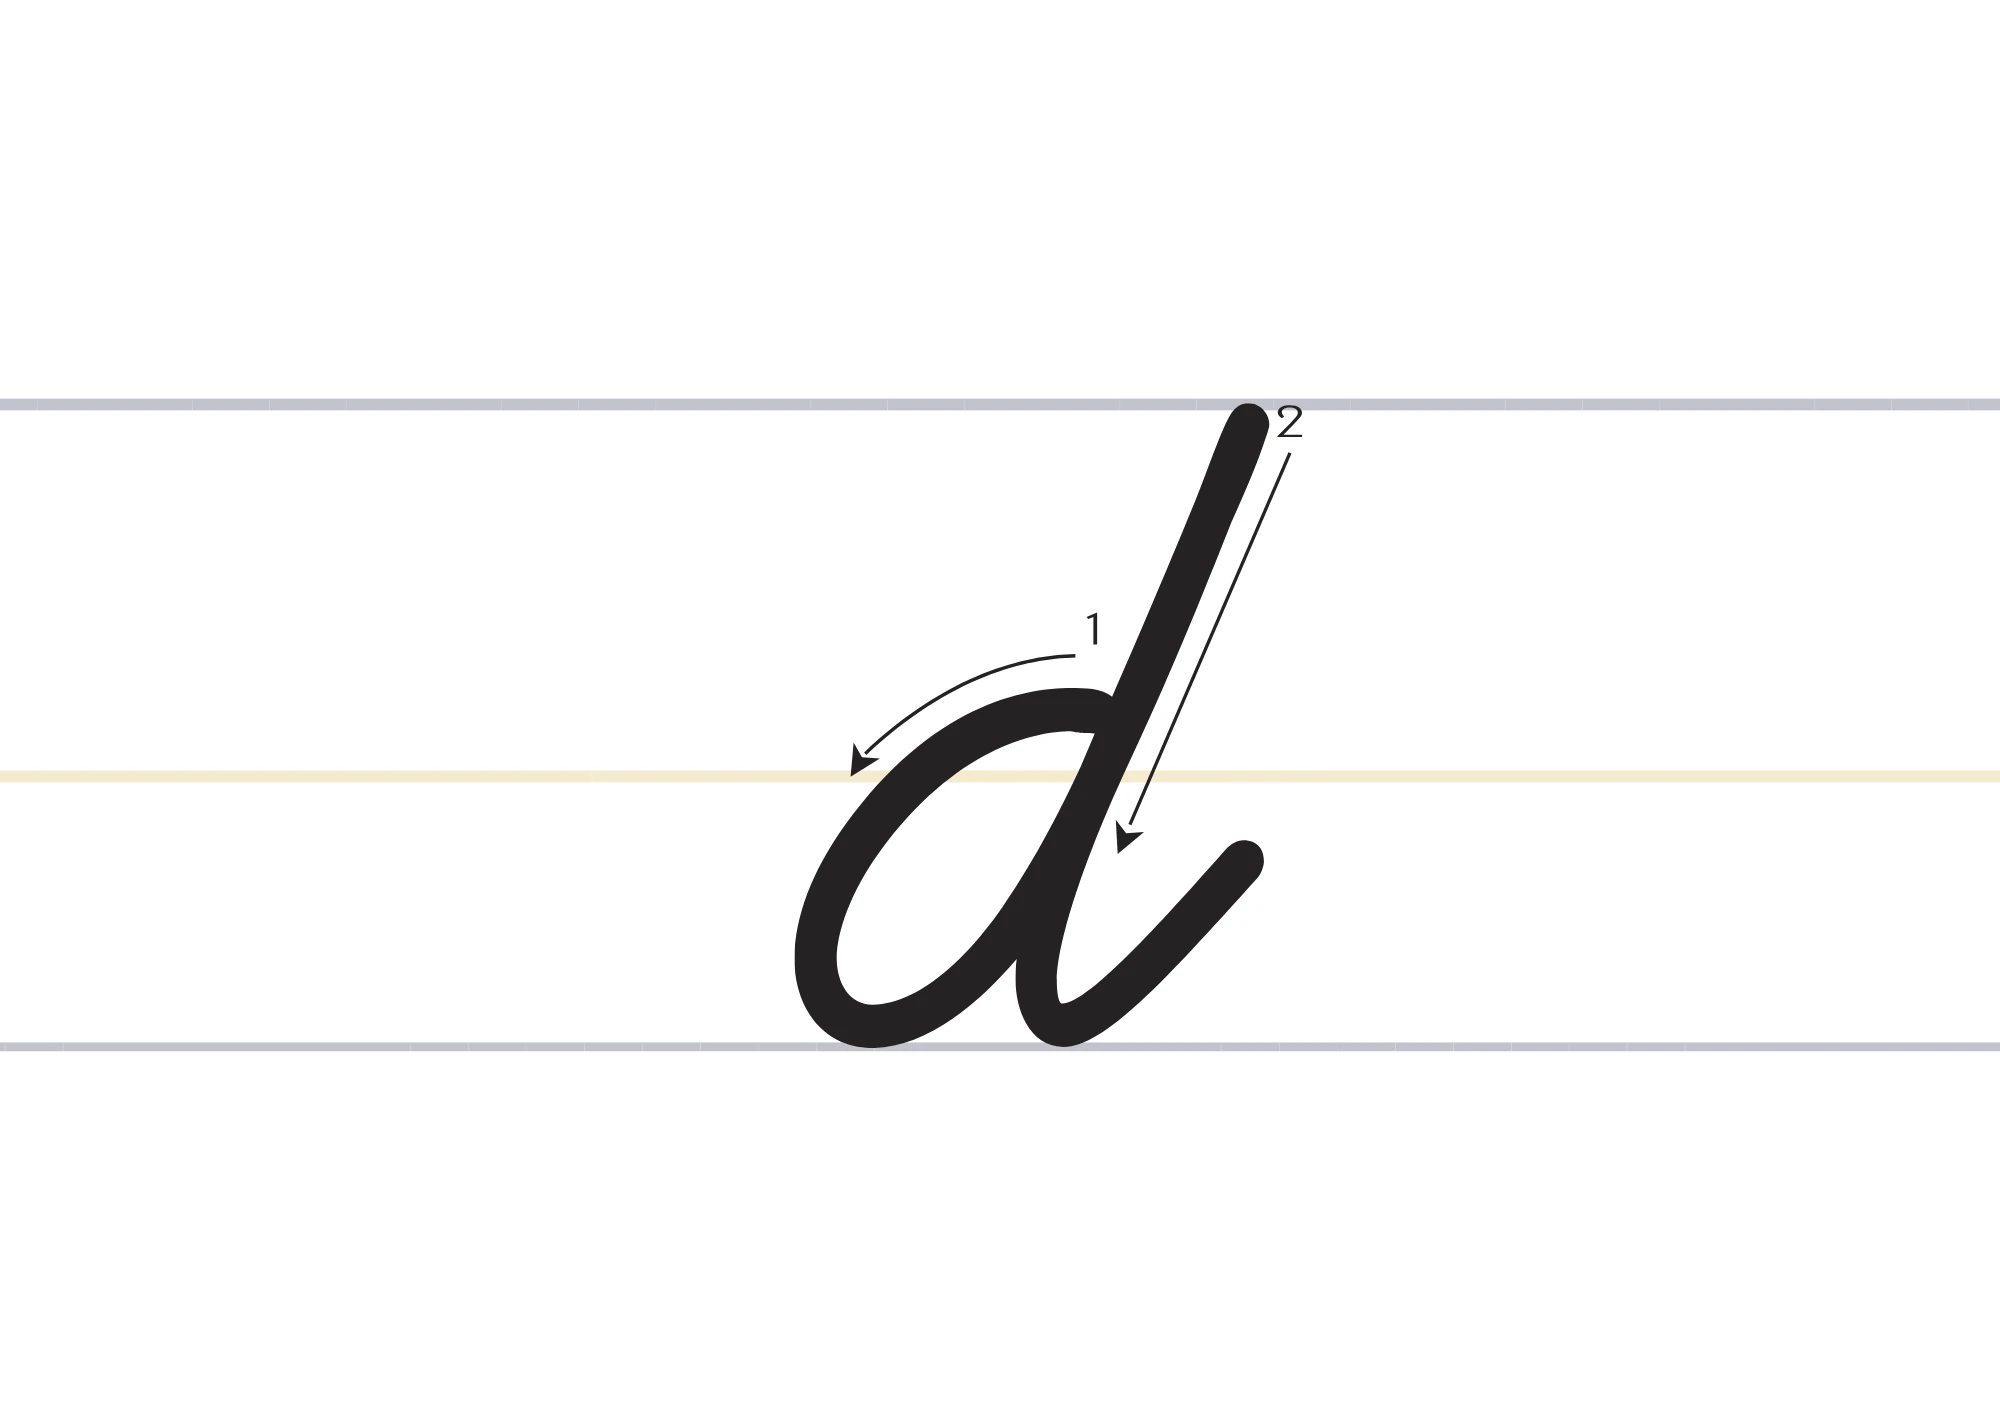
Capital cursive D in the model on this page starts with a tall stem that leans to the right, then sweeps around in a large loop that returns to the baseline, and finishes with a stroke across the top to the right. It fills the full height from the top line to the baseline and is wider than the small form. Small cursive d starts with a small oval between the midline and the baseline, on the left side of the letter, then pulls a tall stem up from the right side of the oval to the top line, then back down to the baseline, and finishes with a short rise to the right. The key feature of small cursive d is that tall stem on the right side of the oval. If that stem is on the left side, the letter reads as b, not d.
How to Write Capital Cursive D
Capital this letter in the model on this page is written in three strokes. The pen lifts between strokes, which is normal for a capital letter. Do not try to force the capital form into one stroke, because the loop will collapse and the top finishing stroke will end up in the wrong place.
Pull the tall stem down
Start at the top line and pull a tall stem down to the baseline, leaning slightly to the right. Keep the stem straight and steady, because it sets the slant for the whole letter.
Sweep the large loop around
From the baseline, sweep up and to the right in a large loop that returns across the top and down to the baseline. Keep the loop wide and even, so the capital form does not look pinched at the top or flat at the bottom.
Finish across the top
Finish with a stroke across the top to the right, ending above the baseline height of the loop. This finishing stroke gives capital cursive D its open, readable top and prepares the hand to start the next letter separately.
How to Write Lowercase Cursive d
Small cursive d is the form you will use most often, because it appears inside almost every word that contains d. It is written in two main motions, an oval and a tall stem, and the step cards below break the stem motion into its rise and its return so you can check each part.
Draw the small oval
Start at the midline and draw a small oval down to the baseline and back up to the midline, on the left side of the letter. Keep the oval closed and inside the midline to baseline space.
Pull the tall stem up
From the right side of the oval, pull a tall stem up to the top line. Keep the stem on the right side of the oval, because a stem on the left side turns cursive d into cursive b.
Return to the baseline and rise
Bring the stem back down to the baseline, close it against the oval, and finish with a short rise to the right. That rise is the exit into the next letter, so do not skip it or make it too long.
How to Write Cursive D: 10-Minute Daily Practice Routine
Ten minutes a day is enough for cursive D if you split the time between the oval and the stem. Most students need more time on the stem than on the oval, because the stem is what makes this letter readable.
- Warm up for two minutes: draw small ovals between the midline and the baseline, five in a row, all the same size.
- Practice the stem for three minutes: write small d slowly and check that every stem reaches the top line and stays on the right side of the oval.
- Join for three minutes: write da, de, di, do, du, and dr, one pair at a time, and check that the exit from cursive D stays level.
- Write words for two minutes: write Dog, Duck, and Door slowly, then read them back and fix only the worst letter in each word.
Words That Start With D in Cursive
Practice cursive D with short, familiar words first, so you can focus on the oval and the stem instead of the spelling. Say each word as you write it, and pause after the first letter to check the stem before you finish the word.
Dog · Duck · Door · Doll · Drum · Daisy
Daniel · Daisy · David · Diana · Derek · Delia
Names are useful for cursive D because the capital form appears at the start, where it is easy to see. Write Daniel and David in a column and compare the capital forms. If one capital is wider than the other, the loop changed, not the letter itself. For small cursive d in the middle of a word, use words like garden, today, and under, because the entry into d from another letter is different from the entry at the start of a word, and the tall stem must still reach the top line.
Common Mistakes With Cursive D
- Putting the stem on the wrong side. A stem on the left side of the oval makes cursive d look like cursive b. Always build the oval first, then pull the stem up from the right side of that oval.
- Making the oval too tall. If the small oval rises above the midline, small d looks like a tall letter in the middle of a word. Keep the oval inside the midline to baseline space.
- Stopping the stem short of the top line. A short stem makes small cursive d look like small a. Pull the stem all the way to the top line on every row.
- Drawing cursive D like printed D. A printed D is made of separate straight lines with no join. In cursive D, the small form ends with a rise that joins to the next letter, and that rise is part of the letter.
- Changing the slant halfway through. A steady, slight slant to the right makes cursive D look neat. A slant that changes inside one letter makes the whole word look shaky.
- Skipping the exit rise. The rise at the baseline is what connects cursive d to the next letter. Skipping it breaks the flow of the word and turns cursive back into print.
How to Join D Cursive Letters
Small cursive d joins from a short rise at the baseline, on the right side of the letter. That rise is low and level, which makes it easy to lead into most small letters. The pairs da, de, di, do, du, and dr are the best first practice, because each one tests a different entry height in the next letter. Into a and o, keep the rise level and let the next oval start at the midline. Into e, keep the rise short so the small loop of e does not start too high. Into i, use a short connector and add the dot only after you finish the whole word. Capital this letter usually starts a word, so it does not join from the left. Write the capital, lift the pen, and start the next letter separately, unless your teacher uses a connected capital model.
Joining cursive D to the next letter
Into tall letters, the rule is simple: finish small d at the baseline, then rise into the tall stem of the next letter without a kink. Into l, t, and h, the rise should be smooth and the tall stem should start at the same slant as the d stem. If the rise is too steep, the next tall letter will lean too far to the right. If the rise is too flat, the next tall letter will start too low and look separate. Practice dr and do first, because r and o show the difference between a low entry and a midline entry very clearly. Once those pairs feel steady, add da and de, which need a tighter, smaller entry.
How to Write D in Cursive: Practice Sentences
Sentences teach spacing and stamina, which single letters cannot teach. Write each sentence three times: once very slowly, once at a normal pace, and once without stopping.
Daniel drew a duck by the door.
Daisy danced with a doll at dawn.
The dog dug a deep ditch.
We practice cursive D with dog and duck every day.
Read each sentence back and check three things: is every small oval inside the midline to baseline space, does every tall stem reach the top line, and does the stem stay on the right side of the oval? Circle the best sentence in each set of three and try to beat it next time.
Letter D in Cursive for Names and Signatures
For a first name that starts with cursive D, keep the capital a little larger and more open than in ordinary writing, because it reads better at a glance and gives the name a clear start. The rest of the name should stay at normal small letter size. For a signature, the same capital can be written faster and looser, but the large loop must stay visible and the top finishing stroke must stay in place. If a signature becomes a scribble, slow it down until the loop is visible again, then build speed back up. Names like Daniel, Daisy, and David are good signature practice because they pair a clear capital this letter with simple small letters after it.
Teaching Cursive D to a Child
Teach small cursive d before capital cursive D, because the small form appears in almost every word and pays off right away. Let the child trace the oval first, then add the stem, then write the whole letter from memory. Keep sessions short, ten minutes a day, and praise the stem on the right side before you correct anything else. A useful check is to write d and b side by side and ask which one has the stem on the right. That one question teaches the key rule of cursive D faster than a long list of rules. For a child who writes with the left hand, tilt the paper a little to the right and move the paper, not just the hand, as the line goes on, so the hand does not cover the part of the letter that still needs checking.
Cursive D, Frequently Asked Questions
What does cursive D look like?
Capital this letter is a tall looped shape from the top line to the baseline, with a finishing stroke across the top. Small cursive d is a small oval between the midline and the baseline, with a tall stem on the right side that rises to the top line.
How do you write small cursive d?
Draw a small oval between the midline and the baseline, pull a tall stem up from the right side of the oval to the top line, bring it back down to the baseline, and finish with a short rise to the right into the next letter.
Why does my cursive d look like a b?
Your stem is on the wrong side of the oval. Build the oval first, then pull the stem up from the right side. A stem on the left side reads as b.
How do you join cursive D to the next letter?
Small cursive d joins from a short rise at the baseline. Practice da, de, di, do, du, and dr first. Capital cursive D usually starts a word, so write it, lift the pen, and start the next letter separately.
Should I learn capital or small cursive D first?
Learn small cursive d first, because it appears inside words far more often. Once the oval and the stem feel easy, the capital form takes only a short session, because it uses the same loop idea at a larger size.
What words can I practice with cursive D?
Start with Dog, Duck, Door, and Doll, then try names like Daniel, Daisy, and David. For d in the middle of a word, try garden, today, and under.
How do I teach cursive D to a child?
Start with the small form, trace the oval, add the stem, then write it from memory. Keep sessions to ten minutes and praise the stem on the right side first. Compare d and b side by side to teach the key rule.
See Your Name in Cursive
Type any name or word and convert it into beautiful cursive text you can copy anywhere, free, with no sign-up.
Open the Cursive Generator