
Home › Cursive Alphabet › Cursive O
Cursive O: How to Write the Letter O in Cursive
Cursive O is a closed oval, and that one fact explains almost every mistake people make with it. The capital cursive O fills the full height from the top line to the baseline, while the lowercase cursive o sits only between the midline and the baseline, yet both forms use the same counterclockwise oval motion. Learn that oval once, at the right size, and the rest of cursive O becomes a question of where you start it, where you close it, and where you leave it.
Cursive script is a style of handwriting in which the letters of a word are joined together, and cursive O is a useful test of that idea because it is one of the few letters that is almost closed. A printed O is a circle that never opens. A cursive O closes too, but it must still hand the pen over to the next letter, so the closing point matters as much as the oval itself. If the oval closes in the wrong place, the next letter has nowhere clean to start, and the word looks broken even when every letter is spelled right.
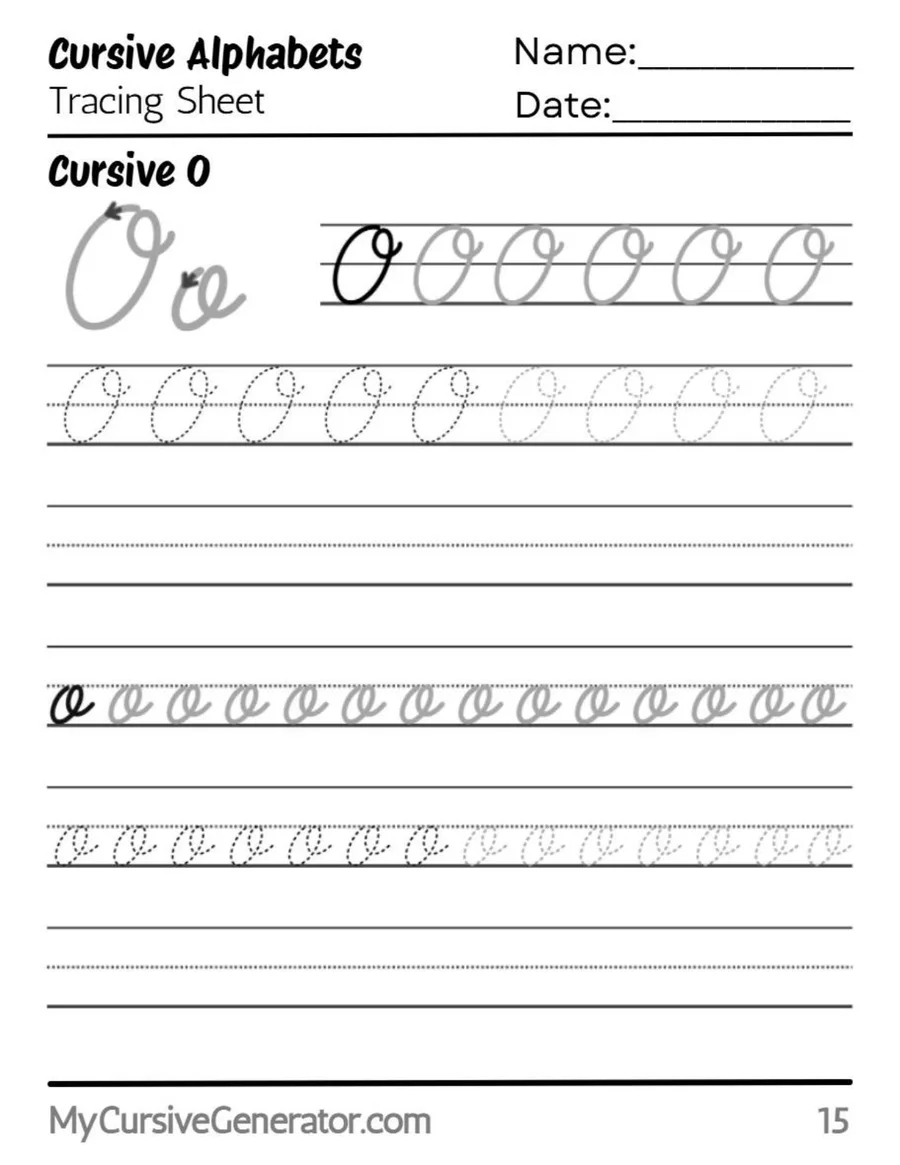
Trace the Cursive Letter O
Trace the large capital oval first, slowly, then trace the small lowercase oval in the same motion, inside the midline and the baseline. The motion is the same. Only the size and starting height change. Teachers often teach cursive O with a, c, d, g, and q, because they share this oval.
Use the worksheet in three passes: trace, copy without tracing, then write short words such as on, ox, and open from memory. If an oval floats above the baseline, trace one more row. A closed, level oval is the goal in the first week, and speed follows it.
The Anatomy of Cursive O
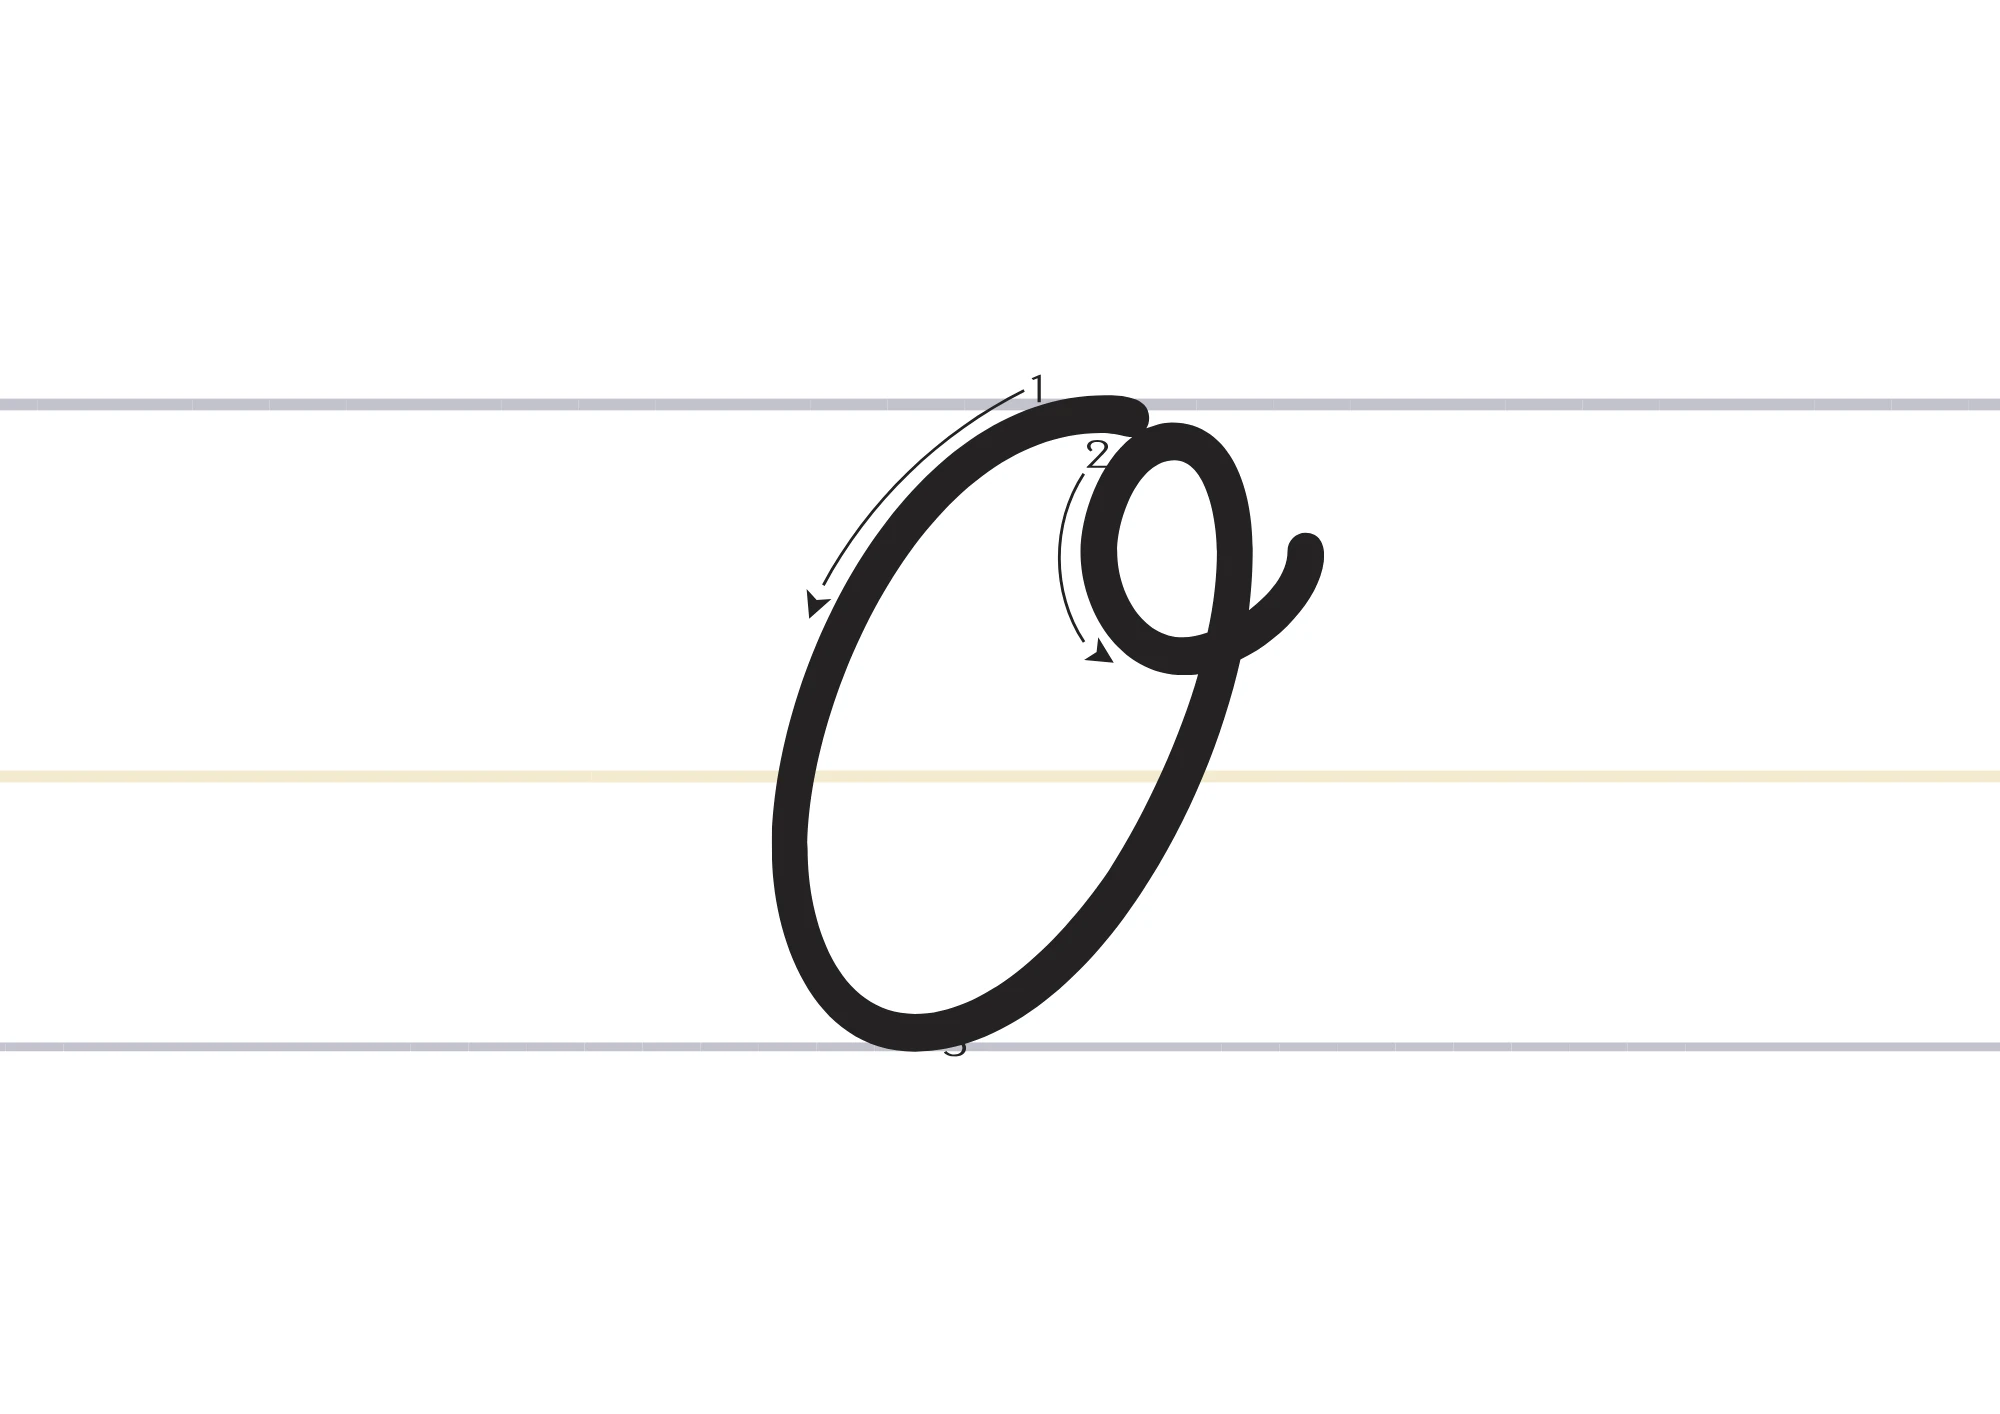
Check four points. Height: capital O touches the top line and the baseline, lowercase o touches the midline and the baseline. Width: the oval is a little narrower than it is tall, leaning slightly right, not a circle and not a thin egg. Direction: counterclockwise, up the left side first, around the top, down the right side, back to the start. Closing point: lowercase o returns to the top and leaves right with a short connector, capital O closes near the top with a short stroke at the top right.
A printed O is a circle with no entry and no exit. A cursive O always has an entry point and a closing point. In D’Nealian cursive, lowercase o is entered from the baseline with a short undercurve, the same entry used for a, c, d, and g, so a word such as good can be written without lifting the pen.
Cursive O and the Oval Family
Cursive O belongs to the oval family. Letters a, c, d, g, o, and q all start with the same counterclockwise oval and differ only after it. Lowercase a adds a stem on the right, c stops before closing, d adds a tall stem, g and q add descenders, and o adds only a short connector at the top. If an o looks like a, a stem was added by mistake. If it looks like c, it was left open. If it looks like q, a descender crept in.
Practice the family together: write a row of small ovals, turn every second oval into an a by adding a stem, and every fourth oval into a c by stopping early. That drill teaches the hand to decide at the closing point. In October, the capital O must be clearly larger than the letters after it. In moon, the two small ovals must match in size and slant.
Before You Start
Sit with both feet flat and the paper tilted slightly to the left if you write with your right hand, and slightly to the right if you write with your left hand. Hold the pencil loosely, about two finger widths above the tip, because a tight grip makes a closed oval shaky and lopsided. Use a soft pencil or a smooth pen, and keep your wrist relaxed. Cursive O is a good test of grip, because a tight hand cannot make a smooth counterclockwise curve. If your ovals come out pointed at the top, loosen your grip before you change anything else.
How to Write Capital Cursive O
Capital cursive O is one continuous stroke. Do not lift the pen until the oval is closed and the finishing stroke at the top right is done. The letter should fill the full height, and it should lean slightly to the right, the same slant as the rest of your cursive alphabet. Work through the three phases below in order, and keep the pen moving slowly through the whole oval rather than rushing the left side and stalling on the right.
Enter and Rise on the Left
Start just below the top line, slightly to the right of where the oval will center, and sweep up and to the left to touch the top line. Then curve down the left side toward the baseline. This left side sets the height and the slant of the whole letter, so keep it smooth and do not let it lean back to the left.
Round the Bottom and Climb the Right
Round the bottom of the oval at the baseline, without flattening it, and climb the right side back up toward the top line. Keep the width steady. If the right side bulges out, the oval becomes a circle. If it pulls in, the oval becomes an egg. Aim for a tall oval that is a little narrower than it is tall.
Close at the Top and Leave a Short Connector
Close the oval near the top, close to where you started, and finish with a small loop or short stroke at the top right. That finishing stroke is what the next letter connects from. In many school models, capital O does not connect with a baseline tail like lowercase letters do. It hands over from the top, and the next lowercase letter simply starts beside it.
How to Write Lowercase Cursive o
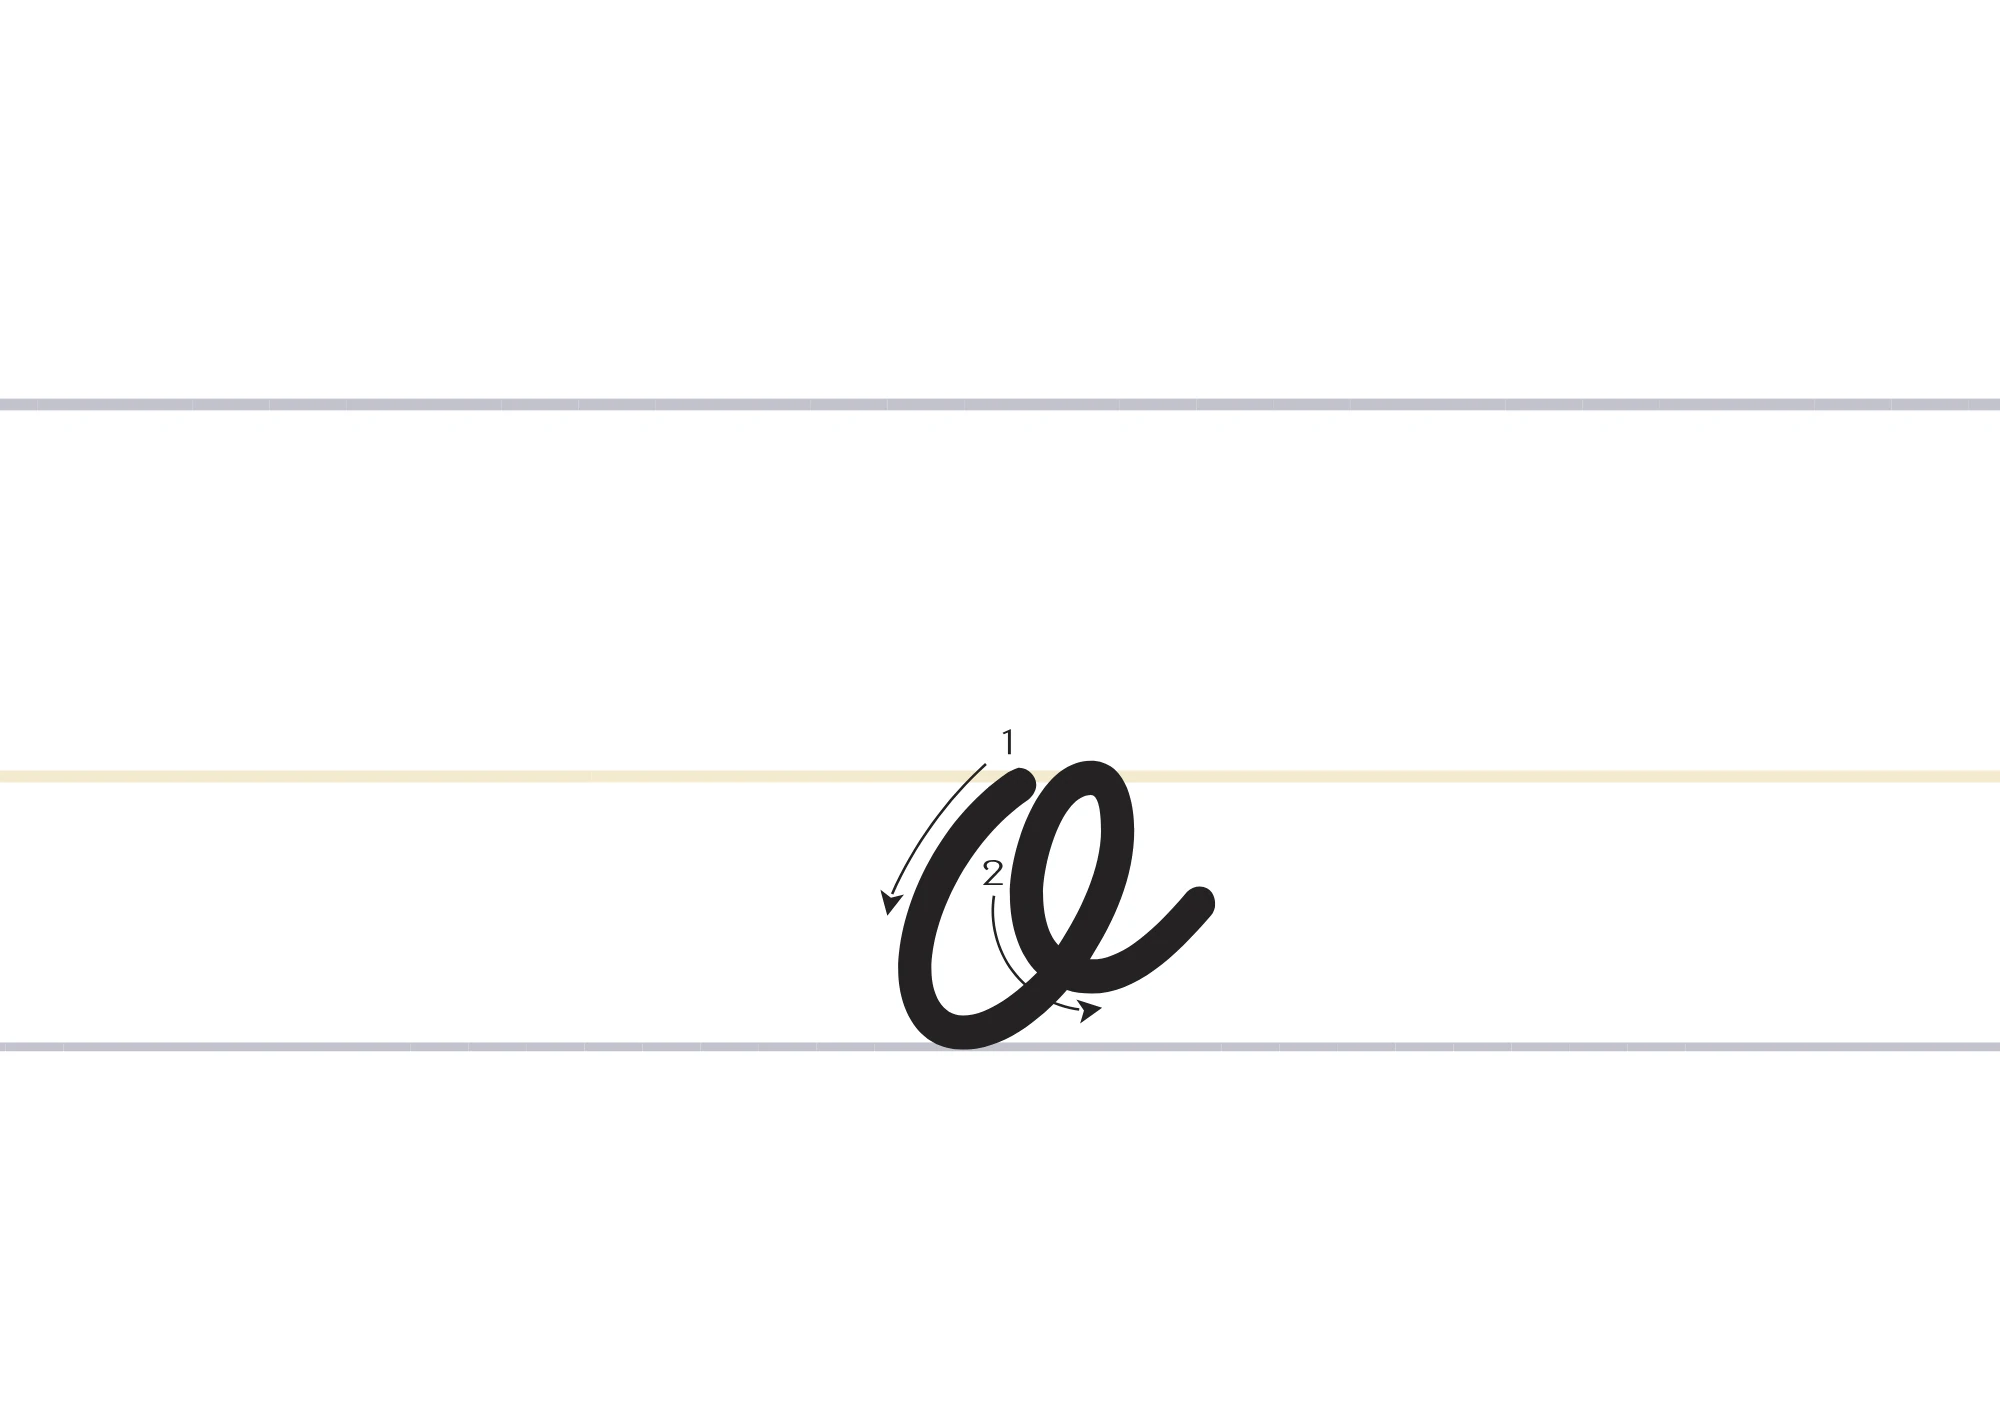
Lowercase cursive o appears in almost every English word, from on and to to look, book, and good. It is much smaller than the capital and must stay inside its lines. The most common error is closing the oval too early, before the stroke returns to the top, which breaks the join.
Enter from the Baseline
Start at the baseline with a short undercurve that rises to the midline. This entry is the same undercurve used for a, c, and d, and it gives the pen a running start into the oval. Do not start at the midline with a straight drop. The undercurve is what makes the letter join cleanly to the letter before it.
Make the Small Counterclockwise Oval
From the midline, curve left and down, round the bottom at the baseline, and climb the right side back to the midline. Keep the oval closed and round, and keep it the same size as your other small letters. A small o that rises above the midline looks like a capital, and a small o that sinks below the baseline looks like a descender.
Close at the Top and Connect to the Right
Close the oval at the top, near the midline, and leave with a short connector to the right at about midline height. That connector is the bridge into the next letter. Into a vowel such as u or e, keep it short and level. Into a tall letter such as l or t, let it rise slightly so the tall stem starts cleanly without a kink.
How to Write Cursive O: 10-Minute Daily Practice Routine
A short daily routine beats one long session. Ten focused minutes a day, for a week, is enough to make cursive O feel natural. Use a lined notebook and keep the pen moving slowly.
- Warm-up ovals (2 minutes): draw large and small ovals at a steady height, width, and slant.
- Capital form (2 minutes): write capital O slowly and check the top close and top right finish.
- Lowercase form (3 minutes): write small ovals inside the midline and the baseline.
- Words (2 minutes): write on, open, and moon slowly, without lifting the pen.
- Quick check (1 minute): compare your last row with your first. Are the ovals the same size and slant, and does every o close at the top?
Repeat the routine tomorrow. The goal is a steadier hand by the end of the week, not a perfect page on day one.
Words That Start With O in Cursive
Practice these common O words. Read them, trace them, then write them on your own:
Ocean · Octopus · Owl · Orange · Olive · Ostrich
Olivia · Oliver · Owen · Oscar · Opal · Omar
Ocean tests capital O into c, which must not close into an o. Olive tests capital O into l, where the connector must rise to the tall stem. Inside words, look, book, good, moon, and room all depend on a small, level lowercase o.
Common Mistakes With Cursive O
- Lowercase o floats above the baseline. It must sit on the baseline. Check the bottom of every oval first.
- Closing the oval too early. A half closed oval has no clean exit at the top, so the next letter starts with a gap. Finish the full oval first.
- Capital O the same size as lowercase o. Capital O must fill the full height, or it does not signal a name or a sentence start.
- A perfect circle instead of a tall oval. A circle is too wide and crowds the next letter. A cursive oval is taller than it is wide.
- Mixing D’Nealian and Zaner-Bloser shapes. Pick one model for a whole assignment. Switching midword makes one letter look like two.
- Lowercase o looks like a. A stem on the right, added by habit, causes this. Keep the right side clean and close only at the top.
How to Join O Cursive Letters
Capital O does not join from the baseline like most lowercase letters do. It closes near the top and finishes with a short stroke at the top right, and the next lowercase letter starts beside it. Do not force a baseline connector out of a capital O. It will distort the oval.
Lowercase o joins from the top, at about midline height. Into a vowel, keep the connector short and level. Into n or m, glide slightly down into the first arch. Into another o, as in moon, keep it very short, or the ovals merge. Into l or t, lift it slightly. Into e, keep it at mid height.
Close the oval fully before you leave it, and keep the spacing even, about one small oval width between o and the next letter. Practice oa, oe, oi, on, ol, and oo daily.
Why Cursive O Looks Like a in Fast Writing
When writers speed up, lowercase o often drifts toward a because the hand adds a stem on the right without thinking. Practice o and a in alternating rows and check the right side after each pair. The o row should have no stem. The a row should have a clear stem down the right side.
The opposite drift also happens: fear of making an a leaves o open, so it looks like c. Practice o and c in alternating rows. The o row closes at the top. The c row stops before it closes.
How to Write O in Cursive: Practice Sentences
Single letters are only half the skill, because sentences teach spacing, rhythm, and stamina. Try each sentence three times: once very slowly, once at a normal pace, and once without stopping.
Olivia opened an orange box.
Oscar saw an owl over the ocean.
The moon rose over the open road.
We practice cursive o with on and open every day.
Read each sentence back and check the ovals, the slant, and the height. In the third sentence, check the double o in moon first.
Letter O in Cursive for Names and Signatures
For a first name that begins with O, keep the capital a little larger and more open than in ordinary writing, so it reads at a glance. The rest of the name should stay at normal size. Olivia, Oliver, Owen, and Oscar all need an unmistakable capital O.
For signatures, the same oval can be faster and looser, but it must stay closed, with the top right finishing stroke visible. An opened signature O looks like a C, and a flattened one looks like a zero.
Cursive O in D’Nealian and Zaner-Bloser
Most US classrooms teach either D’Nealian or Zaner-Bloser cursive, and for O the visible difference is in the entry and the roundness of the oval. D’Nealian lowercase o enters from the baseline with an undercurve and stays rounded and slanted. Zaner-Bloser o is often rounder and can start higher. Neither model is wrong, but mixing them in one word makes the same letter look inconsistent. Match the model on your school worksheet, and use this page in that model only.
Cursive O, Frequently Asked Questions
What does the letter O look like in cursive?
Capital cursive O is a large counterclockwise oval from the top line to the baseline, closed near the top. Lowercase cursive o is the same oval between the midline and the baseline, closed at the top with a short connector to the right.
Is cursive O hard to learn?
No, it is a single oval motion. The hard part is keeping the size consistent and closing at the right point for a clean join.
How do you join cursive O to the next letter?
Lowercase o joins from the top at about midline height. Capital O finishes at the top right, and the next letter starts beside it.
What words can I practice with cursive O?
Start with on, ox, and open, then Ocean, Octopus, and Owl. Inside words, practice look, book, good, moon, and room.
Should I learn the capital or the lowercase form first?
Start with the lowercase form. It appears in almost every word. The capital uses the same motion at a larger size.
Why does my letter O look like a or c?
If it looks like a, a stem crept onto the right side. If it looks like c, the oval was left open. A correct lowercase o closes at the top, with no stem and no opening.
How do I teach cursive O to a child?
Start with large ovals in the air, then on paper. Trace first, then copy, then write from memory. Keep sessions short.
What is the difference between cursive O and print O?
A print O is a closed circle with no entry and no exit. A cursive O is an oval with an entry point and a closing point that hands over to the next letter.
See Your Name in Cursive
Type any name or word and convert it into beautiful cursive text you can copy anywhere, free, with no sign-up.
Open the Cursive Generator