
Home › Cursive Alphabet › Cursive W
Cursive W: How to Write the Letter W in Cursive
Cursive W is a wide, rhythmic letter. The capital form starts with a small entry loop, then rolls through two low valleys to the top line. The small form stays between the midline and the baseline, with two low points that both touch the baseline. Learn the rhythm first, and the shape will follow.
Cursive script is a style of handwriting in which the letters of a word are joined together. In that style, cursive W is a rhythm letter. It is one flowing motion, repeated up and down, and even spacing in that motion is what makes a whole word easy to read.
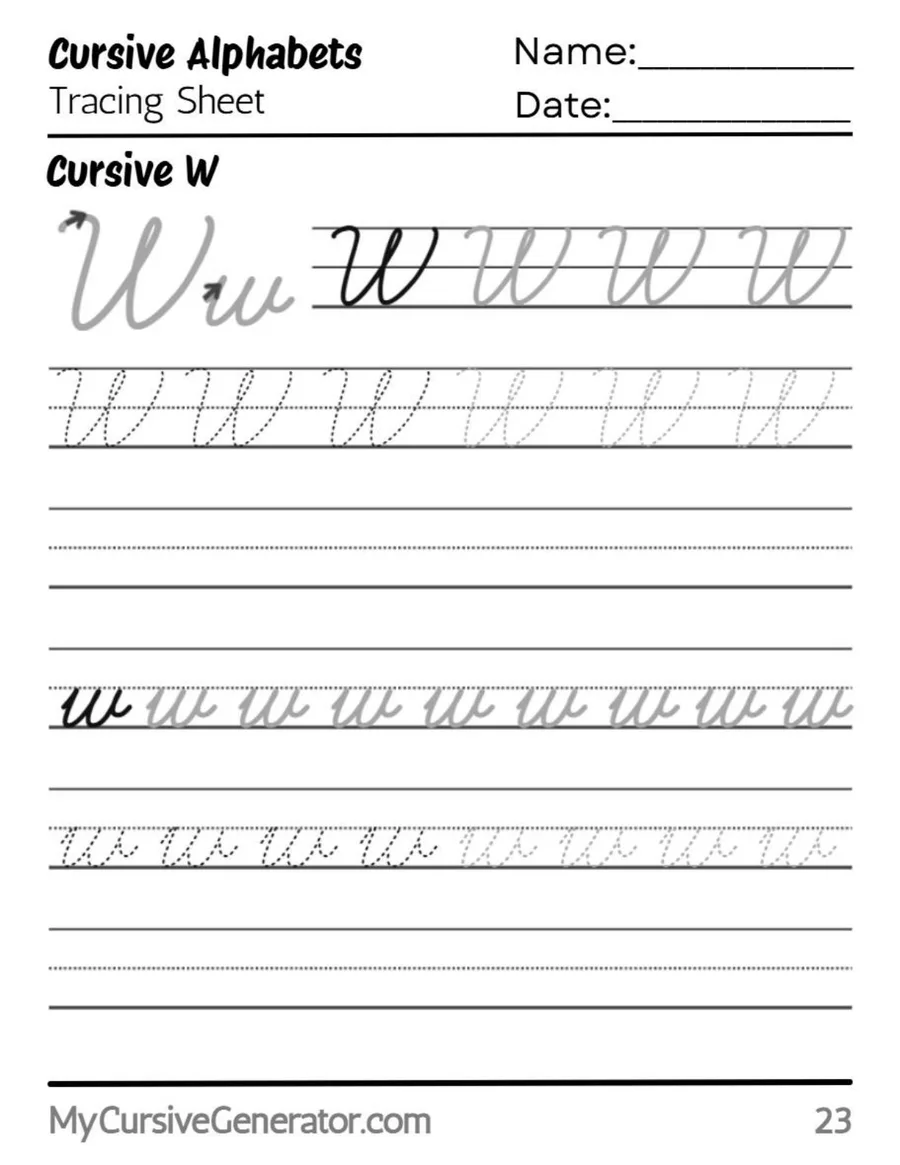
Trace the Cursive Letter W
Start on the worksheet, not on blank paper. Trace the capital form at full height, and watch the small loop at the top left. Then trace the small form between the midline and the baseline, and count as you go: up, down, up, down, up, then the short curve to the right. When the count stays even, the valleys stay even. Then copy one row without tracing, and write one row from memory.
Before You Start
Sit with both feet flat and the paper tilted a little to the left if you write with your right hand, and a little to the right if you write with your left hand. Hold the pencil loosely, about two finger widths above the tip, because a tight grip makes the valleys pointed and shaky. Keep your wrist relaxed so the hand can slide to the right as the letter grows wider.
What Cursive W Looks Like: Size, Width, and Rhythm
Capital cursive W fills the full height of the writing space, from the top line down to the baseline. It has three peaks and two valleys. The first peak is the rounded top of the entry loop, the middle peak is pointed and sits near the top line, and the last peak is rounded and also sits near the top line. Both valleys touch the baseline. The letter is wide, roughly twice the width of a capital I.
Lowercase cursive w stays between the midline and the baseline, and it is wider than u and v because it holds one extra upstroke. It has three small peaks at the midline and two low points at the baseline. The middle low point is the one most writers miss: it must touch the baseline, just like the first and last low points. If it floats above the baseline, the letter reads as a loose squiggle. The final stroke rises to the midline for the third peak, then curves down and to the right and flicks up a little, ending below the midline and ready to join the next letter.
How to Write Capital Cursive W
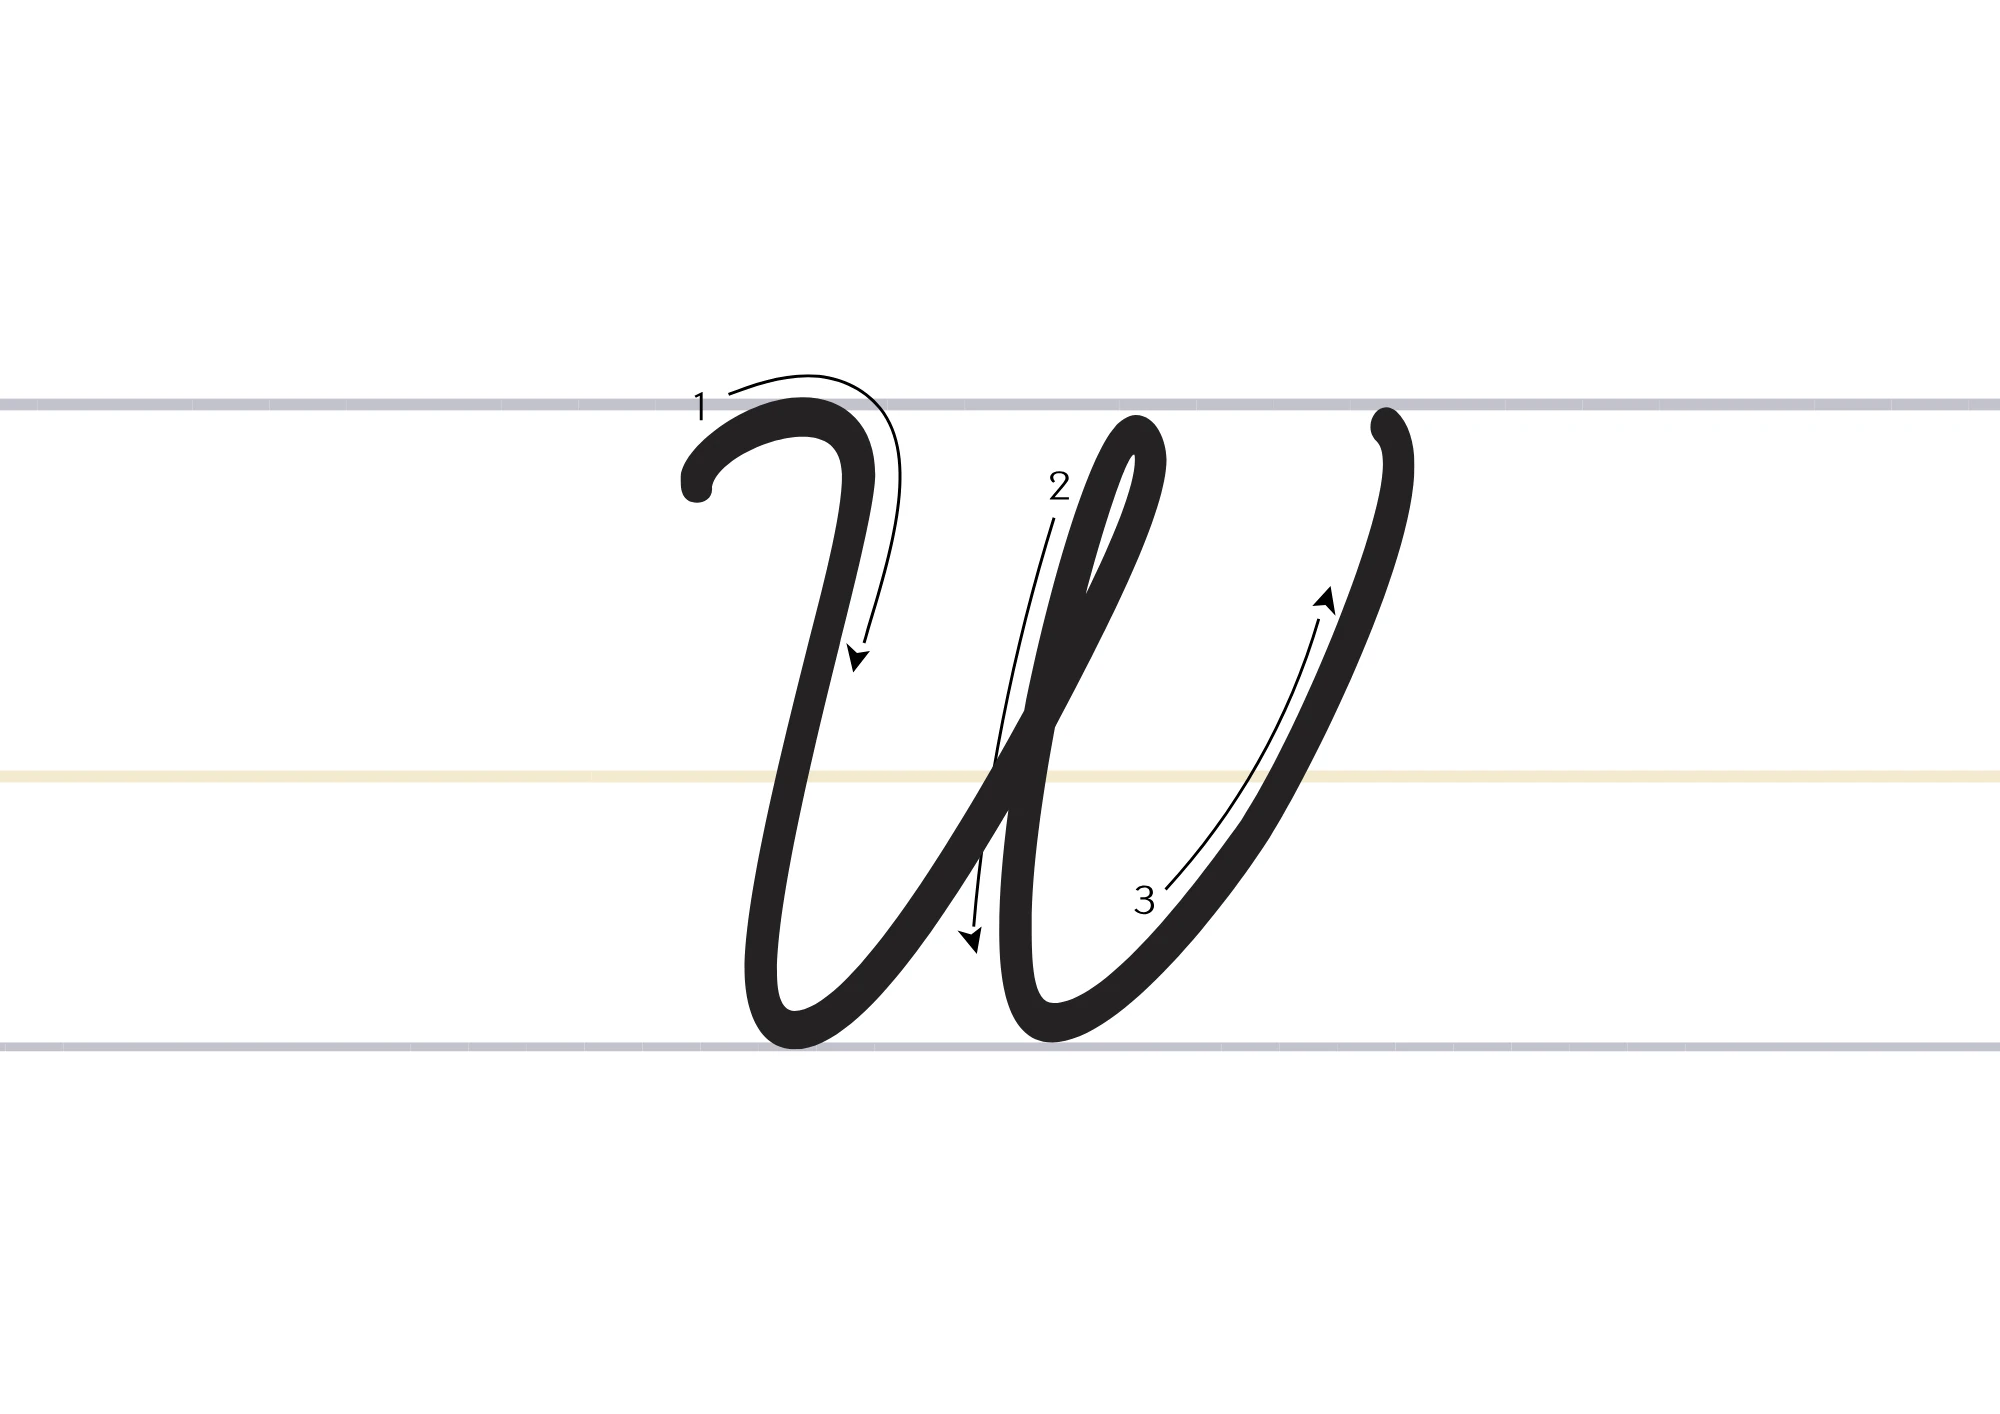
Write capital cursive W in one flowing motion, without lifting the pen. The three steps below are three parts of that one motion, not three separate strokes.
Entry Loop and First Valley
Start just below the top line, curve up to touch the top line, and loop back a little to the left to close the small entry loop. Without lifting the pen, swing down in one long, slanting curve to the baseline and round the first valley.
Middle Peak and Second Valley
From the first valley, rise in a smooth curve to a pointed peak near the top line. Keep this middle peak centered between the two valleys. Then swing down again to the baseline and round the second valley, keeping it the same depth and width as the first.
Final Rise and Joining Curve
From the second valley, rise to the top line on the right side of the letter, round the top, and finish with a short curve to the right at top line height. That short curve is the joining stroke for the next letter, and it is part of this final rise.
How to Write Lowercase Cursive W
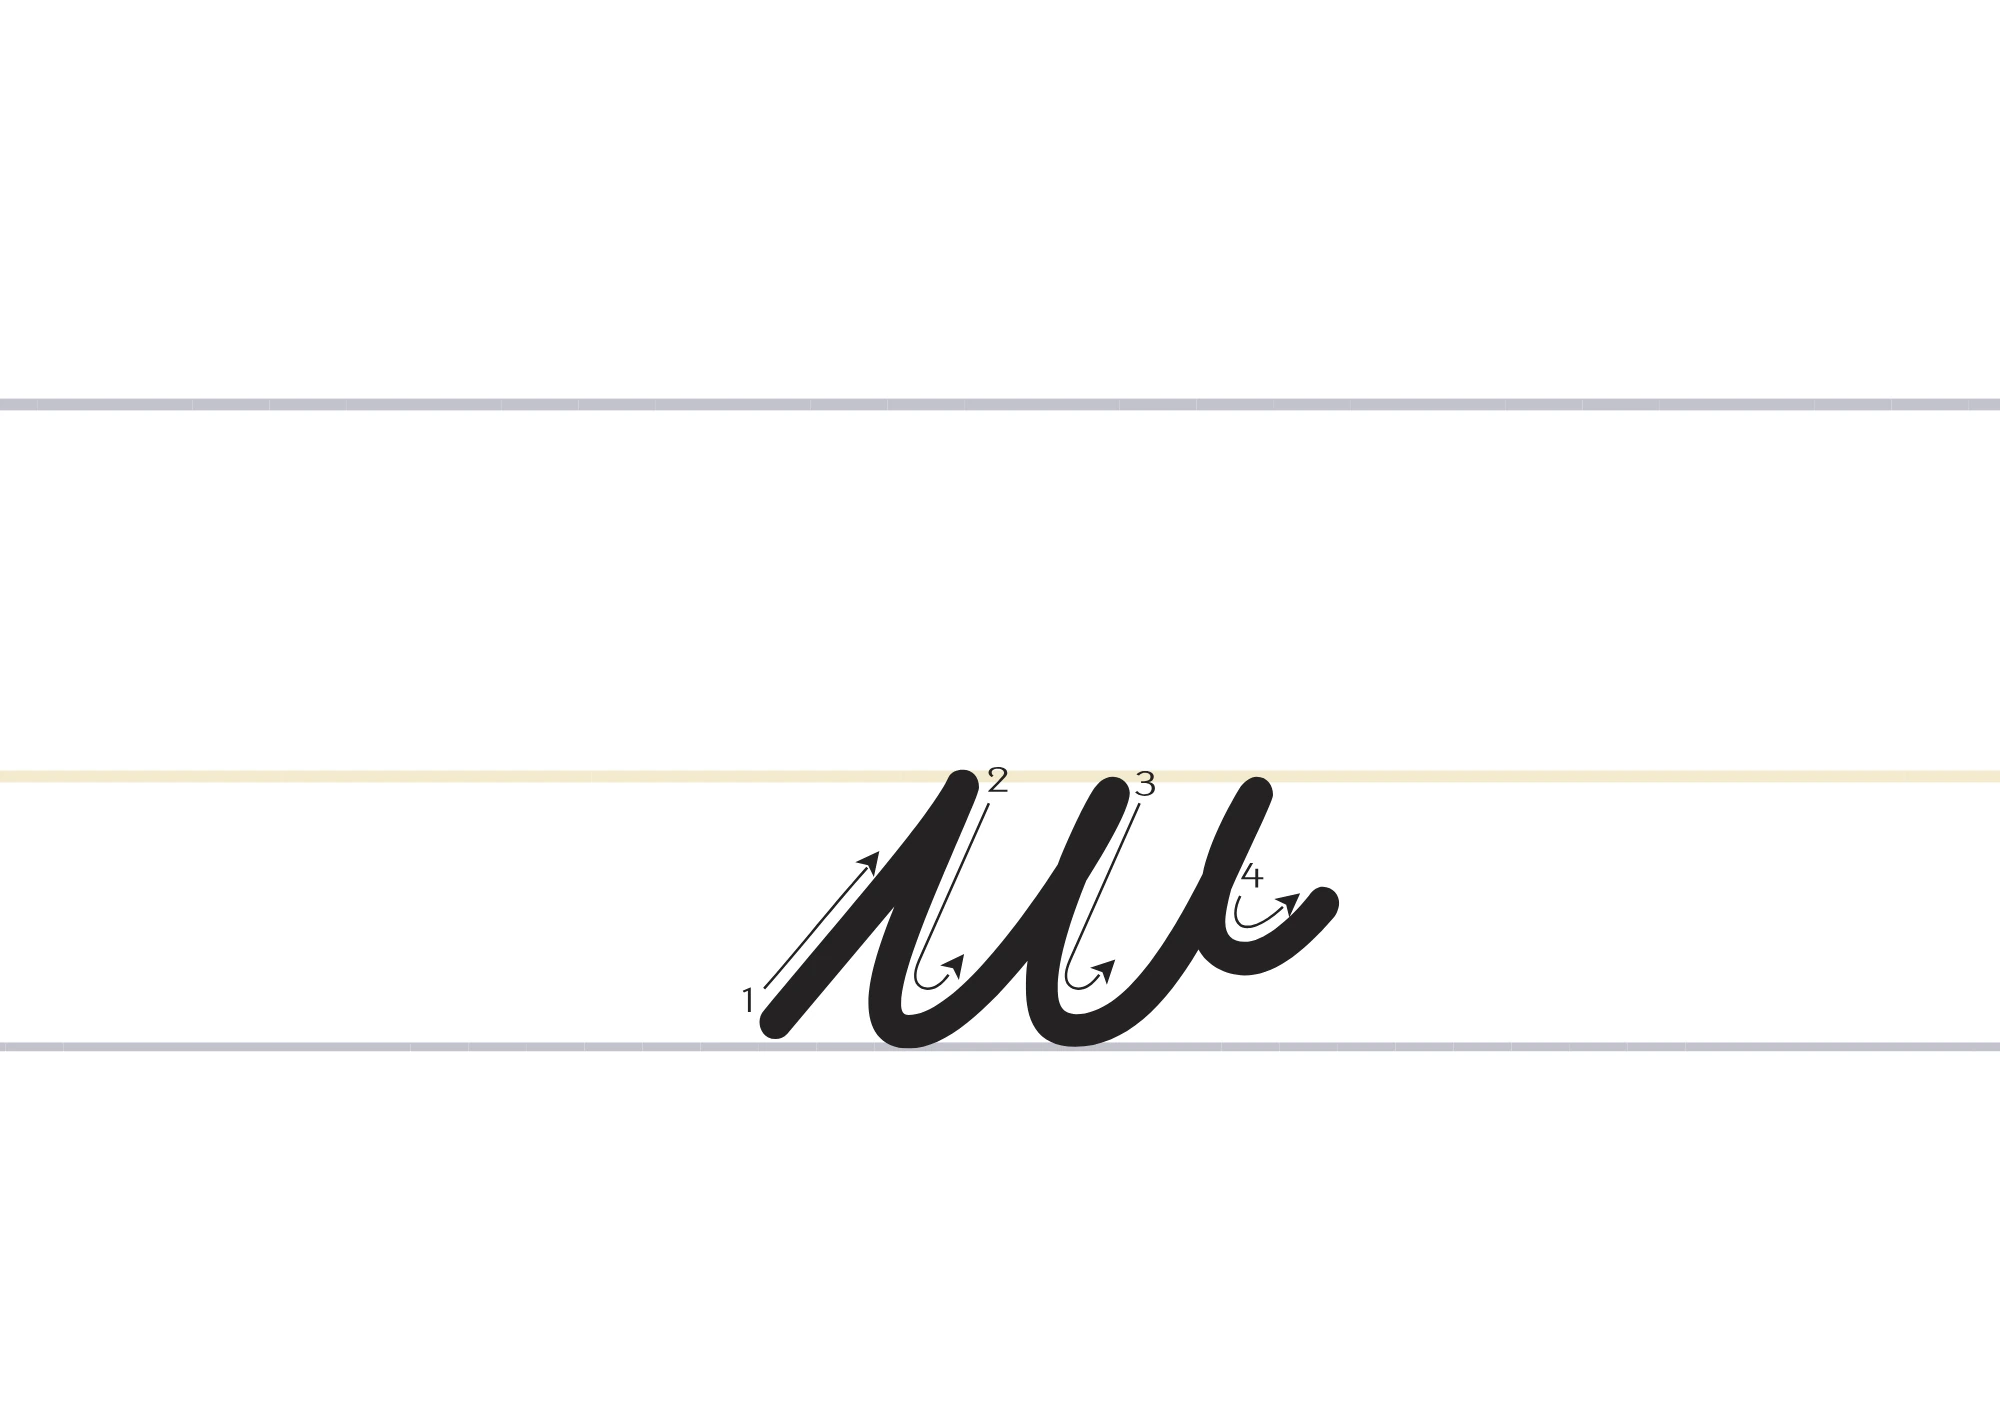
Lowercase cursive w is the form you will use most often, because it appears inside words far more than the capital form does. Watch the low points more than the peaks, because the peaks take care of themselves once the low points land in the right place.
Entry Rise and First Low Point
Start at the baseline and rise in a slanting line to the midline for the first peak. Then swing down to the baseline and round the first low point. If you are joining from a previous letter, the entry rise starts from that join at the baseline.
Middle Peak and Middle Low Point
From the first low point, rise to the midline for the second peak, then swing down again. Land the middle low point firmly on the baseline. Do not stop halfway. A middle low point that floats above the baseline turns a clear w into a wavy line.
Final Rise and Joining Curve
From the middle low point, rise to the midline for the third and final peak. Then curve down and to the right, and flick up a little to finish below the midline. That short rightward curve is the joining stroke, so do not lift the pen here inside a word.
Cursive W vs Cursive M, U, and V: How to Tell Them Apart
Lowercase cursive w is often confused with m, u, and v, because all four letters use the same up and down rhythm. The difference is in the count and the start. A u has one low point and two peaks. A v is like a u, but it starts with a downstroke. A w has two low points and three peaks, so it is clearly wider than both. An m has arches rather than the open valleys of w.
How to Write Cursive W: 10-Minute Daily Practice Routine
A short daily routine beats one long session. Ten focused minutes a day, for a week, is enough to make this letter feel steady. Use a lined notebook and keep the pen moving slowly.
- Warm-up valleys (2 minutes): draw rows of small up and down waves between the midline and the baseline, keeping every low point on the baseline.
- Capital form (2 minutes): write six to eight capitals slowly, checking the entry loop first, then the two valleys, then the final curve at top line height.
- Lowercase form (3 minutes): write small forms in rows, counting three peaks and two low points in each one. Rewrite any row where the middle low point floats.
- Words (2 minutes): write two short words from the list below, slowly, joining each letter to the next without lifting the pen.
- Quick check (1 minute): compare your last row with your first row. Are the valleys equal? Is the slant steady? If a row looks shaky, slow down rather than pressing harder.
Words That Start With W in Cursive
Practice these common W words. Read them, trace them, then write them on your own:
Whale · Wolf · Wind · Water · Window · Winter
Warm · Wave · Web · Wig · Wagon · Walnut
Will · Wendy · Walter · Willa · Warren · Winnie
Some W words hide a silent w, and they are worth practicing on purpose, because the hand must write a letter the ear does not hear. Try write, wrong, wrap, wrist, answer, sword, and two. See any of these words in copyable cursive text with our cursive generator, or go back to the full cursive alphabet chart to pick your next letter.
Common Mistakes With Cursive W
- Leaving out the capital entry loop. Without that small loop at the top left, capital cursive W collapses into print W. Make the loop small and closed before you swing down.
- Floating the middle low point of lowercase w. If the middle low point stops above the baseline, the letter looks like a wave. Push each low point down to the baseline, and check the middle one in particular.
- Making the valleys uneven. One deep valley and one shallow valley make the letter tilt. Aim for two valleys of the same depth and width in both forms.
- Letting the final peak rise too high or fall too low. In lowercase w, the final peak must reach the midline, no higher and no lower. Too high, and the letter looks tall. Too low, and it reads as a u with a tail.
How to Join W Cursive Letters
A capital letter usually starts a word, so it rarely joins from the left. Its job is to open the word cleanly and hand over to the next letter through its final curve at top line height. Good capital pairs to practice first are Wa, We, Wh, Wi, and Wr, as in Walter, Wendy, what, Will, and write. Watch the drop from the top line curve down to the next letter, because a drop that is too steep will make the second letter lean.
The lowercase form does most of the joining work, because it connects on both sides. It arrives from the previous letter at the baseline, rises to its first peak, and leaves through its short rightward curve below the midline. Good pairs to practice first are wa, we, wi, wo, and wh, as in water, west, wind, wolf, and what. Keep the pen on the paper through the whole word, and keep the spacing even.
Joining Lowercase w Inside Words: aw, ew, ow, and More
Most of the joining work for w happens inside words, not at the start. In aw, as in saw, law, and draw, the a finishes at the baseline and the pen rises straight into the first peak of w. In ew, as in new, few, and drew, the e finishes low and the rise into w is short and quick, so it is easy to rush and miss the midline on the first peak. In ow, as in cow, how, and now, the o finishes with a small loop at the baseline, and the pen must leave that loop cleanly before it rises, or the o and the w will blur.
How to Write W in Cursive: Practice Sentences
Single letters are only half the skill, because sentences teach spacing, rhythm, and stamina. Try each sentence three times: once very slowly, once at a normal pace, and once without stopping.
Will watched a whale in the warm waves.
Wendy walked to the window at dawn.
The wolf waited in the woods all winter.
We saw a slow cow walk down the new road.
Letter W in Cursive for Names and Signatures
Names are where most people first notice their own handwriting, because a name is written far more often than any practice word. For a first name that begins with this letter, keep the capital a little larger and more open than in ordinary writing, because it reads better at a glance. Try Walter, Wendy, William, Willow, and Wyatt in full, and watch the drop from the capital curve into the second letter. For signatures, keep the entry loop and the two valleys visible, even at speed.
Left-Handed Tips for Cursive W
Left-handed writers face one extra problem with cursive W: the hand moves across a wide letter that is still wet, and the final curve to the right can drag the hand into the next letter. Tilt the paper a little to the right, keep the wrist straight and the hand below the line, and let the arm slide rather than the fingers stretching.
Cursive W, Frequently Asked Questions
What does the letter W look like in cursive?
Capital cursive W runs from the top line to the baseline, starts with a small entry loop at the top left, and has three peaks and two valleys that touch the baseline. Lowercase cursive w stays between the midline and the baseline, has three small peaks at the midline and two low points at the baseline, and finishes with a short curve to the right.
Is cursive W hard to learn?
No, this letter is straightforward once you break it into its rhythm. Practice the capital form and the lowercase form separately for a few minutes, count the peaks and low points as you write, then join them into short words.
How do you join cursive W to the next letter?
The capital form leaves through a short curve to the right at top line height, which drops into the next letter. The lowercase form leaves through a short curve below the midline, which flows into the next letter. Practice Wa, We, Wh, wa, we, and wo first.
What words can I practice with cursive W?
Start with whale, wolf, wind, water, and window, then try names like Will, Wendy, and Walter. For inside practice, try saw, new, cow, and how, and for a harder test, try silent w words such as write, wrong, wrap, and wrist.
Should I learn the capital or the lowercase form first?
Start with the lowercase form. It appears in almost every word that contains w, so it pays off at once, while the capital form is only needed at the start of sentences and names. Once the small form feels easy, the capital form takes only a short session to learn.
Why does my lowercase w look like a wavy line?
Usually the middle low point is floating above the baseline, or the peaks are uneven. Push every low point down to the baseline, including the middle one, keep all three peaks at the midline, and give the letter enough width for three peaks.
How do I teach cursive W to a child?
Start with the lowercase form, because its size is easier to see on lined paper. Let the child trace the form first, then copy it, then write it from memory. Keep sessions short, count the peaks and low points together, and praise the low points on the baseline first.
What is the difference between cursive W and print W?
A print W is made of separate straight strokes with sharp points, and it does not join to the next letter. The cursive form is made in one flowing motion with rounded valleys, a small entry loop on the capital form, and a short curve that joins to the next letter.
Why does my capital W look like print W?
Usually the entry loop is missing and the peaks are sharp points instead of curves. Start just below the top line, close the small loop at the top left, round both valleys at the baseline, and finish with a short curve to the right at top line height.
See Your Name in Cursive
Type any name or word and convert it into beautiful cursive text you can copy anywhere, free, with no sign-up.
Open the Cursive Generator